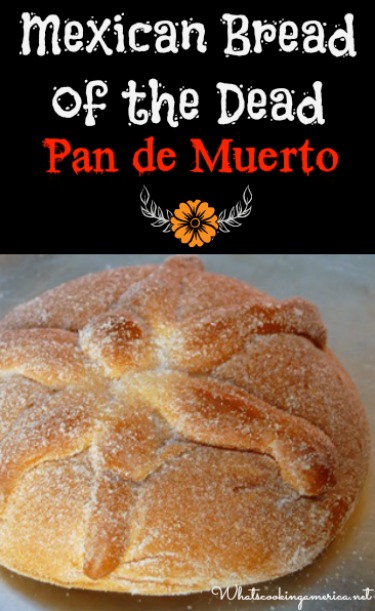
Day of the Dead Bread or Pan de Muerto, is a Mexican bread eaten on Day of the Dead (Dia de los Muertos) which is held for two days in Mexico. November 1st and 2nd is when those who have departed have a license to come back and visit the people they have left behind. Food and drink is shared with the departed in a festive gathering. As with most Holiday’s, Day of the Dead is marked with its own special food. Pan de Muerto or Day of the Dead Bread is one of those foods.
This is a day of joyous celebration when the souls of departed loved ones (human and animal alike) come back to the world of the living. Tradition states that they come back from all realms of the spirit world, both heaven and other places. Celebration of Day of the Dead dates back to ancient Aztec traditions and by a strange, or should I say spooky.
This Day of the Dead Bread recipe is courtesy of Cynthia Detterick-Pineda of Andrews, TX.
Bread Making Hints: Secrets to using the bread machine, About yeast in bread making, and Sourdough Starter – How to make a Sourdough Starter.
More great Bread Recipes, Sourdough Bread Recipes, and Quick Bread Recipes for all your bread making.
- 1/2 cup granulated sugar
- 2 tablespoons orange zest, grated
- 1/3 cup orange juice, fresh-squeezed
- Colored sugar (optional)
-
In a saucepan over medium heat, place butter, milk, and water; warm through until very warm but not boiling, approximately 105 to 110 degrees F.
-
In a large mixing bowl, combine 1/2 cup of flour, yeast, salt, anise seed, and sugar. Slowly beat in the warm milk mixture until well mixed. Add eggs, one (1) at a time, mixing through. Slowly add in another 1 cup of flour. Continue adding additional flour until the dough is soft but not sticky.
-
Turn the dough out onto a lightly-floured board and knead for at least 10 minutes or until smooth and elastic. Form the dough into a large ball. Lightly grease a large bowl and place dough in it. Flip the dough so that the grease covers the top and bottom of the dough ball. Cover loosely with plastic wrap and let rise in warm place until doubled in bulk, approximately 1 to 1 1/2 hours.
-
Oven Bread Rising: Sometimes I use my oven for the rising. Turn the oven on for a minute or so, then turn it off again. This will warm the oven and make it a great environment for rising bread. If you ca no't comfortably press your hand against the inside of the oven door, the oven is too hot. Let it stand open to cool a bit.
-
Cool or Refrigerator Bread Rise: If I do not have the time to wait for the rise to finish or I know that I will be interrupted before the completed rise, I do a cool rise. A cool rise is when the dough is place in the refrigerator and left to rise slowly over night approximately 8 to 12 hours. I usually do this after the first rise and the dough has been shaped into a loaf.
-
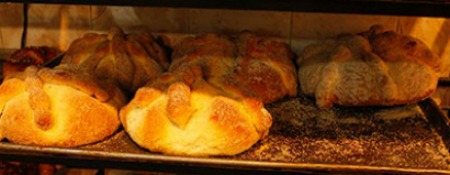
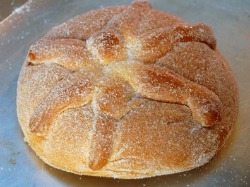
After the dough has risen, punch the dough down and shape into two (2) round loaves. Traditionally these loaves are shaped into skulls. Strips of dough can also be formed into bones and arranged on top of the loaves. Let these loaves rise in a warm place until doubles, approximately 1 hour.
-
Preheat oven to 350 degrees F. Bake bread for approximately 40 minutes. When the bread is done it should sound “hollow” when thumped. A good check is to use an instant digital thermometer to test your bread. The internal temperature should be between 200 and 210 degrees.
-
Remove from oven and paint on the prepared Orange Glaze while the bread is still warm. Then sprinkle some granulated sugar over the top and sides of the bread.
-
Let bread cool to room temperature before serving. The bread is best eaten within a day of baking.
-
Makes 2 loaves.

-
In a saucepan over medium heat, combine sugar, orange zest, and orange juice; bring just to a boil so the sugar is completely dissolved. Remove from heat.
 I get many readers asking what cooking/meat thermometer that I prefer and use in my cooking and baking. I, personally, use the Thermapen Thermometer. Originally designed for professional use, the Super-Fast Thermapen Thermometer is used by chefs all over the world. I only endorse a few products, on my web site, that I like and use regularly.
You can learn more or buy yours at: Super-Fast Thermapen Thermometer.
Sponsored Content
Categories:
Food History Halloween Holidays & Events International Regional Foods Mexican Southwest Breads Sweet Yeast Breads
8 Responses to “Mexican Bread of the Dead – Pan de Muerto Recipe”
Elisa
You know that eggs are not listed in you recipe? How many do you need to use?
Gracias
Sonia
I seen it says use 4 eggs
Patricia McBride
Love the recipes !
Maggie Unzueta
Oh yum. I would love to try this. Love this holiday.
Margaret
Made for my daughters class – was was easy to follow and the bread turned out amazing. Thank you in
Nancy
So glad that you tried the recipe and for visiting What’s Cooking America.
Melissa F Pritchett
Oh this recipe is so good! I made this last year and they have asked for it ever since. My kids couldn’t get enough. I said if I make it all the time then it wouldn’t be special. Gearing up to make it again this year for Day of the Dead.
Evangelina Flores
I made your recipe and my family was very happy nice texture better than the ones we buy at the Mexican bakery.