Baptismal or Christening Cake Recipe:
 With lots of June brides, there are lots of babies. My new neighbor inspired this Baptismal or Christening Cake Recipe. This Baptismal or Christening Cake Recipe will be very easy to make and to decorate. My thought here is that friends and family members that plan baby occasions are also usually very busy people.
One thing that makes this an easy cake to do is that the decorations on the cake help draw the eyes away from any flaws that you might have on the cake. That is what cake artistry is all about. All cakes have flaws but you can learn how to conceal the problems so that they are never noticed.
Peggy Weaver, author of Peggy’s Baking Corner, has generously answered all the questions on cake baking during the last 15 years. Peggy will not be able to continue with the Question and Answer pages in the future. She thanks you for all your interesting questions.
Back to Peggy’s Baking Corner Home Page

- 6 ounces white chocolate, coarsely chopped
- 1 box plain white cake mix (Duncan Hines preferred)
- 2/3 cup water
- 4 ounces butter, room temperature
- 3 extra-large whole eggs
- 1 large egg white
- 1 teaspoon clear vanilla extract
- 1 batch of Buttercream icing (prepared a few days ahead to save you time)
- 1 batch of Marshmallow Fondant Icing (prepared ahead)
- I used the Wilton Shirt Cake Pan for the shape of this cake
- Piping bag - I prefer a 10 or 12-inch bag
- Decorating tip #16
- 2 cake boards that are 13 x 19 inches
- Aluminum foil or a decorative covering for the cake board
-
 Preheat oven to 325 degrees F. Place rack in center of the oven. Generously grease the cake pan with solid vegetable shortening then dust with flour. Shake out the excess flour. Set pan aside.
 -
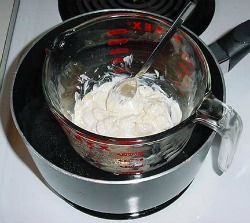
The first thing I do is to start melting the chocolate for the cake.
-
An easy technique is to place the white chocolate in a 2-cup Pyrex glass-measuring cup. Place the chocolate in the cup and the cup in a pot of boiling water. Turn the stove off so that the water will stay hot but not boiling. Stir the chocolate often until totally melted. Be careful not to splash the water into the chocolate. Set aside until it is called for in the recipe.
-
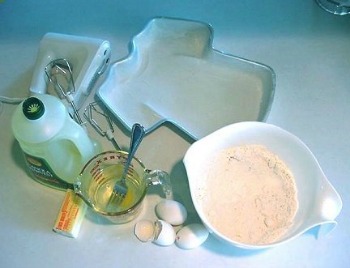
While the white chocolate is melting, assemble the rest of the items together for making your cake. -
-
Place the cake mix, water, butter, whole eggs, and egg whites in a large mixing bowl. Pour in the slightly cooled white chocolate. Blend with a mixer on low for 2 minute. Stop the machine and scrape down the sides of the bowl with a rubber spatula. Mix for 2 minutes. Scrape down again if needed. The batter should look well blended. -
Divide the batter evenly between the prepared pans, smoothing it out with a rubber spatula. Place the pans on a cookie sheet side by side in the oven.
-
Bake the cakes until they are golden brown and spring back slightly when lightly pressed with your finger, about 38 minutes.
-
Remove the pans from the oven and place them on wire racks to cool for 10 minutes. Run a dinner knife around the edge of each layer and invert each onto a rack, then invert again on another rack so that the cakes are right side up. Allow to cool completely, 30 minutes or more, before decorating.
-
While the cake is cooling prepare the cake boards by trimming off 3 inches on the long side so the results are 13” x 16”. Cover the boards with the aluminum foil and set aside.
-
Cover with a thick coating of Buttercream Icing, about 1/ 2 inch. You will see why the thickness is necessary for this cake in a little bit.
-
Roll out the fondant in a rectangle shape that is about 16-inches wide by 20-inches long. Apply the fondant to the fresh applied Buttercream Icing. Very gently roll the fondant over your rolling pin to apply. Do not fold it and only try picking it up, flat, if you have help. You cannot pick it up by yourself without taking a very big chance of badly stretching the fondant out of shape.
-
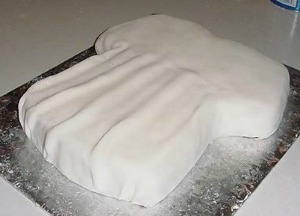
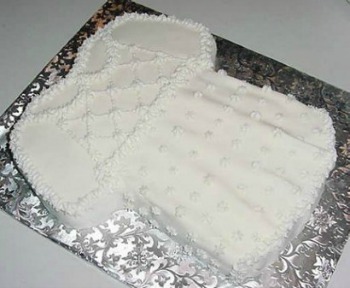
Place the “skirt” area and the arm area of the fondant very loosely over the cake. You are going to try to make gentle ripples in the skirt so the extra “fabric” of the fondant will give you the material that you need.
-
Mold the fondant around the arms. The Marshmallow Fondant (MMF) will stretch quite a bit for you but still use a gentle tough. After you have gently rubbed the bodice and done the arm work, you can trim the bottom edge so that you have a neat bottom edge where the cake meets the cake board. Do not worry though if you are not totally pleased with the results. You can put a row of stars on the bottom edge as the last step of the cake decorating.
-
With a straight edge or gently with a knife, you need to gently mark where you want to bodice to start. I like to go up about 3/4 inch from where the arms meet the skirt. Press gently down into the fondant just enough to make a line that is visible. Also decide it you want to make a “collar” on your cake. I usually do because the extra details really make the cake look more finished and professional. My personal opinion is that I like a medium size collar, but you choose. The option is totally yours.
-
Now, I like to have at least three (3) ripples and the edges raised up to create a total of five (5) ripples for a nice look.
-
With your fingers, about in the middle, press the fondant down into the Buttercream Icing in a line from the bodice to the bottom of the skirt. Gently push down into the Buttercream Icing and from side to side. This will cause the fondant to bulge on each side of your finger. Usually you do not use this technique, but today this is exactly what you want.
-
All of the extra thick Buttercream Icing you applied earlier will also allow you to create the ripples by moving and filling in under the ripple to give you a soft effect. Repeat as many times and you need to get a pretty look. Remember to allow the ripples to flow over the bottom edge.
-
-
The next step is your choice. Sometimes I do it one way and sometimes the other just simply because I feel like it.
-
You can either make the crosshatch marks on the bodice or pipe the stars across the bodice, around the sleeves and around the collar. On this cake, I did the stars first. Mark the crosshatch the same way you did with marking the bodice earlier. Place a piped star on each intersection of the crosshatch.
-
-
Finish up the cake by piping random or spaced stars, your choice, on the skirt of the cake. Make sure you also continue them on the sides. If you wish, you can also add a tiny loop bow at the mid bodice and where the collars meet. Use a colored icing for the bows if you know if the baby is a girl or a boy.
-
 Now, I like to have at least three (3) ripples and the edges raised up to create a total of five (5) ripples for a nice look.
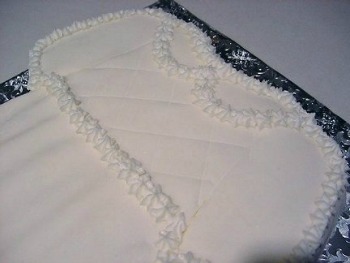
Check out some of Peggy Weaver’s many Cake Decorating Articles, Tutorials, and Q&A pages below.
Fondant Icing/Covering:
Fondant Icing 101
Recipe and Tutorial on making & using fondant icing)
Covering Cakes with Fondant Icing
Decorating Cakes with Fondant Icing
Fondant does not freeze well at all, as a matter of fact, downright lousy. Do not even think about refrigerating it either. The condensation that can occur when you defrost or bring to room temp can destroy the finish of the fondant.
Now, if you are going to freeze the cake, as many folks do until the first anniversary, yes go ahead and freeze. The cake will not look as beautiful as it did originally but you just have to keep the idea in mind that it was perfect on the day of the wedding.
Buttercream Icing/Covering:a
Buttercream Icing 101
(Recipe and Tutorial on making & using buttercream icing)
Wedding Cakes:
Assembling Cakes/Wedding Cakes
Decorating Wedding Cakes
(Lots of Q&A’s on decoration a wedding cake)
Other Cake Baking and Decoration Topics:
Peggy’s Cake Decorating Idea Photos
The idea page has photos only and no detailed decorating instructions.
Categories:
Baking