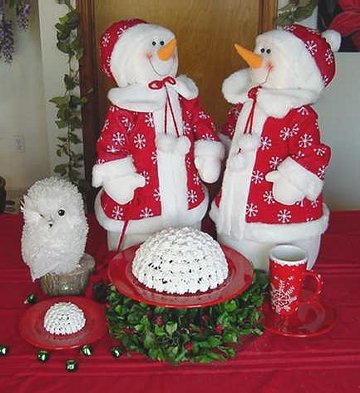
Chocolate Amaretto Snowball Cake

Many folks need a fairly easy cake that is dressed up for the Holidays. That is what this Chocolate Amaretto Snowball Cake is. For this Saturday’s party I made an Amaretto Chocolate Cake with Buttercream Icing. You can use just about any bundt cake recipe but I prefer a chocolate recipe so that you can see a contrast between the cake and the icing.
You can also use a variety of pans for this Chocolate Amaretto Snowball cake. I use a Zucotto cake pan but I haveve also seen a pan set made by Betty Crocker (there are 4 parts in this version) at my grocery store for about $20. You would use the two inner dome pans for this cake. A few other options (but without an inner layer) is the Wilton Sports Ball Pan but your cake will be quite a bit smaller with a 6-inch diameter.
Back in the old days, before specialty pans were readily available, metal bowls were used for dome cakes. Use a bowl that has a 9 inch, top edge diameter for the best look. For this cake you won’t easily be able to have a multiple layer cake. Trying to scoop a ball shape out of the baked cake is very difficult so plan on a single layer cake. You can also make individual desserts by using the Wilton Mini Ball Pan.

- 1 package plain devil's food cake mix
- 1 smll package instant chocolate pudding mix
- 3/4 cup whole milk
- 1/2 cup vegetable oil
- 1/2 cup water
- 1/3 cup real mayonnaise (not salad dressing)
- 4 large eggs
- 1/4 cup Amaretto Liqueur
- 1 teaspoon pure almond extract
- 1 batch of Buttercream Icing (I often prepare this days in advance and refrigerate until needed)*
- 1 each (10 or 12-inch) piping bag
- Decorating Tip #21 and a coupler
-
Preheat oven to 325 degrees F.
-
Generously grease the pan you are using with butter. Remember that if you are using the smaller ball insert for a 2 layer cake, you will need to butter both sides of the inner pan. Just to be sure, also butter the lip of the pan. You do not want anything to stick. A technique that I haveve used is to stick the pans in the refrigerator for a few minutes, then, I paint, melted butter on the pan with a pastry brush. The super chilled pan will cause the butter to harden and stick so you are absolutely sure that the whole thing is buttered.
-
In a large mixing bowl, combine Devil's food cake mix, instant chocolate pudding mix, milk, vegetable oil, water, mayonnaise, eggs, amaretto, and almond extract. Blend with an electric mixer on low for 1 minute, scrape down the sides of the bowl. Increase the speed to medium and beat 2 minutes more. Scrape again if needed. The batter should be well blended. If you need to, you can add a tablespoon or 2 of water the get the correct consistency. I usually taste the batter. If it feels dry on my tongue and I can really sense the flour, I add water.
-
Gently pour the batter into the prepared pans and follow the filling and handling directions that come with the pans if you are using the Zucotto or Betty Crocker Pans for the level that you need fill the pans up to. You probably won’t use all of the batter.
-
Bake at 325 for 70 minutes, or until a toothpick comes out clean in the center of the smaller ball.
-
While you are baking the cake, you can make the Buttercream Icing.
-
Remove the cake from the oven and let cool intact (cake side up on racks until completely cool). This will most likely take about 2 hours. If you take the cakes out of the cake pan when they are to warm, the inner ball will stay firm, but the outer ball can easily collapse and break on you.
-
After cool, put your hand over the top of the cake, turn it upside down (the way it will be on the plate) to gently loosen the cakes from their pans but do not take them out yet. Put the cake back on the counter and gently remove the smaller, inner ball. Set aside.
-
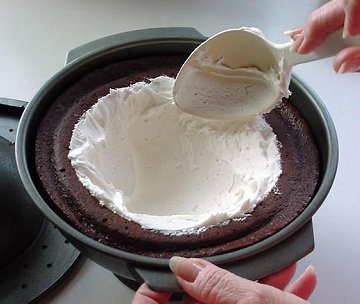
Create a curved layer of Buttercream Icing.
-

-
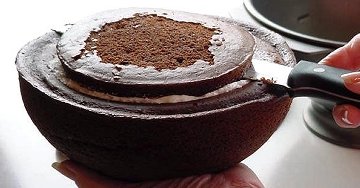
Remove the inner dome from the pan and gently with your hand press the small dome into the iced hole. Don’t worry if it doesn’t fit completely. For me it is easier to now remove the cake from the bowl and gently hold it in my hand. Using a serrated knife, slice off the excess cake so that the bottom of the cake is level. If there are a few small bumps and dips, don’t worry. These will be against the serving plate or cake plate. -
-
Place the cake plate on the bottom of the dome and invert everything. -
-
-
Now you are ready to decorate:
-
Place your coupler into the piping bag and insert the tip. If you are going to make individual desserts, I would suggest that you use a smaller sized piping tip. I like to use a size #16 decorating tip for the small snowballs. For the Zucotto-sized cake, I prefer a Decorating Tip #21, you can pipe the stars quite a bit larger and I think the visual proportions are much better. Do not be afraid to use a different tip and trying different looks. If you use the larger tips remember that you will need a #16 inch piping bag and the larger coupler.
-
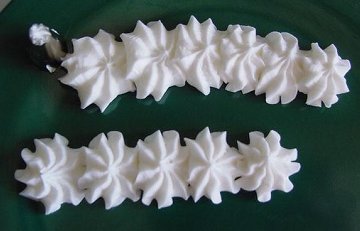
Fill the piping bag about 1/2 way full with the icing and twist the top close. Practice a few stars on a plate so that you can warm up a little and get the feel for what you are doing. Start piping the bottom row, go completely around and then start on the second row, working your way up to the top. If you have a decorating turn table or a lazy Susan, they can really help you with this step.
-
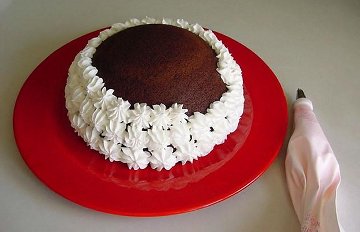
Please think about this before you start decorating your cake. Notice on the picture, you can see the chocolate cake through the icing. I prefer this look for this cake. You may not like this visual look and want a solid covering with all of the stars touching and no gaps. Do the decorating what ever way you prefer. Just make sure that whatever style you choose, continue that look all the way around, be consistent.
-
-
-
-
Here is a thought. You can also fill and pipe your stars on the cake using Whipping Cream. Personally, it is my favorite flavor but there are problems involved. If you need to prepare your cake in advance, the cream is a no no. I have tried the cake with a stabilized cream but in the heat of the house, it always starts to droop while sitting on the table.
-
If you can decorate, cut and serve immediately, the taste of the whipping cream with the Chocolate is really delightful.
-
-
-

* Buttercream Icing (click on the underlined for the Buttercream Icing Recipe)
Check out more of Peggy Weaver’s many Cake Decorating Articles, Tutorials, and Q&A pages below.
Peggy Weaver, author of Peggy’s Baking Corner, has generously answered all the questions on cake baking during the last 15 years. Peggy will not be able to continue with the Question and Answer pages in the future. She thanks you for all your interesting questions.
Fondant Icing/Covering:
Fondant Icing 101
(Recipe and Tutorial on making & using fondant icing)
Covering Cakes with Fondant Icing
Decorating Cakes with Fondant Icing
| Fondant does not freeze well at all, as a matter of fact, downright lousy. Do not even think about refrigerating it either. The condensation that can occur when you defrost or bring to room temp can destroy the finish of the fondant.Now, if you are going to freeze the cake, as many folks do until the first anniversary, yes go ahead and freeze. The cake will not look as beautiful as it did originally but you just have to keep the idea in mind that it was perfect on the day of the wedding. |
Buttercream Icing/Covering:
Buttercream Icing 101
Recipe and Tutorial on making & using buttercream icing)
Wedding Cakes:
Assembling Cakes/Wedding Cakes
Decorating Wedding Cakes
(Lots of Q&A’s on decoration a wedding cake)
Other Cake Baking and Decoration Topics:
Peggy’s Cake Decorating Idea Photos
(The idea page has photos only and no detailed decorating instructions.)