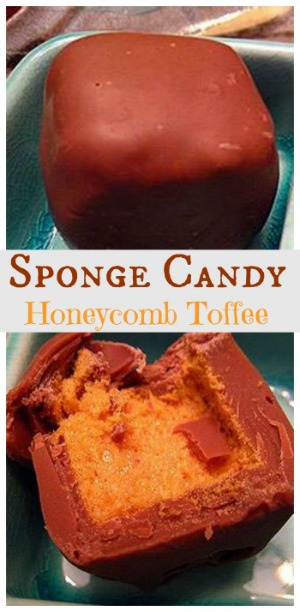
Honeycomb Candy is also known by various names around the world, such as Sponge Candy, Hokey pokey, puff candy, cinder toffee, sponge toffee or candy, molasses puffs, fairy candy, and sea foam. There are also many variations of how the candy is made in each country. These candies are very addictive!
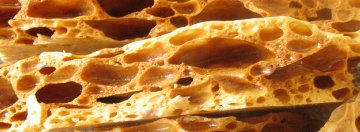
This Honeycomb Candy is basically a hard candy (toffee or taffy) with boiled sugar and corn syrup. After being taken off the heat, some baking soda and vinegar are added to foam it up as it cools which makes the interior look like a sponge.
This type of candy is known as Sponge Candy in Buffalo, NY. It is considered a local specialty in the area, and in Buffalo, it is always made with chocolate on the outside with a yellow, crunchy interior. The candy pieces can vary slightly in shape and size.
History: As to when this delicious candy was invented, food historian do not seem to know for certain. It is generally agreed that taffy/toffee first became popular in the 1800s. According to The Encyclopedia of American Food and Drink, by John F. Mariani:
“Taffy. A confection made from sugar, butter, and flavorings that has a chewy texture obtained by twisting and pulling the cooked ingredients into elasticity. The British term for such candy is toffee or toffy, possibly from tafia, a cheap West Indian rum made from molasses and used originally to flavor candy. T he Oxford English Dictionary notes that taffy…seems to refer to an older form of the candy. By the 1870s taffy bakes and taffy pulls, at which young people would gather to stretch the candy between them, had become social occasions.”
Hokey Pokey Candy - Puff Candy - Cinder Toffee - Molasses Puffs - Sea Foam Candy - Sponge Candy
- 2 cups (1 pound) sugar, granulated
- 4 tablespoons white vinegar
- 3 tablespoons light corn syrup or golden syrup
- 2 cups water
- 1 tablespoon baking soda, sifted
- 12 ounces semisweet chocolate chips
- 2 tablespoons vegetable shortening
- 1 (1-ounce) square unsweetened baking chocolate
-
Butter or oil an 8-inch square pan; set aside.
-
In a large heavy saucepan (I like to use my small cast iron Dutch oven) over medium-high heat, place sugar, vinegar, golden syrup, and water. NOTE: A large pot is needed because sugar has a tendency to boil over. Gently heat the mixture, stirring with a wooden spoon, until sugar has dissolved and syrup has melted. Bring to a boil, cover and boil approximately 3 minutes, and then uncover and boil until temperature reaches 285 degrees F. on a thermometer (hard-crack stage) and the mixture turns a light amber color.
-
Remove from heat and stir in the baking soda, mixing well to allow bubbles to subside a little. CAUTION: once you add the baking soda the mixture will bubble up quite a bit. Again, make sure your pot is large enough or it will bubble over the sides. The trick is to combine the soda without bursting the bubbles as little as possible. The baking soda is what gives it its light airy texture.
-
Quickly pour into prepared pan (so that mixture stops cooking and doesn't burn - do not spread, as this will make all the bubbles disappear) and leave until just beginning to set (as it cools, it will harden).
-
After candy has cooled, cut or break into pieces. Honeycomb can be eaten as is, or you can dip it in melted chocolate (my choice).
-

-
In a large micro-proof bowl, combine chocolate chips, vegetable shortening, and baking chocolate. Microwave on HIGH 2 minutes. Using wooden spoon, stir until melted; remove from heat.
-
Dip honeycomb pieces into the melted chocolate, covering completely. Make sure you cover the entire candy with chocolate. If moisture or humidity gets inside the candy, the center loses that honeycomb texture. Some get so much moisture in them that they get mushy, and others get damp and dry out. Moisture makes these sponge candies hard as a rock.
-
Place on waxed paper to cool. When cool, wrap each candy individually in wax paper, twisting the ends together, and store in an airtight container. This candy cannot be left out in the open for any extended length of time, as it will draw moisture from the air and become a sticky mess.
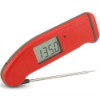 I get many readers asking what cooking/meat thermometer that I prefer and use in my cooking and baking. I, personally, use the Thermapen Thermometer. Originally designed for professional use, the Super-Fast Thermapen Thermometer is used by chefs all over the world. I only endorse a few products, on my web site, that I like and use regularly.
You can learn more or buy yours at: Super-Fast Thermapen Thermometer.
Sponsored Content
Comments from readers:
I just found the recipes that are from Buffalo on your web site. Even down to sponge candy which I have only seen one recipe for, and I will never attempt that one. I am not good with candy thermometers and this candy is touchy. Please add one thing to the recipe – Make sure you cover the entire candy with chocolate. If moisture or humidity gets inside the candy, the center loses that honeycomb texture. Some get so much moisture in them that they get mushy, and others get damp and dry out. Moisture makes these sponge candies hard as a rock.
I have noticed this in local stores that sell the candy in the bulk section, and the ones that come from the candy factory with “holes” in the chocolate lose quality. Great Job! – Lisa H, Lockport, NY (6/19/11)
2 Responses to “Honeycomb Candy Recipe”
Karen G
You can add in a teaspoon of orange extract with the vinegar and it will make an orange sea foam candy.
Laurie M
I have made this and many other candies before and can see the benefit of the temperature stability of cast iron. This candy is absolutely delicious. My question is that I normally have to soak candy pots to get the sugar out. What would be the best method of cleaning in this particular case that wouldn’t kill the seasoning?