
Learn all of our most helpful tips for Making the Perfect Cookies every time. From ingredients to baking pans and technique, this is the ultimate cookie baking guide.
1. Read your cookie recipe carefully before starting:
Be sure you have all the ingredients called for and that you understand the recipe clearly.
Remember – If something is worth doing, it is worth doing right! Cultivate the do-it-right attitude and habit. Baking demands accuracy and care. Unlike other kinds of cooking, such as soups or stews, you cannot improvise or substitute ingredients. Never carry on another activity while you are mixing a recipe. Distractions, no matter how small, lead to mistakes. Let the telephone ring!
Favorite Christmas Cookie Recipes.
2. Use good tools and utensils:
Assemble all the bowls, pans, and utensils you will need on your counter or worktable before starting. Use standard measuring cups and spoons.
3. Use correct pan sizes:
Use the type of pan specified in the recipe. Recipes are carefully calculated as to yield and changing the pan size also alters the baking temperature and time.
Larger, shallower pans need increased heat; smaller, deeper pans need decreased heat.
The size of a baking pan or dish is measured across the top of the container from the inside edge to inside edge. The depth also is measured on the inside of the pan or dish from the bottom to the top of the rim.
Prepare the pan carefully according to the recipe. Place pans as near the center of the oven as possible. Do not place pans directly over another and do not crowd the oven (this makes for uneven baking).
4. Use top-quality ingredient and assemble the ingredients before starting:
You can not expect a first-rate product using second-rate ingredients. Be sure your ingredients are fresh and of the finest quality. If your recipe says the ingredient must be room temperature, then make sure they are at room temperature before proceeding.
Baking Powder and Baking Soda: Check expiration dates of baking powder and baking soda, replacing if necessary. For testing purposes:
Baking soda should bubble when added to vinegar
Baking powder should bubble when added to hot water.
Be sure to mix baking powder and/or baking soda into the flour before adding to the wet ingredients, as this distributes everything evenly so your cookies will not end up with large holes.
Controlling Spread in Cookies with Baking Soda:
From How Baking Works; Exploring the fundamentals of Baking Science, by Paula Figoni
Cookies spread across a cookie sheet when a they have too little structure and cannot hold their shape. Whether this is desirable or not depends on what kind of cookie you wish to bake, but often some spread is desirable.
There are many ways to increase cookie spread: One way is to add a small amount of baking soda, as little as .25 to .5 ounce (5 to 15 grams) for 10 pounds (4.5 kilograms) of cookie dough. This increases pH of the dough, weakening gluten, and also weakening egg protein structure. With less structure, cookies spread more and have a coarser, more porous crumb. Since moisture evaporates from a porous crumb more easily, baking soda often provides for a crisper crumb, as well.
Measure baking soda carefully. Baking soda increases browning significantly, and if used at too high a level, it leaves a distance salty-chemical off flavor. Too much baking soda also causes eggs in baked goods to turn grayish green.
When working a high altitudes, omit baking soda from the cookie dough. The lower air pressure at high altitudes already encourages spread.
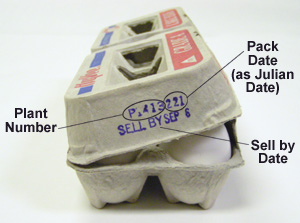 Eggs: Check out Sell Date of Eggs (Sell Date of Eggs – Date Codes on Egg Cartons). Eggs should be at room temperature. Also the emulsion can be ruined if eggs or other liquids are too cold or too hot when they are added.
Flour: Do not substitute flour types different from the recipe. If your recipe calls for all-purpose flour, that’s what you need to use. Cake flour and bread flour will not behave the same. Learn about the different types of flour. When a recipe calls for all-purpose flour, it means the bleached variety.
Measuring Flour: Too much flour can make some cookies rock-hard. When in doubt, error on the side of less flour. Even better, use a scale if the recipe offers a weight equivalent. Spoon the flour into your measuring cup and sweep a spatula across the top to level it off. Do not use the measuring cup as a scoop or it will pack the flour and you will end up with more flour in the cup than intended. See #6 below for additional information.
Nuts: Smell and taste nuts before using. Oils in nuts can turn rancid quickly. Store any leftover nuts in the freezer for longest shelf life.
Butter: Make sure your butter is at room temperature, otherwise it won’t cream properly with the sugar. T he terms room temperature, softened, and soft mean different things. The temperature of the butter can and will make a difference in the recipe. Most cookie dough recipes depend on the emulsion that occurs when you cream butter and sugar together. This emulsion will not happen if the butter is too hot or too cold.
Room Temperature Butter: It should be pliable enough that your finger can leave a mark in it, without being soft and greasy. Set the butter out at least one (1) hour in advance (I usually set my butter on the counter the night before I want to bake).
Softened Butter: Will feel a little warmer to the touch, and it will be much easier to leave a deep indentation, but it should still be firm enough to pick up without falling apart.
Soft Butter: Will be too soft to pick up.
Microwave Butter: Do not try to microwave your butter as it will just end up too soft. If you do not have an hour’s lead time, increase the surface area by cutting the butter into small pieces or shredding it on the large holes of a grater. It will then come up to temperature in approximately 10 minutes.
Unsalted Butter: Unsalted butter is generally recommended because some salted butters have more sodium than others. If you use salted butter, only use 1/2 the amount of salt called for in the recipe. Do not skip the salt, as salt brings out flavors and balances the sweetness in a recipe.
Salt: Use the full amount of salt called for in a recipe, especially when using unsalted butter. If you use salted butter, you can use 1/2 the amount called for in the recipe. Do not skip the salt, as salt brings out flavors and balances the sweetness in a recipe.
Shortening: Check vegetable shortening before using. Shortening, especially new trans fat-free brands) can go bad, introducing off-flavors to your cookies that you worked hard making. It is best to store opened shortening in the refrigerator.
Sugar: The type of sugar used in your cookies can promote spread in baked cookies. To understand this, you need to know that sugar is a tenderizer which interferes with the formation structure. Sugars with a finger granulation promote more spread (probably because they dissolve sooner and only dissolved sugars will tenderize). Powdered sugar (confectioner’s sugar), when it contains cornstarch, prevents spread in cookies despite it finer grind.
5. Room temperature Ingredients:
Have all ingredients at room temperature for more glamorous perfect cookies, unless otherwise specified.
6. Measure the ingredients quantities correctly – Use correct measuring cups and spoons:
This is a baking must! Follow your cookie recipe to the tee (you can always experiment with later batches, testing how alterations affect the final product). One common cause of cooking failures is inaccurate measurement of ingredients. You can use the best ingredients in the world, but if you do not measure correctly, the recipe will not come out properly. Also always use level measurements (all measurements in a recipe are level).
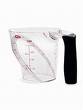
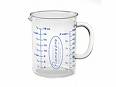
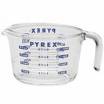
Measuring Liquids – Liquid Measuring Cups: Know the difference between liquid and dry measures, and use the appropriate one for each task. While they hold the same volume, they are used differently.
Use a Liquid Measuring Cup (glass or plastic measuring cup) for liquids such as water, milk, or oil. The glass or plastic permits you to see the level of the liquid being measured. The cup for liquids should have additional space above the one-cup line, so that a full cup can be accurately measured without spilling. To get an accurate reading in a liquid measuring cup, set the cup on a level surface and bend down to check the measurement at eye level.
Liquid measuring cups come in several different sizes and are also useful for melting chocolate and butter in the microwave as well as measuring. Following are some different types of liquid measurement cups:

Measuring Dry Ingredients – Dry Measuring Cups:
Dry ingredients such as flour, sugar, salt, and baking powder should always be measured in Dry Measuring Cups, never in liquid cups. Use individual Standard Measuring Spoons for tablespoons and teaspoons.
Techniques: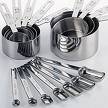
- Check out my Cooking Equivalent Measurement Chart to help you figure out cup and spoon sizes. The charts shows standard U.S. measures following U.S. Government guideline. The charts also offer equivalents for United States, metric, and Imperial (U.K.) measures.
- Lightly spoon dry ingredients into correct cup or spoon size, and level off with edge of spatula by cutting across the top. Use measuring spoons in this way too.
- Dip a dry measuring cup into the ingredient and sweep away the excess with a straight-edged tool, such as an icing spatula.
- Measure a liquid in a measuring spoon by filling it full.
- To measure a “heaping” or “rounded” tablespoon or teaspoon, it is generally a moderately-sized, round mound, or heap of the dry ingredient in addition to that which fills the spoon.
- Measure a “scant” spoon by filling the measure not completely full or by shaking or pouring a little bit out. Flour need not be sifted before measuring unless recipe specifies it. When a recipe calls for sifted flour, it is important to take the time to sift, even if the flour you’re using is labeled “pre-sifted.” Sifting flour onto a sheet of wax paper instead of into a bowl cuts down on dish washing.
- Measure brown sugar by packing it firmly into a measuring cup or into a measuring spoon.
- Shortening should hold its shape when turned out of the measuring cup. The same applies to brown sugar.
7. Oven temperature:
Preheat the oven 10 to 15 minutes before you begin baking cookies. This is usually consistent unless a recipe specifically calls for you to start with a cold oven.
Purchase an Oven Thermometer to make sure your oven is operating at the right temperature. An oven that is too hot or too cold not only throws off the cooking times but can throw off the texture and appearance of the finished cookies.
8. Baking or Cookie Sheets:
A baking or cookie sheet should be either: Cool or at room temperature when the cookie dough is placed on it; otherwise, the dough will start to melt, adversely affecting the cookies’ shape and texture.
Type of Cookie Sheets To Use: Cookie Sheets with little or no sides will allow the cookies to bake quickly and evenly.
Greasing Cookie Sheets: Grease cookie sheets with either vegetable shortening or unsalted butter. Do not use vegetable oil for greasing the cookie sheets, as the oil between the cookies will burn during baking – this is very difficult to clean.
- You also can use parchment paper or the reusable Silicone Baking Mats on your cookies sheets instead of the shortening or butter. I, personally, can not imagine how I ever lived without these fantastic reusable silicone pan liners. To me this is a “must have” in my kitchen. You can not rip them, you can not tear them – they are extremely durable and inexpensive, and they never lose their shape.
- If the cookie dough you are using has a large amount of vegetable shortening or butter in it, it is not necessary to grease or butter the cookie sheets or pans. Most cookie dough can be baked on ungreased pans.
- If you flour a cookie sheet after it is greased, there will be less tendency for the cookies to thin out and spread too much during baking. A greased and floured cookie sheet is also preferred for any dough containing chocolate chips (the chocolate which comes in contact with the cookie sheet is less likely to stick and burn while baking).
Baking Cookies: Bake one cookie sheet at a time, and be sure that the cookie sheet fits in your oven with at least one-inch of space around its edges for proper heat circulation. Avoid placing one sheet above another sheet in the oven, as this causes uneven baking. Cookies should be baked in the center of the oven.
Cooling Cookie Sheets: Be sure to cool your baking sheets between baking batches of cookies. Rotate cookie sheets and rinse and wipe clean between batches. A baking or cookie sheet should be either cool or at room temperature when the cookie dough is place on it. Otherwise, the dough will start to melt, adversely affecting the cookie’s shapes and texture. If the sheets are still hot when you add more dough, the cookies can start to melt and spread before they even get in the oven. To cool your cookie pans in a hurry, run them under cold water and then wipe dry before using.
9. Baking Perfect Cookies:
Cookies should be of a uniform thickness and size so they will bake in the same amount of time. Using a small cookie scoop or ice cream scoop will provide picture-perfect, uniform size cookies. To get uniform cookies, weigh the cookie dough. Using your kitchen scale, weigh 1-ounce dough for each medium-size cookie and 1/2-ounces for each smaller cookie.
Leave room between cookies on the cookie sheet. Rule of thumb is 2 inches between cookies. If the cookies are extremely large cookies or the recipe calls for more space, adjust the space.
Watch the baking time and use an accurate timer. Always check the cookies at the minimum baking time listed in your recipe. Even one minute can mean the difference between a cookie that is done and one that is ruined.
What if you want a gooey cookie? All you have to do is under bake the cookies. You may have to play with the timing and adjust until you get the consistency that you would like.
Unless the recipe directs otherwise, remove baked cookies from cookie sheet to wire rack immediately to prevent further baking. Use a thin pancake turner to remove and move cookies from baking sheets. If cookies are left on the sheet to cool, they will be very difficult to remove (this will keep cookies from tearing or breaking).
How To Soften Hard Cookies:
(1) Butter or Margarine must be at natural room temperature. If you soften by heating, cookies will be too hard when cool.
(2) Coarse brown sugar controls spreading of cookies. More coarse (brown) sugar equals more spread. More fine sugar (white granulated) equals less spread. But 2 cups combined is max.
(3) To soften hard dry cookies put the in a sealed container with a piece of bread or apple.
(4) If you are like me, you want results instantly! Put cookies (uncovered) in microwave along with a mug of uncovered hot water. Use low heat setting for several minutes; check after a minute or so. Time depends on amount of cookies.
(5) I have had very good results when I put a chunk or two of apples in the cookie storage container. It is quick and easy. I do not wait until they get hard; if it’s a recipe that I want to stay moist I just add the apple when I take the cookies out of the oven and first store them.
(6) If your stored cookies have gotten too crisp for your liking, put them in a plastic bag with a piece of fresh bread. The next day you will have soft cookies again.
Bars, Squares, and Brownies
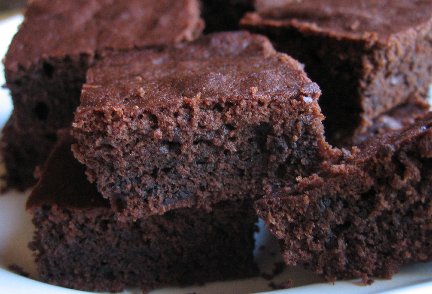 Bars and squares are a softer type of cookie. They are more like a cake. Always bake bars and square cookies in greased pans that are at least 1 1/2-inches deep and that have sides.
Do not over beat this type of cookie. Beat just enough to mix the ingredients together. Over beating will cause them to rise too much, and as they cook, they will then fall with a cracked surface and a ridge around the outside edge.
Important: Do try to use the pan sizes indicated in your recipes. The texture of the baked bars or square cookies are affected by the thickness. Using a pan smaller than the one indicated in the recipe will give a cake-like result, not a chewy one. A pan too large, will give a dry and brittle result.
Bars and squares are done when the sides shrink from the sides of the pan or the top springs back when lightly touched with your finger. When baking brownies, do not over bake them (the result will be dry and crumbly). Brownies should appear set in the center and when a wood toothpick is inserted at edges (1/2- to 1-inch from edge of pan), the toothpick should have moist crumbs attached. If the crumbs are dry, the brownies are over baked.
Cutting Bar Cookies: To prevent jagged edges that often occur when cutting bars and squares, use a sharp knife to score the bars as soon as the pan comes out of the oven. Cool completely before cutting – then cut the cooled bars along the scored lines.
Bar Cookie Tips:
Make sure that you use the size pan that the recipe calls for. Too big can cause dry bars and too small can cause under baked bars.
If baking in a glass pan, reduce the oven temperature by 25 degrees.
To store brownies or bar cookies, wrap bars in the pan they are baked in, covered with plastic wrap or aluminum foil. If storing for prolonged periods, wrap each square in aluminum foil after they have cooled.
Brownies are best when refrigerated or frozen for storage.
Line pans with aluminum foil for super easy removal of bars. Leave an overhang at two opposite ends so you’ll be able to lift out the baked bars easily.
Cutting Brownies Tips:
To make cutting easier, score the bars with a knife as soon as they come out of the oven, using a ruler as a guide.
It helps if you completely cool the brownies before cutting. You can even cool them down in the freezer somewhat hardened. Dip the sharp knife in hot water and wipe with a dry kitchen towel before making each cut.
Move the knife across the pan in an up and down sawing motion from one end to the other until they are cut.
Some people get better results by using a sturdy plastic knife or a Teflon spatula to cut brownies.
Crisp or Rolled Cookies
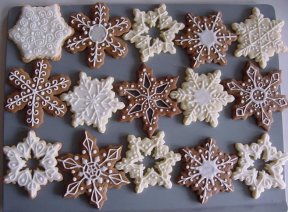 Crisp or rolled cookies are made from a stiff dough which is rolled with a rolling pin and cut with sharp cookie cutters, a knife, or a pastry wheel. They should be thin and crisp.
It is usually best to work with a small amount of dough at a time. Chill the dough if it is too soft to handle easily. For rolled cookies, the dough should be chilled for 15 to 30 minutes before rolling. this will prevent the dough from sticking to the rolling pin. Roll out only one portion of the dough at a time to prevent dough from drying out. I like to keep the other portion is the refrigerator and chilled.
When using plastic cookie cutters, they should be dipped in warm vegetable oil while you are working. You will get a cleaner, more defined edge on the patterns.
For the most tender cookies, use as little flour as possible when rolling out the dough. Save all the dough trimmings and roll at one time (these cookies will be less tender). Sugar cookies will not get stiff or tough if you roll them in sugar instead of flour. TIP: Roll the chilled dough between 2 sheets of parchment paper or wax paper. Remove the top sheet. Make cookie cutouts, then lift with a wide spatula from paper to pan.
Crisp or rolled cookies should be stored in a container with a tight-fitting cover.
Rolled Cookie Decorating Tip:
To keep sparkling sugar on unfrosted rolled cookies, make a “paint” of egg white and water (1 egg white and 1/4 teaspoon water) and paint the UNBAKED cookie with this colorless paint. Then sprinkle the sugar right onto the sugar to stick. Then bake the cookies according to your recipe.
Drop Cookies
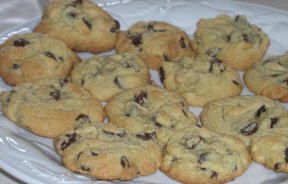 Almost any cookie dough can be baked as a drop cookie if additional liquid is added to the batter. Use your kitchen scales:
1 ounce of cookie dough makes a nice large cookies
1/2 ounce of cookie dough is great for smaller cookies.
Drop cookie dough vary in texture. Some fall easily from the spoon and flatten into wafers in baking. Stiffer dough’s need a push with a finger or the use of a second spoon to release them.
To make uniform soft drops, use a measuring teaspoon. When chilled, dough may be formed into balls and flattened between palms. First dust your hands with flour or powdered sugar. If the cookies are dark or chocolate, use cocoa for dusting.
#1 Cookie Question Asked – Why do my drop cookies spread and thin out while baking?
Easy Solution: Bake a test cookie to get an indication of dough condition before baking an entire batch. If it spreads too much, one of the following could be the cause:
Dough was not properly chilled.
Pure cane sugar (sucrose) was not used; fructose sugar or a blend of sugars was substituted.
Baking pans were greased too much. Do not grease the cookie sheet unless the recipe calls for it.
Dough was placed on warm baking sheets.
Used a low-fat margarine, diet spread, or vegetable-oil spread instead of butter or shortening. Never use a low-fat spread with 60% or less fat. Low-fat spreads have a higher moisture content and will make cookie dough very soft.
Butter makes cookies spread if the dough is too soft before baking. Not having the butter at the right consistency when making the dough. The dough should be soft enough to allow you to poke an indentation with your finger, but the indentation shouldn’t stay.
If using 100% butter, start with CHILLED butter right from the refrigerator versus room temperature butter. Cut butter into 1-inch cubes and chill again before using in your recipe.
Substitute shortening instead of butter, as butter melts faster than solid shortening. Even 1/2 butter and 1/2 shortening will melt more slowly than using butter only.
Used the wrong type of flour. Flour can affect how cookies bake and behave. Flours with a high protein content (bread flour and all-purpose flour) produce cookies that tend to be flatter, darker, and more crisp than their counterparts made with cake or pastry flour. Unbleached all-purpose flour is recommended for the best spread on cookies. Bleached or chlorinated flours reduce spread.
Macaroon Cookies
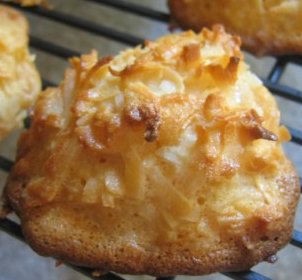 Macaroons originated in an Italian Monastery around 1790. They were baked by the Carmelite nuns who followed the principle: “Almonds are good for girls who do not eat meat.” During the Revolution, two nuns who hid in the town called Nancy, made and sold macaroons. They became known as the “Macaroon Sisters.”
Most macaroon and meringue cookies are fragile and need special handling. Keep them small and they will hold together better. Some of the meringues, heavy in nuts, keep well if stored in a tightly covered container.
Macaroon Cookie Tip:
Using your fingers, form cookies into loose hay stacks. Moisten fingers with water to prevent sticking.
Should the macaroon cookies harden on the pan, return the cookie sheet to the warm oven for a minute before trying to remove them.
Shipping or Mailing Cookies:
When mailing cookies, choose cookies that are hardy so they can stand the trip. Soft cookies generally are the best travelers.
Use a strong cardboard box or metal container; line with either wax paper or aluminum foil. Then place a cushion of crumpled wax paper, plastic wrap, or cellophane straw on the bottom.
Wrap cookies in pairs, back to back, with wax paper between them. A moisture-proof material, such as plastic wrap, safely holds the flavor while the cookies bounce around.
Pack snugly in rows with heavy cookies at the bottom. Tuck popcorn, puffed cereal, or crushed wax paper into the holes to prevent jiggling. Cover each layer with a cushion of wax paper or paper towels.
Tape the box shut, print address on box (if paper should become torn in route, the address will not be destroyed with it) and wrap in heavy brown paper. Tie or tape securely.
Print name and address plainly on front of package and label “FRAGILE, HANDLE WITH CARE.”
Storing Baked Cookies:
 Always store cookies after they have cooled completely. If still warm, they will get too soft and moist from the condensation and you will wreck them. For short-time storage follow these suggestions:
Crisp Cookies – Stored in a container with loose lid unless you live in a humid climate. If your humidity is high, store these cookies in an airtight container as well.
Fragile Cookies – Store in a shallow tin instead of a deep cookie jar or crock as extra weight will break the delicate treats.
Frosted Cookies – Stored only after the frosting is set on the cookies. Like soft cookies, all frosted cookies should be stored between layers of waxed paper. It is best if you do not stack the layers deeper than 3 layers.
Soft Cookies – Placed between sheets of waxed paper in an airtight container. Make sure the container has a snug fitting lid. If the cookies begin to dry out, place a slice of on a sheet of waxed paper and place inside the container. Replace the slice of bread as needed.
Cookie Jars – If storing cookies in a cookie jar, line it with a re-sealable plastic bag for airtight storage.
Freezing Baked Cookies:
For a longer storage you should freeze baked cookies in airtight freezer containers, freezer bags, or aluminum foil. NOTE: Do not use cardboard containers because they pick up freezer odors. T hey can be frozen up to twelve months.
First put a piece of waxed paper or foil in the bottom of the container. Then place the cookies so they are not touching and separate the layers with waxed paper or foil to protect. Seal tightly.
Before serving the cookies make sure you thaw them in their original freezer wrappings (so that condensation forms on the wrapping, not on the cookie). Crisp cookies may soften when thawed after freezing; to re-crisp, put them in a 300 degree F. oven for 8 to 10 minutes.
Freezing unbaked cookie dough:
Most cookie dough freeze extremely well and can be kept frozen for up to 3 months. The most important thing to keep in mind is that the dough will absorb any odd odors present in your freezer if it’s not properly wrapped and sealed. To prevent this smell-sponge effect-as well as freezer burn-wrap the dough securely twice.
It’s also a very good idea to write the type of cookie dough and the date it was frozen on the outside of the package. When you are ready to bake simply let the dough defrost in the refrigerator. This will take several hours, so plan ahead.
The cookie dough that freeze best are shortbreads, chocolate chip, peanut butter, refrigerator, sugar, and brownies, just to name a few. The types of cookie dough that do not freeze well are cake-like cookies and cookies that have a very liquidly batter, such as Madeleine cookies.
For slice-and-bake cookies, form the dough into a log and freeze. When ready to bake, just slice off as many cookies as you need.
When ready to use, the dough should be thawed in the refrigerator because it needs to be quite cold and firm to be cut into even slices. You can even slice it frozen if you want to, you just need a really sharp knife and a little elbow grease.
Lots of favorite Christmas Cookie Recipes. Check them out!
How To Have A Successful Holiday Cookie Exchange or Cookie Swap
The cookie exchange or cookie swap tradition has been around for many years. The Christmas holiday season is a favorite time to have these parties. They are a lot of fun, and as a bonus you’ll have lots of different cookies on hand for the holidays. Just think – bake one batch different kinds. Invite your friends, family, neighbors, church members, or community group.
18 Responses to “Secrets To Making Perfect Cookies”
Ricelpulis
I used an old-fashioned recipe for slice-and-bake cookies. I refrigerated the logs overnight. When i began slicing them the next morning they fell apart. Can the crumbled dough be salvaged?
Whats Cooking America
Once the crumbled dough softens up, you should be able to either bake them as a drop cookie or roll out the dough and use cookie cutters, then bake.
Linda Malnati
I am so happy to have found this Site, as a lot of my questions have been answered. I wanted to know when making Cut out cookies, is it better not to use baking powder as I don’t want a real puffy cookie. Also a lot of Bakers Bake their cookies at 400 degrees F. I have always used 350 degree F. for mine but I would like your opinion on this as soon as you have the time. Some bake at higher temps for shorter periods of time. I would Love to Bake the Perfect Cut Out Cookies. Thank you for such Valuable information.
Linda Stradley
Your question peaked my interest. I looked at all our cookie recipes for cut out cookie recipes on What’s Cooking America. Most cookie recipes for cut out cookies did not use any baking powder or soda. Several did use baking soda. I found a couple of recipes that used some baking powder. I found this discovery very interesting!
Using baking powder in the dough when making cut out cookies does make them light and fluffly and more prone to spreading. Cookies will have less of a tendency to puff up and spoil the lines of your intricately detailed cookies when not using baking powder or baking soda. Using baking powder seems to produce a better taste in the cookies when baked.
After reading more about the question – Is baking powder needed when making cut out cookies. Yes, you do not need to add any baking powder or soda to cut out cookie dough.
If you are making other types of cookies, you do need to add some baking powder or you will produce produce flat cookies. Baking soda and baking powder are powerful chemical agents. Without them, the entire character of a batch of cookies changes – usually not for the better. Unless you want a cookie with a dense, hard texture, always use a leavening agent if your cookie recipe calls for it.
Regarding oven temperature for baking cookies. Generally, cookies are baked in a moderate oven of 350 degrees F. (175 degrees C.). That being said, I personally recommend that you should follow your recipe and use the oven temperature that is suggested in the recipe.
Learn about the history of baking powder. Thank you for your interesting question – Linda Stradley
Kelli Sobczuk
Great site. How do you keep 1/2 pound large cookies from breaking when taken in and out of the cookie jar? Also my digital scale goes up to 9.9 ounces and then shows 1 pound. My question is when using that scale is half a pound 5 ounces? Thanks so much.
Linda Stradley
U.S. Measurements:
16 ounces = 1 pound
8 ounces – 1/2 pound
Junpyo Rempillo
hi! thanks to your site i find it very reliable when it comes to baking cookies, may i ask if you know how to make cookies soft even after seven days? i think it’s on the procedure of making the dough, right?? can you give an advice pls bcoz i make cookie dough but after two days my cookies are hard already.. thank you for your time..
Linda Stradley
Here are the ideas listed on my Secrets To Making Perfect Cookies:
How To Soften Hard Cookies:
(1) Butter or Margarine must be at natural room temperature. If you soften by heating, cookies will be too hard when cool.
(2) Coarse brown sugar controls spreading of cookies. More coarse (brown) sugar equals more spread. More fine sugar (white granulated) equals less spread. But 2 cups combined is max.
(3) To soften hard dry cookies put the in a sealed container with a piece of bread or apple.
(4) If you are like me, you want results instantly! Put cookies (uncovered) in microwave along with a mug of uncovered hot water. Use low heat setting for several minutes; check after a minute or so. Time depends on amount of cookies.
(5) I have had very good results when I put a chunk or two of apples in the cookie storage container. It is quick and easy. I do not wait until they get hard; if it’s a recipe that I want to stay moist I just add the apple when I take the cookies out of the oven and first store them.
(6) If your stored cookies have gotten too crisp for your liking, put them in a plastic bag with a piece of fresh bread. The next day you will have soft cookies again.
Mona
What do you think about granulated brown sugar? Results same? Makes it easier for measuring.
I feel I don’t know how firmly to pack traditional brown sugar.
Linda Stradley
Brown sugar makes baked goods more moist than white sugar because of the molasses content. Brown sugar also changes the flavor of your cookies.
Spoon brown sugar and pack it down until sugar is flush with the top of the measuring cup. Packing the sugar presses out the pockets of air that gets trapped among the sticky sugar granules.
Zina Pledger
I hope you can help me? This is the first time that I have bought a cookie mold pan for Easter. My problem is I don’t know how much cookie dough to put in each of the little molds or how long too cook them? I have looked everywhere for some help and still no luck? I just thought this cookie mold pan would make cute little bunnies and flowers? But without any directions the pan is no good. If you could help me I would appreciate it. Thank you
Linda Stradley
A simple cookie mold is a shallow container with a decorative pattern on the bottom that holds and forms dough.
The cookie dough should also be pliable for use in a mold. If it is too dry, the mold will not make a good impression on it
Spray mold with vegetable oil spray. Make sure you get every nook and cranny. Lightly press with a paper towel to wipe out excess oil. Dust lightly with flour. You will have to re-flour the mold before each cookie, but do not oil it again.
To form cookies, press dough firmly into the mold to imprint the design onto its surface. Avoid pressing too hard so that dough does not crack. If your mold is one-sided, run a knife or spatula across the surface of the mold to remove excess dough and level the back of the cookie.
Prick the entire surface with the tines of a fork. This is so the steam can escape and the dough won’t buckle and warp during baking.
Polly74
Great article. I was wondering could you help me? I want to bake, thaw and serve cookies. But The recipe I use calls for baking powder only (no baking soda). When I thaw them they are a bit dry and crumbly. Can you recommend a chocolate chip recipe that would remain soft once thawed. Thanks
Linda Stradley
I have been told that the technique works, but I, personally, have not tried this technique:
After thawing the cookies, give them a little refreshing in the oven, at 250 degrees F. or about 20 minutes.
Also, be sure to let you baked cookies cool completely before freezing.
MaryJane McCoy
Hello, My sugar cookies came out of the oven with what I can only describe as a wrinkled skin appearance on the tops of them. How can I get a smoother “finish?” Thankyou
Bobbie
I am very glad to have found this information. I do seem to have difficulty with my rolled out shortbread cookies. I follow the recipe to the tee. I measure out all of the ingredients, sift the flour, everything. When the cookies are baked they spread all over the pan, it looks like a fine lace pattern has formed. The shape does not hold up at all. I have added cornstarch to the recipe, still no change. What could be wrong? I have even decreased the oven temperature to 300 degrees as opposed to the 350 degrees. I could sure use some help. Thanks
Carol Polacek
Thank you for all the information to help my skills in cookie making.
Tyrone
Wow! Very handy and useful tips. I love the part where you discussed about measuring dry ingredients because accuracy is very crucial in baking. I tried your cookie recipe and it tastes amazing! Have fun baking!