Sugar Cookie Recipe – Gingerbread Cookie Recipe – Royal Icing Recipe
Recipes by Peggy Weaver
Timeline for making the Snowflake Cookies – This is a three-day project for four dozen cookies with a fourth day for packaging:
Day One – Baking – Sugar Cookies or Gingerbread Cookies
Day Two – Outlining, filling, and letting cookies dry overnight.
Day Three – Detail piping and Sugar Sanding.
Day Four – I will be making this a four-day project because I have chosen to put each cookie into a separate cello bag that is tied with raffia and a note.
- If you can have your room on the cool side, I like 65 degrees F. when baking, the fats and sugar whip up much better.
- 4 ounces butter
- 4 ounces Crisco vegetable shortening
- 3/4 cup lightly-packed brown sugar
- 1/2 cup unsulphured molasses
- 1 large egg
- 3 1/4 cup all-purpose flour
- 2 teaspoons ginger, ground
- 1 teaspoon cinnamon, ground
- 1 teaspoon baking soda
- 1/4 teaspoon nutmeg, ground
- 1/4 teaspoon cloves, ground
- 1/4 teaspoon salt
- 1/4 teaspoon Food Gel Color in brown**
- 1 pound fondant or powdered sugar (confectioners' sugar)
- 1/2 teaspoon cream of tartar
- 5 1/4 teaspoon Meringue Powder or Egg White powder
- 6 tablespoons water
- 1/2 teaspoon pure vanilla extract
-
Preheat oven to 350 F. In a large mixing bowl, cream sugar, butter, and shortening approximately 3 minutes or until light and fluffy on medium speed. NOTE: I used my Kitchen Aid for these recipes. If using a hand mixer you will need to cream approximately 5 minutes.
-
Add egg, egg yolk, and vanilla extract; mix an additional 1 minute. Add flour and salt; mix on high speed until dough holds together. Add one or two tablespoons of water if necessary.
-
Form dough into two disks (6-inch by 9-inch) and wrap in plastic wrap. Refrigerate for at least 2 hours but better if overnight.
-
When ready to roll the dough, remove one dough disk at a time from the refrigerator. On a lightly floured surface, roll disk about 3/16 inch thick. Cut into desired shapes with Snowflake Cookie Cutters or cookie cutters of your choice. Place 1-inch apart on ungreased baking sheet. Gather and press all scraps together (you can re-roll and cut shapes but keep it cold). Refrigerate cut cookies (on baking sheet) at least 30 minutes. Do not cheat on this especially if you have cutouts in the dough.
-
Remove from refrigerator and bake 8 to 10 minutes or until the edges just start to brown. For my oven (which was calibrated before this project) 8 minutes was just right. Remove from oven and allow cookies to sit on the cookie sheet for a few minutes to allow them to harden. Carefully move to a wire rack to cool completely before decorating with Royal Icing (see recipe below).
-
Preheat oven to 350 degrees F. Line two cookie sheets with parchment paper and spray lightly with pan coating.
-
Cream the butter with flat paddle attachment of electric mixer on high speed about 3 minutes or until soft. Beat in sugar; continue beating for about 2 minutes until light and fluffy. Beat in molasses and then beat in egg, scraping down bowl once or twice.
-
Sift together flour, ginger, cinnamon, baking soda, nutmeg, cloves, and salt. Add the dry ingredients to the butter mixture in three batches, mixing just until each batch is blended.
-
Shape into a large flat ball by hand, kneading a few times until smooth. Shape into two disks (6-inch by 9-inch). Wrap in plastic wrap and refrigerate at least 2 hours or until firm enough to roll out – Overnight is best.
-
Roll out dough on a lightly floured surface to 3/16″ thickness. Cut out shapes as desired using either a gingerbread person shape or any other of your choice. Transfer to cookie sheets using a broad-angled spatula, leaving at least 1 inch between cookies. Place similar sized cookies on the same sheet.
-
To make hanging ornaments, punch holes in the tops of the shapes with a straw.
-
For Snowflake Cookies, bake approximately 9 1/2 to 12 minutes depending on size, rotating pans front to back once during baking. They should just begin to brown around the edges and feel firm to the touch. Remove from oven and cool pans on wire racks for a few minutes; transfer cookies to racks to cool completely. Let pans cool completely before proceeding with next batch; you may reuse the parchment.
-
Store in airtight container at room temperature for up to two weeks or freeze for up to one month. Decorate as you desire with Royal Icing.
-
I chose this recipe because I can get Just Whites at my market. I had problems getting the Meringue Powder that is recommended in many recipes. Raw Egg Whites is not advised to use these days.
-
Warning: Any grease will break down icing. Remember if the icing is too dry, add water a few drops at a time. If icing is too moist, add more powdered sugar. It’s as simple as that.
-
In a large mixing bowl, stir together powdered sugar, cream of tartar, and powdered egg whites. Add water and vanilla extract; beat at low speed until sugar is dissolved, then at high speed about 10 minutes or until mixture is light and fluffy (icing must hold its shape before using). Keep bowl covered with a damp cloth to prevent drying.
-
NOTE: I spooned 1/2 of this mixture into a 10-inch piping bag fitted with a #2 decorating tip. I liked putting a “Chip Clip” on the top of the bag to keep it closed and twisting the bag to get the icing to flow. By twisting, I used a lot less hand pressure and didn’t tire out so easily. Put the piping bag tip side down in a glass that has a damp paper towel in the bottom. This will keep the icing hardening up like cement while you attend to other life duties.
-
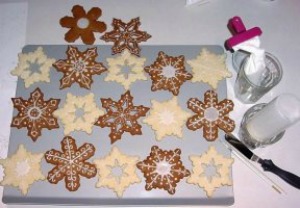
To the second 1/2 of the icing, I added water, a teaspoon at a time and mixed well until the consistency of heavy whipping cream. Then I poured it into a squeezable bottle with a cap and stored the bottle upside down in a glass. I outlined the cookie with the pastry bag and let them sit for a few minutes, Then flood the icing from the squeeze bottle, with a back and forth motion over the whole area. If necessary use a knife to smooth all over the cookie and a toothpick comes in handy for getting rid of tiny bubbles and filling little holes. Set aside and let dry overnight.
-
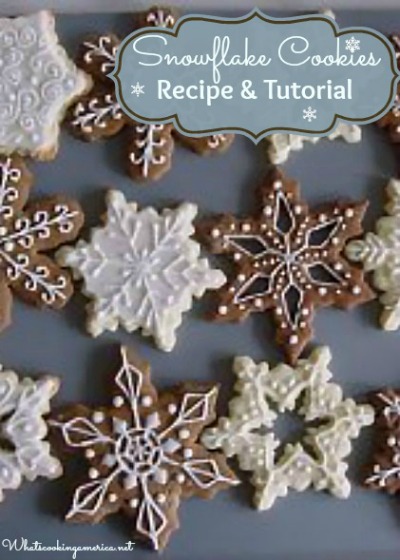
Next day, pipe your designs. I had eight drawings of patterns that I made up, so I taped them on my dish closet door right in front of my face for fast reference. The drawing were the basic idea and every cookie ended up with different points, curls, swirls and dots. Let dry overnight then package.

* You can substitute Kings Syrup or Treacle for the unsulphured molasses in the Gingerbread Cookie Recipe if you want a lighter colored cookie.
** Can be purchased online and at most craft stores.
Peggy’s notes and comments on making Snowflake Cookies:
DOUGH: Use a mixture of Crisco shortening and Butter. I know I know – there will be lots of complaints here, but this is one time I found that in using the combination, the cookie is tender, flavorful and held the cookie cutter design. Some of the cookies that I made have cutouts. When I used just butter the cutout closed up and the edges of the cookies just had ripples instead of points.
REFRIGERATING DOUGH: Keep the dough cold. I separated the dough into two parts after I made it. I patted each half to 6-inch by 9-inch disks, wrapped them in plastic wrap, and refrigerated. This shape allowed me to start rolling quickly and helped with cutting out the snowflakes. After rolling out and cutting the cookies, even if you are fast, put those trays in the refrigerator for 30 minutes. It makes all the difference in the world. The cookies edges come out beautiful because the edges bake very quickly and hold the look before the butter and the Crisco melt and make a puddled mess.
ROLLING DOUGH: To keep the cookie dough from sticking, I combined one (1) part powdered (confectioners’) sugar to one (1) part flour. I had no problem with dough sticking to the counter and the cookie wasn’t damaged by to much flour being added to the recipe, causing toughness.
Roll out your Sugar Cookie dough 3/16-inch thick. The 1/8-inch cookie broke, 1/4-inch was tough. I am lucky that I have a husband that has a work shop. He made for me a set of “Baking Gages”. They are two strips of maple, 16 -inches long and 1-inch wide. Depth is 1/8-inch, 3/16-inch, and 1/4-inch. I tried all three and decided that the 3/16-inch is by far the best. You can get the gages at many baking stores or internet sites. I now feel these are a necessity for all my baking and all our daughters are getting them for Christmas. They made rolling out so easy. The best thing is that everything is uniform and all bake evenly.
BAKING SHEETS: I tried four different baking sheets.
- Air-bake type cookie sheet
- Cheap sheets that you get at the market and replace every year or so.
- Heavy steal sheet
- Stone-ware type
My husband and the neighbor both voted on the cheap sheets. The air-bake was a very soft snowflake cookies. When I tried baking longer, the cookie just seemed dried out. The heavy steel sheet burned the bottom but was soggy in the middle. The stoneware sheet took five more minutes to bake and had to be completely cooled before baking the next batch. The cheap sheet, in eight minutes, gave me a strong bottomed but tender cookie that was a very lightly golden. Exactly what I was looking for. Also I didn’t have to use a nonstick spray or parchment to keep the cookies from sticking.
COOLING: After baking, let the snowflake cookies sit on the tray for a few minutes to cool otherwise you take a change of breaking off the snowflake points. Also use a thin metal spatula to remove cookies from the tray to a cooling rack. If necessary dust the spatula with a bit of the flour and powdered sugar mix to keep things from sticking.
COOKIE CUTTERS USED:
- Snowflake cutter #38327, 4 7/8-inch
- Cutter #38334, 4 7/8-inch
- Five-piece snowflake cutter set, they are from 5/8 inch to 4 5/8-inch

Back to Peggy’s Baking Corner Home Page
Peggy Weaver, author of Peggy’s Baking Corner, has generously answered all the questions on cake baking during the last 15 years. Peggy will not be able to continue with the Question and Answer pages in the future. She thanks you for all your interesting questions.
Check out some of Peggy Weaver’s many Cake Decorating Articles, Tutorials, and Q&A pages below:
Fondant Icing/Covering:
Fondant Icing Recipe – Marshmallow Fondant
Recipe and tutorial on making & using marshmallow fondant icing.
Q&As on making fondant icing.
Additional fondant recipes.
Covering Cakes with Fondant Icing
Buttercream Icing/Covering:
Buttercream Icing 101
Recipe and tutorial on making & using buttercream icing.
Buttercream Recipes
Additional buttercream recipes.
Wedding Cakes:
Assembling Cakes/Wedding Cakes
Other Cake Baking and Decoration Topics:
Peggy’s Cake Decorating Idea Photos
This idea page has photos only and no detailed decorating instructions.