Clarified Butter and Butter Ghee
Clarified Butter and Butter Ghee are also known as Liquid Gold. I know that regular butter is fantastic, but believe it or not, butter can be made to taste even better!
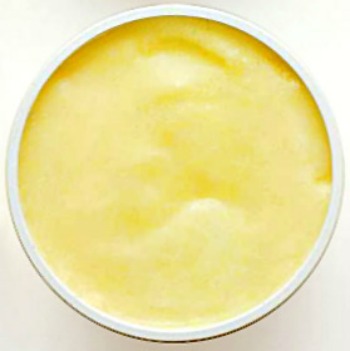
The only difference in making both Clarified Butter and Butter Ghee, is the length of the cooking time. Unlike cooking oils, butter is not 100% fat – but only approximately 80% fat and 20% water. When the water is removed, you are left with pure butterfat which is also know as Clarified Butter or Butter Ghee.
Clarified Butter and Butter Ghee are usually used for frying and sauteing. You can use clarified butter the same as you would regular butter, but I tend to reserve clarified butter or butter ghee for dishes where you’re really going to taste the butter in the dish.
Clarified Butter:
Also called drawn butter. Regular butter is made up of butterfat, milk solids, and water. Clarified butter is the translucent golden butterfat left over after the milk solids and water are removed. In short, clarified butter is just butter that contains only pure butterfat. It has a higher smoke point than regular butter, thus allowing you to be able to cook at higher temperatures, and won’t spoil as quickly.

Butter Ghee:
Clarified butter and ghee are not the same. Ghee is clarified butter that has been cooked longer to remove all the moisture, and the milk solids are browned (caramelized) in the fat and then strained out. This gives a rich nutty taste. Ghee has a longer shelf life, both refrigerated and at room temperature. It is traditionally used in Indian cuisine.
Making Clarified Butter and Ghee Tips and Hints:
1 pound of butter = about 1 1/2 cups clarified butter or ghee.
Type of Pan Used: Use a heavy bottomed and deep stainless steel pan. Make sure the pan you will be using is clean and dry.
Chef’s Tip – Use a double boiler. This will let you safely clarify your butter while you are busy elsewhere in the kitchen. Never cover the pan during the whole cooking process.
Low Heat: Use low heat so the butter will not burn. Yes, turning up the heat will melt the butter faster, but the milk solids may begin to burn. For fast melting, cut the unsalted butter into pieces and melt slowly in a heavy saucepan for approximately 30 minutes.
Storing clarified butter and ghee: They can both be stored, covered, without refrigeration in a glass or earthen jar for about six (6) months. At room temperature, they become semi-sold. With refrigeration, they both harden and can be stored, covered, for about one (1) year. Do not let any water get into your clarified butter or ghee jar. A drop of water can easily promote bacteria and spoil them.
Using clarified butter and ghee: Clarified butter and ghee is great to saute with because it does not burn as easily as ordinary butter. It is useful in all kinds of sauce making, especially the butter-based sauces like Hollandaise Sauce. It is also a delicious accompaniment for lobster or crab. Use in place of regular butter in your cooking.
How To Make Clarified Butter – How To Make Butter Ghee:
The only difference in making both clarified butter and butter ghee, is the length of the cooking time. The additional Ghee directions are in blue print below.
Making Clarified Butter:
Place one (1) pound of unsalted butter in your pan. Over low heat, melt the butter. When the butter has completely melted, continue to heat it over low heat.
When the melted butter starts boiling, it will begin to foam and sputter a lot at first as the water boils off. Continue boiling the butter, uncovered.
As the butter melts, it will slowly separate into three (3) layers:
The top layer is a thin layer of foam (this is the butter’s water content boiling off.
The middle layer contains the liquid.
The bottom layer is where most of the milk solids are.
Slowly the liquid on top becomes more and more transparent. When the clarified butter has a golden transparent color, there is very little foam left on the surface, and the solids have settled on the bottom, the clarified butter is ready. The cooking time is approximately 30 minutes, depending on the heat source and the kind of pot that you use.
Remove from heat immediately as it can burn easily at this point.
Making Butter Ghee:
Continue to slowly cook over low heat, watching carefully and stirring occasionally, until solids on the bottom of the pan turn light brown and the liquid deepens to golden and turns translucent and fragrant. Also a rich aroma (aroma smells like popcorn) arises in the air. Immediately remove from the heat. Important – If you leave it on the heat too long, you will burn the residue and all of the ghee will have a burnt taste.
Ways to remove the foam and solids:
Skim off the foam after removing from heat. Let the butter cool to let more of the solids settle, and then pour or spoon out the clarified butter, leaving the remaining milk solids in the pan.
Pour the hot melted butter through cheesecloth, fine-mesh skimmer, or tea strainer to filter out the foam and solids that have settled, letting the clarified butter flow into a jar.
My favorite way – Pour the hot melted butter into a container and allow it to separate on its own while cooling, and then refrigerate. After it has solidified, you can easily scrape off the hardened foam on top.
Use a gravy or fat separator to make the skimming easier.
Strain the melted butter through a paper coffee filter.
The advantages of making your own clarified butter and/or ghee:
You can choose the quality of butter used.
Home clarified butter and ghee tastes better.
Making your own is much cheaper than purchasing it.
High smoke point of 375-485F or 190-250C (depending on purity)
Long shelf life (refrigerated or room temperature).
Is well tolerated by those who are lactose intolerant.
Categories:
Baking Hints & Tips Condiments - Sauces - Butters - Relishes - Jam and Jelly Recipes Cooking Lessons - Cooking 101 Oils and Fats Hints & Tips
18 Responses to “Clarified Butter – Butter Ghee”
Carol
I could take your website much more seriously without the typos.
Linda Stradley
If you find typos, please let me know so I can correct them. Typos do happen.
Robin
Yes, they do….we all make them from time to time. Your article was very informative and exactly what I was looking for. And thanks for adding pics!
Robin
Oh for God’s sake. Her typos have nothing to do with the content & her knowledge of the subject. I guarantee that you have not been “typo free” your whole life. None of us are. I prefer to rate her on her knowledge instead of standing in judgement of something as inconsequential as her spelling/grammar.
Teresa
Fantastic website! Thank you for the info. Don’t let someone who’s a negative person keep you from doing such great work!
Marcia
This is very good. Explained all I hoped to learn about clarified butter and ghee. Thank you.
Kitt Piel
This explained, in a very simple way, the difference between the two. I was so confused! I feel like I understand now the difference in the products, and in the cooking process, and I can’t wait to try my hand at it. I’ve also had a lot of trouble straining, and I’m excited to try some of your other methods. How do you store yours, in mason jars? Would you use this for butter embellishments, like rosemary or chives? I bet it would really infuse the butter with flavours.
Chef Vaughn
How exactly do you make roux
Nancy
Here is a link about making roux: https://whatscookingamerica.net/Sauces_Condiments/Roux.htm
Laura
I did not notice your typos… I am very interested in the topic of your article. Thank you for sharing the information.
Mary
Thank you so much! I’ll be able to use this info to make ghee for my daughter, who has allergies to dairy products, but can tolerate ghee.
James Bullock
What is the butter/ghee equivalent? If I am making a sauce, how much ghee instead of 1/2 cup/4 ox butter?
Thank you.
CJ
I would be interested to know this too.
Brian Gilbert
Can you re-use ghee or clarified butter?
Delrae Johnson
Thank you for the helpful information on clarified butter and ghee; was always wondering about the differences! Great information just in time for Crab Season!
Kumar
Ghee is a traditional Indian superfood since ages. Making authentic ghee is lot more complex than what is mentioned above. Properly made ghee has lot of medicinal values, apart from culinary use.
If we consider just culinary usage, instant ghee (above process) and orthodox/Indian/desi ghee are almost similar.
Appreciate your detailed article.
Michael Kane
I’ve been researching and making clarified butter and ghee for a while now. Your article specifies 375 degrees as their smoke point. Every other source I’ve seen until now says they have a much higher smoke point, 450 to 480 is most common.
Nancy
Michael, thanks for writing, I did some research on our own page about smoking points and you are right, we actually have a range, depending on purity. https://whatscookingamerica.net/information/cookingoiltypes.htm
Thanks
Nancy