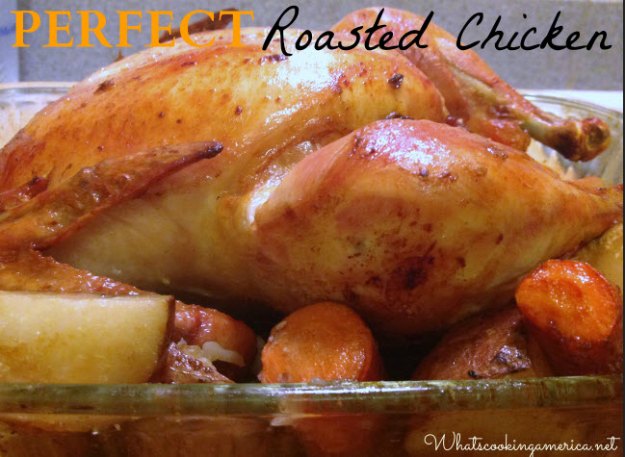
Guidelines For Perfect Roasted Chicken
A roasted chicken in the oven is a beautiful aroma! I can recall many Sunday family dinners enjoying roasted chicken and fighting over who gets the chicken leg. Nowadays, you can buy a roasted rotisserie chicken at your local grocery store for a convenient weeknight dinner to feed the family. However, there is nothing like slow roasting a chicken over a bed of vegetables in your own oven!
Learn how to Brine Poultry (Chicken and Turkey) and check out more outstanding Poultry Recipes.
Additional Roasted Whole Chicken recipes:
Roast Chicken with Thyme Butter
Roasted Lemon Rosemary Chicken
Roasted Dutch Oven Chicken and Vegetables
Roasted Rosemary Garlic Chicken
The USDA has issued new guidelines for cooking and roasting whole chickens. These changes were based on a study conducted by the University of Georgia, which showed that the existing USDA cooking times were longer than needed to assure safety and doneness. The data supported reductions of 15 minutes to one hour, depending on the size of the bird. The USDA has come up with a one-temperature-suits-all for poultry safety: 165 degrees F. For safety and doneness, the internal temperature should be checked with a meat thermometer. It appears that “timing is NOT everything.” Recommended cooking techniques must also be followed. A meat thermometer should be used to check the internal temperature of the bird in several places for safety’s sake and to prevent overcooking.
Many variables can affect the roasting time of the whole chicken:
- A partially frozen bird requires longer cooking.
- Dark roasting pans cook faster than shiny metals.
- The depth and size of the pan can reduce heat circulation to all areas of the bird.
- The use of a foil tent for the entire time can slow cooking.
- Use of the roasting pan’s lid speeds cooking.
- An oven cooking bag can accelerate cooking time.
- A stuffed chicken takes longer to cook.
- The oven may heat food unevenly.
- Calibration of the oven’s thermostat may be inaccurate.
- The rack position can have an affect on even cooking and heat circulation.
- The meat thermometer must be placed properly in the thigh joint. See Taking The Chicken’s Internal Temperature below.
Roasted Chicken Instructions for Safety and Doneness:
Be sure the chicken is completely thawed – Times are based on fresh or completely thawed frozen chicken at a refrigerator temperature of about 40 degrees F. or below.
Placing Chicken in Roasting Pan – Place chicken breast-side up on a flat wire rack in a shallow roasting pan, 2 to 2 1/2 inches deep.
Optional Steps:
Truss or Not to Truss – You do not need to bother with complicated trussing. Instead, secure the legs by tucking the ankle joints into the pocket of skin at the tail end. Tuck wing tips back under the shoulders of bird (called “akimbo”).
Adding Liquid – Add 1 cup chicken broth/stock to the bottom of the pan before beginning the cooking. This will create a steam room-type environment in the oven, which help keep the breast moist but will not prevent browning of the skin. Check out Chicken Stock – Basic Chicken Stock to learn how easy it is to make your own homemade chicken stock.
Tenting the Chicken – In the beginning, a tent of aluminum foil may be place loosely over the breast of the chicken for the first hour, then removed for browning. Or, a tent of foil may be placed over the chicken after the chicken has reached the desired golden brown. As part of the study, some chickens were tented with foil for the entire cooking time; this increased the cooking time required.
Basting the Chicken – Brush the chicken with butter or vegetable oil at the beginning before roasting it in the oven. This will contribute to browning. Basting during the roasting process is an unnecessary extra stop. Basting in the last hour of roasting can actually turn a beautiful crisp chicken skin soft.
Easy ways to baste a chicken:
Use a Chicken Baster (bulb baster).
Use a basting brush.
Use a large spoon to scoop up the juices and drizzle over the chicken.
Chicken Cooking Times – The new roasting times are based on the recommendations above and on a 325 degree F. oven temperature. These times are approximate and should always be used in conjunction with a properly placed meat thermometer.
Approximate Whole Chicken Cooking Times:
Un-Stuffed Chicken
| Weight | Cooking Time |
|---|---|
| 3/4 pounds | 30 minutes |
| 1 1/4 pounds | 40 minutes |
| 2 pounds | 50 minutes |
| 3 pounds | 1 hour and 10 minutes |
| 4 pounds | 1 hour and 15 minutes |
| 4 1/2 pounds | 1 hour and 25 minutes |
| 5 1/4 pounds | 1 hour and 30 minutes |
Stuffed Chicken
| Weight | Cooking Time |
|---|---|
| 1 pound | 40 minutes |
| 2 pounds | 50 minutes |
| 3 pounds | 60 minutes |
| 4 pounds | 1 hour and 20 minutes |
| 5 pounds | 1 hour and 30 minutes |
| 6 pounds | 1 hour and 40 minutes |
| 7 pounds | 1 hour and 45 minutes |
Taking The Chicken’s Internal Temperature:
The USDA has come up with a one-temperature-suits-all for poultry safety: 165 degrees F. For safety and doneness, the internal temperature should be checked with a meat thermometer.
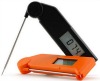 This is the type of cooking and meat thermometer that I prefer and use in my cooking. I get many readers asking what cooking/meat thermometer that I prefer and use in my cooking and baking. I, personally, use the Thermapen Thermometer shown in the photo on the right. To learn more about this excellent thermometer and to also purchase one (if you desire), just click on the underlined: Thermapen Thermometer.
To Take Temperature of Thigh – Place the thermometer in the thickest part of thigh away from the bone of the chicken to check the internal temperature at intervals during the cooking time.
To Take Temperature of Breast – Insert thermometer at neck end, holding it parallel to the chicken. Confirm temperature by inserting thermometer in both sides of the chicken.
Cleaning Meat Thermometer – After each use, wash the stem section of the thermometer thoroughly in hot, soapy water.
Temperature of Cooked Chicken and Stuffing/Dressing – The temperature must reach a minimum of 165 degrees F. in the thigh before removing from the oven. The center of the stuffing should reach 165 degrees F. after stand time.
In Absence of a Meat Thermometer – Juices should be clear. Pierce the chicken with a fork in several places; juices should be clear with no trace of pink. NOTE: The old-fashioned way of wiggling the leg to see if it’s loose will give you an indication that the chicken is ready, but unfortunately, by the time the leg is truly loose, the chicken is sadly overcooked. The only reliable test for doneness is to check the internal temperature with a meat thermometer in the thickest part of the thigh, without touching the bone.
Removing The Chicken From The Oven:
Once you remove the chicken from the oven, tent it with aluminum foil and allow it to rest for 20 to 30 minutes, so the meat can firm up and hold the juices, making it easier to carve. Resting allows for the redistribution and re-absorption of the juices in the meat. This makes for ultra-moist, flavorful meat while also giving the chicken a chance to cool for easier carving. If you skip this important step, you will both burn yourself and end up with a flood of juices on your carving board, not to mention a dry chicken.
In this recipe I have used Julia Child’s technique for Roast Chicken. In her first cookbook, Mastering The Art Of French Cooking, by authors Julia Child, Louisette Bertholle, and Simone Beck. Her recipe is the French technique and requires a lot of basting and turning of the chicken while roasting which I followed.
- 1 (4-pound) whole chicken*
- Coarse salt
- 2 to 3 tablespoons butter, softened
- 3 to 4 large carrots, washed, peeled and cut into large chunks
- 4 to 5 red potatoes, washed and cut into quarters
- 2 tablespoons butter, melted
- 1 tablespoon olive oil
-
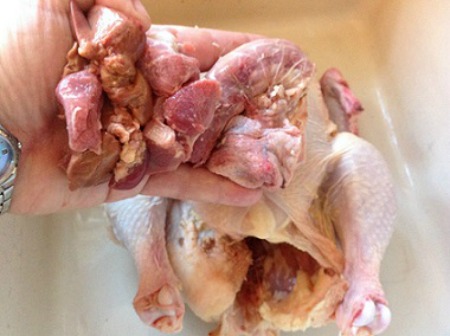
Remove the neck, liver, and gizzards from inside the chicken cavity and discard or freeze for later use. Wash and dry the chicken, place on a plate, and put into the refrigerator, uncovered for 1 to 2 days (this dries out the skin which will give a crisper skin after roasting). Be sure to remove the chicken from the refrigerator at least 2 hours prior to roasting, to bring down to room temperature.
-

-
Preheat the oven to 425 degrees F. Place oven rack in middle of the oven.
-
Prepare the Chicken: -
Remove the chicken from the refrigerator and allow the chicken to come to room temperature.
-
Rub or smear the inside of the chicken with 1/2 the butter. Sprinkle the inside with coarse salt. Rub the outside skin with the remainder of the butter. Optional step: Secure the legs by tucking the ankle joints into the pocket of skin at the tail end. Tuck wing tips back under the shoulders of the chicken (called "akimbo").
-
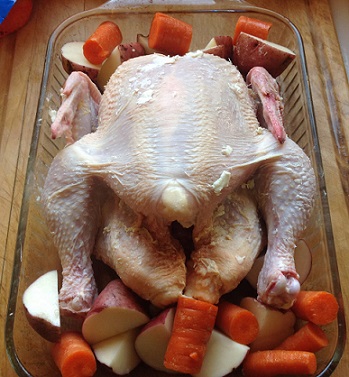
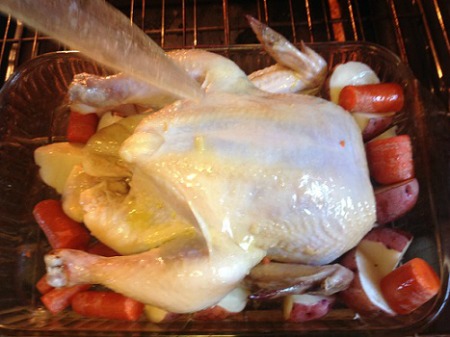
In the prepared roasting pan, place the chicken breast side up on bottom of the pan. Spread the carrots and potatoes around the chicken.
-
-
Roasting the Chicken:
-
Place the prepared chicken in the oven and allow the chicken to brown slightly for 15 minutes.
-
While the chicken is roasting, in a small saucepan over medium heat, melt the butter. Add olive oil and stir until combined. Remove from heat.
-
Basting the chicken:
-
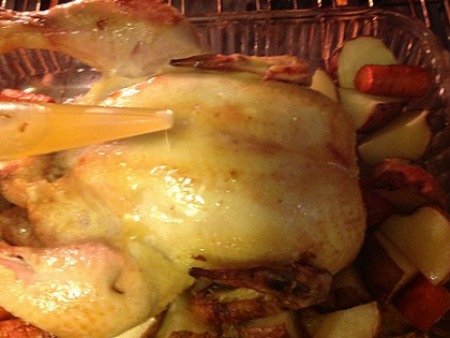
Open the oven door and baste the chicken, using a chicken baster bulb, basting brush, or a large spoon with the melted butter mixture all over the front and sides of the chicken. Also scoop up the liquid on the bottom of the roasting pan and drizzle over the chicken.
-
-
Reduce oven temperature to 350 degrees F. Continue to baste the chicken every 10 minutes using the fat in the roasting pan when the butter/oil baste are depleted.
-
Halfway through estimated roasting time: Sprinkle the chicken with 1/4 teaspoon coarse salt. Turn chicken over on its other side. Continue basing every 10 minutes.
-
-
Fifteen minutes before end of estimated roasting time: Again sprinkle the chicken with 1/4 teaspoon coarse salt. Turn the chicken breast-side up. Continue basting every 10 minutes. Continuing to baste as the chicken cooks.
-
-
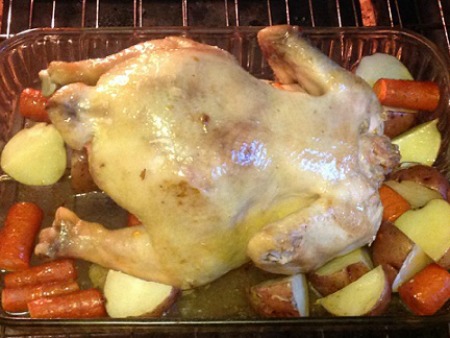
Chicken is done when the thigh and breast registers an internal temperature of 165 degrees F. on your meat thermometer (juices will run clear when cut with the tip of a knife).
-
Remove chicken from oven and transfer to a cutting board, cover with aluminum foil and let rest for 20 minutes.
-
Cut chicken into serving pieces, place on the serving platter, and place the cooked potatoes and carrots along the sides. Drizzle pan juices on top of chicken.
-
Makes 4 servings.
* Choose a chicken weighing around 4 pounds. I prefer organic, free range chickens as I think they taste better.