Guidelines for Melting and Tempering Chocolate
Melting Chocolate and Tempering Chocolate are not the same.
It is not necessary to temper chocolate when it is used as an ingredient in a recipe. Tempering is necessary if the melted chocolate is to be used in a baked items or in a candy center that contain other ingredients.
Melting Chocolate – Important General Rules or Guidelines for Melting Chocolate:
The most important rule is not to hurry or rush when melting chocolate and always use low heat. DO NOT let the temptation to turn up the heat to try to hurry the process, as rushing the process will ruin the flavor and texture of the chocolate.
Break up, grate, or chop the chocolate into small pieces. The chocolate will melt fast and more easily if you do this.
Use a rubber spatula, not a metal or wooden spoon to stir the chocolate (wood can retain moisture). Use only rubber spatulas that have not been exposed to strong flavors such as tomato sauce or garlic.
Always melt chocolate slowly, at a low temperature. The melting point of chocolate is between 86 degrees F. (30 degrees C.) and 90 degrees F. (32 degrees C.), lower than body temperature.
Using high heat is very risky and the most common cause of grainy and/or lumpy chocolate. Chocolate melts better and faster when using lower temperatures. Never let the temperature of your chocolate get above 115 degrees F. Milk and white chocolates, which are more heat sensitive, should not be heated above 110 degrees F. Use an instant-read thermometer to check the chocolate’s temperature while melting.
 This is the type of cooking and meat thermometer that I prefer and use in my cooking. I get many readers asking what cooking/meat thermometer that I prefer and use in my cooking and baking. I, personally, use the Thermapen Thermometer shown in the photo on the right. To learn more about this excellent thermometer and to also purchase one (if you desire), just click on the underlined: Thermapen Thermometer.
Stir the chocolate slowly and gently and keep movement to a minimum.
Always melt chocolate uncovered as moisture can condense on the lid and fall back into the chocolate causing it to seize.
Before pouring the melted chocolate into another container, be sure to wipe the exterior of the pan or bowl dry to prevent water drips.
Water and chocolate do not mix. Remember, chocolate is an oil-based product, and oil and water do not mix. Be careful not to drip any water into the chocolate. Chocolate responds noticeably to small amounts of moisture by transforming it from a shiny, smooth texture to a lumpy, grainy mass (called seizing). That’s because there’s not enough liquid to moisten all the dry particles within the chocolate.
Please make sure any equipment you are using (pans or bowls) are perfectly dry, as any stray drops of water will cause the chocolate to thicken and stiffen.
See What to do if you make a mistake when melting chocolate below.
Methods For Melting Chocolate:
Double Boiler Method:
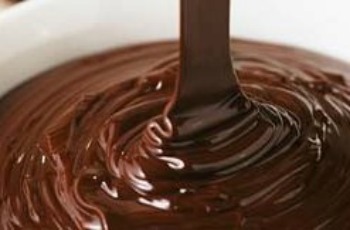
This is the preferred methods of melting chocolate. In this method, the chocolate is either broken, grated, or cut in pieces, melted over hot, simmering water, in a double boiler.
Definition of a double boiler: A double boiler is a specialized set of pans consisting of a saucepan that holds hot water, and a bowl that fits securely over the saucepan.
Chocolate is placed in the top bowl and allowed to melt over gentle, indirect heat. If you do not own a double boiler, any metal or glass bowl that fits snugly over the top of a saucepan can be used. Fill the bottom pan with just enough hot water that does not touch the bottom of the top pan or bowl. NOTE: The simmering water (not boiling) must never touch the bottom of the pan or bowl.
Either break up, grate, or chop the chocolate into small even pieces.
Melt chocolate slowly over low heat. Chocolate is very delicate and can become lumpy or grainy if overheated. Do not let dark chocolate get above 115 degrees F. Milk and white chocolates, which are more heat sensitive, should not be heated above 110 degrees F. Use an instant-read thermometer to check the chocolate’s internal temperature while melting.
Stir chocolate slowly and gently occasionally until melted. Begin stirring the chocolate with a rubber spatula when the outside edges start to liquefy. Stirring prematurely will actually slow down the melting process. When melting a large amount of chocolate, melt 1/3 of the chocolate at a time, allowing each addition to begin to melt before adding the next. Stir frequently to distribute the heat evenly.
Remove the pan or bowl from the double boiler as soon as the chocolate is nearly melted. Continue gently stirring until it is smooth and shiny.
Before pouring the melted chocolate into another container, be sure to wipe the exterior of the pan dry to prevent water drips.
Oven Method:
Either break up, grate, or chop the chocolate into small even pieces. Preheat oven to a low setting – no higher than 300 degrees F. (150 degrees C). After preheating, turn oven off.
Place chocolate pieces in an oven-proof bowl, place in oven, and let stand until melted. Use an instant-read thermometer to check the chocolate’s temperature while melting.
Microwave Oven Method:
Either break up, grate, or chop the chocolate into small even pieces. Heat the chocolate in a microwave-safe bowl, uncovered, to prevent moisture from collecting.
Place chocolate in the microwave for 30 seconds at a time on medium power until the chocolate is melted. Be very careful not to overheat it, as the chocolate may not look as if it has completely melted, because it retains its shape.
The chocolate should be only slightly warmer than your bottom lip. You may still see lumps in it once you’ve stirred it, but do not worry. The residual heat of the chocolate will melt it.
Do not rely on appearance alone when microwaving chocolate. The only way to know if it is fully melted is to gently stir it and use an instant-read thermometer to check the chocolate’s temperature while melting. Use a rubber spatula to stir the melting chocolate. NOTE: Do not leave in microwave until all the chocolate is melted.
Melt Chocolate with Liquids Method:
Either break up, grate, or chop the chocolate into small even pieces. Chocolate can be safely melted with a small amount of liquid, such as milk, cream, butter, or alcohol if they are placed in the pan or bowl together (the same time).
Chocolate should never be melted with very small amounts of liquid. The amount of liquid added must be at least 25% of the chocolate. This prevents the dry particles (cocoa and sugar) in the chocolate from binding together and becoming lumpy:
Chocolate with 55% to 60% cacao – 1 tablespoon liquid for every 2 ounces chocolate
High-percentage chocolates with 60% to 70% cacao – 1 1/2 tablespoons for every 2 ounces chocolate
Cold liquids should never be added to melted chocolate, as they can cause the chocolate to seize. Instead, ensure that your liquids are warm (but not boiling) when you add them to chocolate.
Plastic Bag Method:
Either break up, grate, or chop the chocolate into small even pieces and put it in a small plastic bag.
Place the plastic bag with the chocolate in it in a bowl of hot water; let sit until melted.
Once the chocolate is melted, cut off the corner of the bag and you can drizzle it on cakes, etc.
Chocolate Seizing – What To Do If You Make A Mistake When Melting Chocolate:
If you splatter water on melting chocolate or overheat the chocolate, it can be disastrous, causing the chocolate to seize or turn grainy. This happens when moisture, say a splash of water or a bit of steam, gets into the chocolate after it’s already begun to melt. Note that some recipes call for melting chocolate along with liquid. This is OK, as long as the liquid is added at the beginning. If that happens, here is what you can try:
Add a taste-free vegetable oil (canola, not olive), shortening, warm milk or cream, or warm melted butter by the teaspoon to the melted chocolate in a saucepan. NOTE: The liquids added to the chocolate must not be cold – best if warmed to the same temperature as the chocolate. Stir constantly until the chocolate returns to a smooth state. Use 1 tablespoon of liquid for every 6 ounces of chocolate; stir until smooth.
Chocolate recovered from seizing should only be incorporated with other ingredients to make sauces, frostings, or batters. It is not suitable for using alone, such as for coating candy or creating decorative curls (it will not have the same shine or delicate texture).
When tempering chocolate and seizing occurs, once vegetable oil is added it can no longer be tempered
Burnt chocolate is another matter. It is harsh, bitter taste will ruin whatever you’re making. Discard the chocolate and start again.
How To Temper Chocolate:
Chocolate is the secret to professional chocolate products. Tempering is necessary if you want to make professional-quality and looking candies and truffles, you must first learn how to temper melted chocolate. Tempering is a heating, cooling, and stirring process that induces the melted chocolate to set with a glossy surface and smooth texture. Tempering is important because it determines the final gloss, hardness and contraction of chocolate.
When you melt chocolate, the molecules of fat separate. In order to put them back together – you must temper the chocolate.
Why Temper Chocolate?
When you raise the temperature of chocolate above 91.5 degrees and melt it, the crystals of cocoa butter (all hard-saturated fats form crystals) melt and lose their shape. When the chocolate cools back to about 80 degrees F. it will harden again, but the crystals, having been rendered unstable by the rise in temperature during melting, will not automatically resume their previous shape. The result chocolate will look dull and streaky rather than shiny and its texture will be grains rather than smooth. Tempering is a process of manipulating the temperature of melted chocolate to make the cocoa butter crystals resume their previous shape so that the chocolate returns to the stable condition it was in before you melted it. – Source: Chocolate: From Simple Cookies To Extravagant Showstoppers, by Nick Malgieri
Purchasing Chocolate for Tempering: Always purchase high-quality chocolate for tempering. It will make a difference in your recipes. When tempering chocolate, it is best to use at least a minimum oft 1 to 1-1/2 pounds of chocolate, as any less will be more apt to burn.
Easiest Method for Tempering Chocolate: There are a variety of ways to temper chocolate, but the result is always the same. Chocolate is tempered when its temperature is between 84 and 88 degrees F. (29 and 31 degrees C). The below technique is the simplest and easiest way to temper chocolate:
You may use any of the above methods described for melting chocolate. Make sure the temperature of the chocolate rises to between 104 degrees F. and 113 degrees F. when melting. Do not heat above 115 degrees F. (milk and white chocolate) and 120 degrees F. for dark chocolate, otherwise it will burn. Chocolate, especially milk chocolate, is very sensitive to heat and will scorch or seize easily.
A easy chocolate rule to remember – the lighter in color the chocolate, the more easily it burns.
Chocolate Melting Temperature:
Dark chocolate – 115 degrees F.
Milk or white chocolate – 110 degrees F.
Personally, I find that it is best to just melt the chocolate until it almost melts; then remove from the heat source and stir until all of it is melted. This prevents the chocolate from burning.
Once the chocolate is melted, let the chocolate to cool to room temperature, off the heat, stirring occasionally until the temperature drops to between 84 and 88 degrees F. (29 and 31 degrees C.). You can tell this is happening when the chocolate starts to set around the top edge of the bowl. When tempering chocolate, it is essential to use an instant-read Cooking Thermometer to verify the internal temperature of the chocolate. I, personally, rely on a thermometer, which is foolproof.
This is the type of cooking and meat thermometer that I prefer and use in my cooking. I get many readers asking what cooking/meat thermometer that I prefer and use in my cooking and baking. I, personally, use the Thermapen Thermometer shown in the photo on the right. To learn more about this excellent thermometer and to also purchase one (if you desire), just click on the underlined: Thermapen Thermometer.
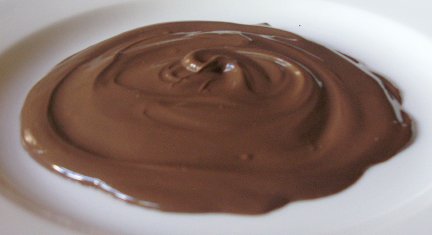
Testing Temper in Chocolate: Smear a thin sample of the tempered chocolate on a small piece of waxed paper and refrigerate it for 3 to 5 minutes. After that time, if the sample is dry to the touch and evenly glossy, the chocolate is ready to use. If it is dull or streaky, it has not been tempered correctly. If you mess up the temper, you can always re-melt the chocolate and try again.
Using Tempered Chocolate: When using tempered chocolate, you must keep it warm but not hot, ideally in the 85 to 88 degree F. range. You can either keep it over a pan of warm (but not simmering) water, stirring occasionally, or try placing it on an electric heating pad set to “low.” It is also important to stir often so that the chocolate remains a uniform temperature throughout.
Blooming Chocolate: Blooming is what happens to chocolate that’s not properly tempered – the cocoa fat rises to the surface and blooms (forms a thin layer of cocoa butter on the surface – like cream rising to the top of fresh milk), making it unappealing and unattractive. Chocolate that has bloomed is ok to eat and not ok to use in candy making.
Storing Tempered Chocolate: Tempered chocolate can be store for several months at a constant cool room temperature of 60 and 65 degrees F. (15 and 18 degrees C,). Do not place in the refrigerator, as the chocolate will bloom.
More interesting chocolate articles to help you in your baking:
Chocolate Glossary – Types of Chocolate – All chocolate is not created equal. When shopping for your chocolate look at the label to find the percent of cocoa butter contained in the bar. The cocoa butter is where all the flavor and texture is. The higher the percent, the better the chocolate.
Chocolate Substitution Chart – Need a quick substitution for chocolate? Here are some chocolate substitutions, but remember not always do they work as well as the original recipe ingredient.
Dark Chocolate – Dark Chocolate is Healthy Chocolate – It is The Best Medical News In Ages! Studies in prestigious scientific journals say dark chocolate is healthy chocolate
Learn about the History of Hot Chocolate – There is a difference between hot cocoa and hot chocolate. The terms are often used interchangeably, but technically they are as different as white chocolate and bittersweet chocolate.
Chocolate Clay Roses – These delightful chocolate roses can be used as edible decorations for a cake or to create a basket of blooms. So easy to make that even children enjoy making them.
Dutch-Process Cocoa vs. Unsweetened Cocoa – Learn about the differences between different types of cocoa
11 Responses to “How to Melt and Temper Chocolate”
peter paul baluyan
how would a freshly ground cocoa be tempered.? or should i say, could it be tempered? if true, when should milk be addded and what kind, powdered or.liquified?
Linda Stradley
Can anyone help answer this question?
Jack
The reason the question hasn’t been answered is because it doesn’t make sense. By definition cocoa contains no fats, thus it cannot be melted. There is no such thing as freshly ground cocoa, as cocoa is not a solid substance to begin with. You could no more have a solid block of cocoa than you could have a solid block of flour.
I hope that helps.
Jack
The article contains several errors. For one thing, it isn’t necessary to use a special spatula when tempering chocolate; a stainless steel spoon works just fine. It also isn’t necessary to use an expensive instant thermometer. I use a $10 digital thermometer; it just takes a few seconds to register the correct temperature. As for melting chocolate in a microwave oven, it’s safer to use low power settings for longer periods of time. 12 ounces of chocolate chips can be melted in under 10 minutes on 20-30% power. Once at the proper temperature, short bursts of 6-8 seconds on full power will raise the temperature several degrees, to allow continued stirring. For the novice chocolatier, I find using a microwave oven to be the safest and most reliable method for heating chocolate. It’s also important to work with around 8-12 ounces of chocolate at a time. Too little and it’s easy to overheat. Too much and it’s difficult to work with while maintaining the proper temperature.
Archana
How to save chocolate from melting & sweating. In India we have little hot weather so, we store chocolates into the refrigerator. Is it right? How to store chocolate?
Which coconut oil is best as only in winter we have solid coconut oil available. Rest of the seasons it is in liquid form. Thank you.
Tara
My coconut oil came melted and on its side in the mail but where I live it has solitified and remains that way year round. If the room temperature is hot enough to melt your coconut oil, I would say yes to storing chocolates in the refrigerator. Just make sure they are in an air tight container. 🙂
Kathleen
My granddaughter did a science project for school about the effects temperature has on chocolate she melted her chocolate in a candy melting machine she used chocolate chips 1/2 cup it was completed melted at 86 degrees. She had an instant thermometer which was great because she measured at very short intervals meaning 1 min 2 mins 3 mins and 3 mins 18 seconds which was when she observed all chocolate to be melted as when she stored before that there were still chips. So the chocolates was completely melted some time between 3 and 3 mins 18 seconds but was exactly 86 degrees she then made it solid by placing in refrig at 32 degrees and it went back to solid. I forgot how long but the thermometer stood straight up in the chocolate without anyone holding it . I have melted chocolate using double boiler then placing in a fondue pot. It was interesting to read the different effects temperature has on chocolate in the above article
Tara
How much heavy cream and butter would one add to a 4 oz bar of 100% bakers chocolate? Also could I add my sweetener to the warm butter and cream mix to dissolve the sweetener ( granulated lakanto) before adding the 4 oz pure chocolate to the mix? I have been looking online for quite some time, any advise would be appreciated. I want to make a coconut bounty/mounds type treat and I’m wondering if this will work. TIA
Mahima
I make chocolate with cacao butter, cacao powder,powdered sugar & milk powder on double boiler. Why does it result in grainy mixture?
Nancy
Your chocolate has likely “Seized, usually because it has come in contact with water in some way. Maybe it was in your pot when you started? Google Seized chocolate for more information.
pauline p
People seen to mix up cocoa with cacao.
Cacao beans grow in husks on trees and when the beans are taken out of the husks and sun dried they can be milled and moulded into a lump… or I suppose slab. I saw this happening in Peru inland. This can be used for drinking…
Cocoa on tje other hand as someone already pointed out has undergone a process to separate the cacao powder from the cacao butter . Notice the different spelling.
Coconut oil is from coconuts.