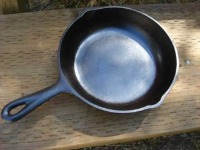
Techniques for Restoring an old Cast Iron Skillet
Self-Cleaning Oven for Cleaning Cast Iron
How To Use Your Self-Cleaning Oven Top Clean Cast Iron Pans:
Lower both your oven racks to the two bottom positions in the oven.
Line the lowest rack with aluminum foil (to catch any drippings from the pan).
Place the cookware upside down the the top rack in the oven.
Bake for 1 hour, turn off oven, and leave the cookware in the oven until it is cooled.
Check out all my web pages on cast iron pots, kettles, and Dutch ovens: The Irreplaceable Cast Iron Skillet
WARNING FROM A READER!
Question:
I was looking for a technique to clean some very dirty cast iron pans and found your site “What’s Cooking America
I tried the self cleaning oven technique one time and I wanted to let you know about my experience. My mom had told me about this so I thought I would give it a try. Well, you know how the door locks when you self clean? I put a pan in the oven that had been thoroughly cleaned; however, I must say it was thoroughly blackened with who knows what. It actually caught fire. I did not know what to do besides turning off the breaker. Even this did not unlock the stove. So, I patiently sat in front of the stove with a fire extinguisher until it burnt out. Talk about being nervous.
I read through all the comments from other readers and I did not really see anyone talk to much about the dangers of cleaning those baked on cast iron pans in an oven that locks. Just thought you might want to mention it. I am going to try to put them in the oven at 450 degrees F. today rather than use the self cleaning cycle so if it does catch fire I can promptly throw baking soda on the darn thing. Found your website very informative and will visit again. – Angie (2/23/08)
Answer:
Oh my goodness!! I will definitely add your comments to my web page. How did you cast iron pan turn out?
Feedback:
Well, the one I did that day I did not finish because of the fire incident. I did one today with the oven on 550 degrees F, and after 3 hours it still looks bad. My mom just reminded me of something she remembers trying. She said she used to spray them with easy off and then put them in a closed plastic garbage bag for a day or two. So, I’m gonna try this and I will let you know how it works on my extremely baked on black Griswold.
I had the exact same experience as the incident described on the”WARNING FROM A READER!”
I found out quite soon, that I had applied too much vegetable shortening, which caught on fire rather soon, since it’s Smoking Point Temperature could be as low as 360F. When I finally could open the oven door, I removed the aluminum foil, and repeated the process again, this time with no fire eruption. – Alejandro Fuentes, Chipley, FL (7/5/10)
Comments from Carolyn (12/11/12):
I have been reading your articles on cast iron and on the pages that discuss seasoning the cast iron, several people commented that they couldn’t season the cast iron in the oven because of wooden handles. Just thought I would mention that the wooden handles will come off. The ‘hanging ring” on the outside of the handle will “unscrew”. The wooden handle is held on by a long metal shaft that feeds through the wooden part and screws into the pan. Just stick a rod (a screwdriver is perfect!) through the ring and turn it to remove it.
Comments from Phyllis (9/11/12):
I just wanted to thank you for the great site about iron ware. I bought 3 old iron skillets at an auction. The largest one, an old SMART Diamond G from Brockville, Ontario, 8″ (I think – there’s a number 8 on the handle) was the one which had been obviously best loved and used, going by the heavy crust of goodness knows what, which covered the sides and bottom and some of the inside.
After reading a good deal of your site and other reader’s comments, especially the woman whose pan caught fire during the oven-cleaning method, I decided to try a combination of two different ways. First I used the oven cleaner method and put the skillet in a plastic bag, thoroughly soaked it with oven cleaner and left it for 2 days. Some of the crud came off easily and some of it I scraped off with a spoon. It still looked pretty bad. I cleaned it thoroughly with soap and water and decided to try the self-cleaning oven method. How amazing the result!
I have to admit that I was a bit apprehensive about using the self-cleaning oven method for 2 reasons – one was the ‘fire’ story and the other was simply that I had never used a self-cleaning oven before. I am so glad that I got over my fears and did it. All 3 skillets look a 100% better. Now all I have to do is take off the light rust,season them and start using them. I Cannot wait!
P.S. The other 2 skillets are marked: Japan, then the numbers 2 and 8, separately – both numbers in separate circles right underneath the word JAPAN. Then 01-6 and the number 4 underneath that. The other is TAIWAN, 8 INCH SKILLET and then the number10 underneath the word TAIWAN. Can you recommend a site where I can research these? Thank you in advance.
Comments from John of Florida (5/04/10):
A couple of notes on cleaning cast iron after reading the site. Any of those methods will work. I cleaned 6 old rusty pans today and used the self cleaning oven followed by a wire brush wheel on a drill.
If my sandblaster was all set up I would have used it instead of the oven/wire wheel, however the blasting sand that is most common is Silica sand and silica is not good. Poison actually. I do not know if enough could get embedded into the cast iron and later into the food to do any harm but better safe than sorry.
A cheap and safe alternative is play sand that you can get at any home improvement center and some hardware stores, to fill the sand box for the kids. It does tend to have some chunks in it that will clog a sandblaster every 5 minutes, so it is best to run it through a piece of window screen to filter it. It is actually a little cheaper than blasting sand where I shop and definitely cheaper than ground walnut shells which are like 80 bucks a pound. (That might do one pan).
As for using salt for cleaning, especially between uses. I have heard that a few times but never a reason why except for coarseness. Then as I was reading it on your site it dawned on me. (I think) Salt has been used forever for curing and has the ability to kill germs. I could be wrong as I am just guessing but I am thinking this is an “old school” method for cleaning and sanitizing cast iron at the same time. Back when soap was a luxury, dishwashing liquid was non existent and lard was pure unprocessed pork fat. (pork fat rules)
Well, time to go pull the pans out of the oven and admire the hard work and first seasoning.
Comments from Leonarda Brusy, CA (2/27/10) on using self-cleaning oven:
Thank you so much for having such a wonderful web site. I bought four (4) cast iron frying pans yesterday at a thrift shop. After trying unsuccessfully to clean them, I looked on the internet for an answer. That is when I discovered your great site.
Last night I put them all in my oven, opened our windows, turned on the oven’s automatic cleaning cycle, and went to bed. This morning I got up, took the pots out of my oven, cleaned them with cleanser and sponge, and then with steel wool. Now I am ready to season them. They look great! Thanks so much for the advice and printing comments from others.
Mike Stoianoff of Anchorage, AK (5/28/09) sent me the following comments on using the self-cleaning oven:
Pursuant the articles on caring for cast iron cookware, I found that one simple way to clean years of crud off cast iron cookware is to place the item in a self-cleaning oven, set for two hours. When the cleaning cycle is over and the oven can be opened, the item can be removed, the ash can be removed with a damp sponge, the item dried and it is ready to season.
Comment: I have a lot of cast iron cookware some darting back 100 years. Today Lodge is the only remaining company making bare metal cast iron cookware. The problem with “Lodge: cast iron cookware is that the internal (cooking) surfaces are not smooth like old Wagner Ware cast iron cook ware, and other cast iron cookware companies bought out by “Lodge” This make seasoning “Lodge” cookware very difficult. It takes about two hours with a grinder to remove the rough coating left over from the casting process. My grandmother, from home I inherited a lot of my cast iron would never buy the poor quality cast iron cookware sold by “Lodge” today.
My best cast iron is Wagner-ware and Griswold. All cooking surfaces on these brands are ground or machined smooth. Even poor quality light-weight cast iron cookware made in Taiwan and India in the 1950s has smooth cooking surfaces produced by tumbling the cookware in abrasive slurry like a rock tumbler. Thus what was considered poor quality cast iron in the 1950s is higher quality than Lodge cast iron in 2009.
In my opinion “Lodge” cast iron cookware is crap that they can sell only because they have no competition.
Costco and many other companies sell anodized cast aluminum sets of cooking pots and pans, but none with metal covers that could be used as a Dutch-oven. Most have glass covers with plastic knobs that will melt or burn in a hot oven.
David Westbrook (1/03/09) sent me the following comments on using the self-cleaning oven:
After reading your section on cast iron pans and cleaning them, I have some information you may want to know.
I have eaten from and cooked on cast iron for 50 years. I have found nothing else in cooking to replace them with. Teflon will not hold up to constant use and to me things don’t taste as well cooked on a thin aluminum pot/pan as they do in cast iron. Plus Teflon needs to be replaced often if you want real non-stick, and that cost’s unnecessary money once a year for good cookware.
I have cleaned cast iron in a self cleaning oven and let it go full cycle. For cast iron pans found in flea markets, abused or just long used, this is a good way to go but drastic for common cleaning. Example, my mothers cast iron ware that never had a good cleaning other than wash and wipe down for 35 years with a very heavy crust on the bottom.
If you go this route then a few notes:
Be confident of your vent hood’s ability, and it should vent to the outside. You will have smoke! You can also leave the doors and windows open weather permitting. Treat your cast iron well and you will maybe need to do this once every 5 years.
If you use aluminum foil you will find it “if you do find it” melted on the bottom of some ovens “mine will melt aluminum.” Also do not clean aluminum pots like this, and Teflon will make a poisonous gas.
The extreme high heat will reduce any organic matter to a fine ash that’s easy to wipe up if you go full cycle. So do it when you need to clean the oven anyway. The door will lock until the oven cools down as a safety measure. You do not even want to think about getting it open while it’s this hot. “Near red heat!”
For abused ironware, the high heat will relieve long built up stress in the metal and prevent cracking in the future. If it already has a crack though this can finish it off, but you do not want a nearly dead pan breaking on your stove with a load of hot grease anyway! If you see a crack just hang it on the wall as a decoration please!
If it’s a collector piece do not do this, original condition is best. If it is a user go for it. Other than some rust and rust pits it will be like factory new and need complete re-seasoning.
Kristin Doyka (6/08/08) sent me the following comments:
I just had to write and say thank you. I recently got a hold of my mothers cast iron pan’s and needless to say they were in bad shape. I found your website on a Google search and found it so helpful. I used the self-cleaning oven method and WOW did that do the trick! I wanted to send you some photos. She cooks like a charm now. Thanks again.
John F. House (10/22/08) of Richmond Virginia sent the following wonderful idea on using the self-cleaning oven with unglazed tiles:
There’s a way to avoid the dilemma of foil melting/welding into the oven interior versus buying a new oven floor to use when NOT seasoning iron ware. It is a whole lot cheaper and has advantages for bakers. Find a local source for plain UNGLAZED tiles. If your local retail stores do not carry them, they can tell you who the wholesalers are that have this item. Buy enough to lay out side by side covering one of your oven racks, and leave an inch or more around the outer edge for heated air to move through the oven. Put this rack in the lowest oven position. You can put the ironware on top of these and crank up the cleaning cycle. The tiles need to cool down just like the iron will, of course – just leave them in the oven for a while.
Any grunge that comes off the ironware onto the tiles will come off in the dishwasher if you use one. Ditto for overflow from pie fillings, etc. when you’re cooking in the oven. Or, just wash the tiles by hand and forget about how they look as long as there is no residue that you can remove with a little scraping and soapy water.
The good points are:
The tiles are cheap and if not dropped, banged on, or put into cold water when hot, they usually will not break. If they do, replacing is cheap, so just buy a couple more than you need and you’re good for years.
They are small and flat, usually about four to six inches on a side and less than a half inch thick, so they store away easily.
They do not even notice your oven temperature – they are baked in industrial kilns to make them, much hotter than your oven can get. So, you could leave them in during oven cleaning cycles and burn off any residue.
If you leave them on a rack in the lower slot of your oven, they serve as a heat sink; it will take a quarter hour longer to bring your oven up to high temperatures than without them, but once they are heated, it also takes longer for your oven to cool. For some things, that is a nuisance, so slip them out. But for things like baking pastry, cakes, or bread, where you want steady even heat without your oven turning off and on and off and on with it’s thermostat while you are baking, they are wonderful. You COULD buy an expensive large flat clay baking tile, but why? If you want to, you can even slide your pizza or bread dough onto the tiles with a peel once they are hot. You will be afraid that the dough will drip down between the tiles like water– but if you are baking at 400 degrees F. or higher, which works best for artisanal breads, flatbreads, pita, or pizzas, the good news is that the dough seals virtually instantly when it hits the hot tile, and there’s no drip even if the tiles slide apart slightly when you slip the dough onto them. Really. OK, if you slam it around and make a whole inch of gap, it’ll sag through and make a mess, so just practice a couple of times and be gentle! Tiles are a heck of a lot cheaper than using (or Heaven forbid, having to replace) a chef’s store large baking stone.
Jeffery D. Skinner (3/21/07) sent the following comments on using the self-cleaning oven:
First off, I love the information you have on your website. I was looking for information on cleaning some very heavily carboned up cast iron skillets when I came across your site.
First I had tried to scrape off the gunk, but it was rock hard. Then I put them in my trunk and finally yesterday they had the sand blaster out. I took them out to see what that would do. It got off the lighter stuff but the thicker stuff was taking too long. They finally gave up.
So I came home and took my dremel tool with a sandpaper drum to it. That worked, but the resulting mess was awful. I was covered in a fine black powder when I got done. That was only on one 8″ pan. I had another 8″, a 5″ and a 12″ to do.
There had to be an easier way. I came in and found your site and the information on the self cleaning oven. So I figured I did not have anything to loose and put them in to bake. These were my in-laws pans and over the years have cooked many pans of spaghetti sauce and pork chops. I don’t think they were ever seasoned right to start with. Anyway I got up this morning and opened the oven and all the hard baked on gunk was just a white to rust colored powder, with plenty in the bottom of the oven. I took them to the sink and hit them with steel wool and a green 3M pad. They were just like new, nice and smooth except for a few pits and imperfections in the original casting. I dried them off and put them on the stove burner to make sure they were good and dry, then gave them a light coat of olive oil to protect them until I can season them again. I just could not believe that the 50 years of hard gunk, a sandblaster couldn’t even get off, came off like nothing in the oven. One note, make sure you can vent the kitchen well if you do this. It looked like our kitchen was on fire from all the smoke and I had to put a fan in the window to exhaust it.
Thanks again for the great information on your site. It saved me tons of work and our pans!
Linda M. Suarez-Ioia (8/29/07) sent the following comments and warning on using the self-cleaning oven:
I decided to do the oven cleaning method. My husband took all the racks out of the stove (didn’t want them to discolor) and since we have no heating element on the bottom, we laid the foil on the bottom of the stove and placed the pan upside down on it.
We turned on the self clean cycle (which cannot be adjusted to less than 3 hours) – the door locked and we were on our way. The fumes started in about 20 minutes and we had the blower going and all our windows and doors open because I have asthma and couldn’t handle the odor. We had no smoke, just odor. We canceled the cleaning cycle after an hour on the timer and waited for the stove to cool and unlock. One look at the pan and I saw that this method works very well. I probably should have left it in a little longer, but most of the gunk came off and I could not handle the odor anymore. I waited for it to cool and took steel wool and soap & water and cleaned off the rest of the mess. We dried the pan and then seasoned it. It looks almost new!
Now for the bad part – ( I went to remove the foil from the bottom of the stove and part of it was stuck. I got most of it up but there were several spots I couldn’t get the aluminum foil off of. I scrubbed and rubbed and even tried to use a plastic scraper and could not get it off. My husband was surprisingly calm as we tried to get it off and took it quite well that the enamel actually peeled off the stove along with one of the pieces of foil. The foil literally fused to the enamel in some spots – there was no removing it without doing more damage. So, we left it alone, went to bed and in the morning my husband announced that he was going to order a new bottom (it is a brand new GE stove by the way) which he did today (cost $60 plus shipping). I should have just put the pan on the rack in the first place or used an old rack placed on the bottom, but I had no clue this would happen to the stove.
Please caution your readers and put this information on your website not to put the foil on the bottom of the stove because of the potential damage it can cause. I would like to prevent it from happening to someone else. I am not sure if anyone else has ever had this problem or not, but better to let them know even if it seldom does.
Nevertheless, lesson learned and I now have a clean frying pan. I intend to do the Dutch oven next (BEFORE) my husband replaces the bottom of the stove. All in all, it is a very effective method for cleaning the pans, it would have been a perfect success if not for the stove dilemma.
Question:
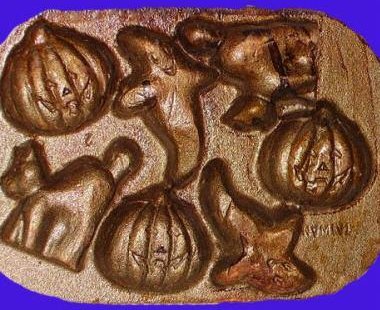 I recently bought a cast iron baking pan from an EBay auction. It is for Halloween and has cats, pumpkins and ghosts. The pan was used, but not well taken care of. It had a few spots that were getting rusty and it had gooey spots in all the crevices.
Needless to say I need some deep cleaning ideas for this pan. What can I use to break down the goo and what would you recommend for getting into the tight spots? I noticed the outside of my regular cast iron pans get these sticky goo spots too. What is it and how can I avoid them?
Halloween is just around the corner and I’d love to pop out some fun Halloween cornbread with a autumn soup after we set out to decorate the yard. Any help is appreciated. – Kathy Saucier (9/26/06)
Answer:
Using the self-cleaning oven method might be the best for you: https://whatscookingamerica.net/Information/SelfCleanOven.htm. You might also have to do some additional sanding.
Feedback:
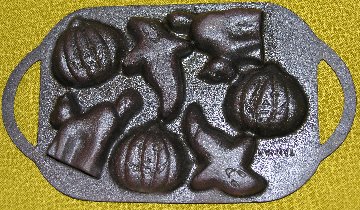 Well I gave the self-cleaning oven treatment a try, the oven needed cleaning anyway! What a difference! I have a cast iron Halloween mold that I got on EBay. It has cats, pumpkins and ghosts. Lots of nooks and crannies! When I received it I was worried. Lots of old gunky goo and dust settled into the crevices. I tried a good washing, with soap and very hot water. About 80% came out, but the last 20% was horrible. The self cleaning method really did wonders. The only thing left was a bit of rust way deep down. I took Pam and lightly sprayed the nooks and went after it with Q-tips. They got way down and removed all the rust! I blotted with a paper towel and repeated till the Q-tips were virtually free of rust color. I reseasoned and it looks GREAT! I am ready for some wonderful Autumn soup with little Halloween cornbread muffins. The kids are decorating the yard and this will be a treat for them! Thank you for your help! 🙂
Maxine Sullivan (9/02/06) sent the following comments:
Quite a few years ago, I cleaned my cast iron frying pan in a self-cleaning oven. It worked well—too well! I would NEVER again put one of my pans in a self-cleaning oven. The “like new” finish some of the writers talk about means that it takes a lot of seasoning and frying to get those pans back to a nonstick finish. New is not what you want when it comes to cast iron! In my experience—I grew up with cast iron pans and have cooked on them through 38 years of marriage—a simple re-seasoning does NOT make a pan nonstick. It seems to take several seasonings, followed by a year or so of daily use. This was especially true with the Lodge pan–with a pebbly finish—that my son has been using for about 8 years.
If you have a self-cleaning oven, you can leave the racks inside while the cleaning cycle is on. The racks will darken and discolor slightly, but it doesn’t create any problems. The ash that falls to the floor of the oven can be easily wiped up with a damp rag.
I used your sandpaper technique to clean a rust-stained pan I found in one of our rentals. Seemed to do the trick, and did not remove all of the seasoning…which is what I wanted. I re-seasoned it (and will do itagain) as a housewarming gift for a young friend. It has a smooth surface and a ridge all the way around the bottom, like Lodge, but no markings whatsoever.
I cannot stress enough the importance of pre-heating the pan and not cooking on too high of heat. Thanks for your very informative website.
Carla Shaffer (4/02/06) of Iowa send the following information:
I have quite a variety of sizes of cast iron skillets mostly collected from second hand stores and garage sales. Many years ago, I read in a magazine to set the skillets in an electric oven when you are planning to use the self-cleaning cycle. The high temperature turns ALL the black crusted grease (inside and out) to ashes.
It is so simple, but don’t be shocked when you open your oven, the pans will be coated in a film of rusty ashes. Just rinse and scour lightly any rusty areas with a nylon or steel wool pad, dry immediately and proceed to seasoning your new pan. Hint: When you oven cools use a vacuum hose to suck up the ashes.
Gina Lettieri (3/21/06) of Fort Lauderdale, Florida sent the following information:
I am a frequent user of cast iron cookware. Old Griswold is my favorite and I have several pieces that were my Mums and G’mothers so they go way back. Because they were always kept well seasoned, they are in what I consider perfect cooking condition.
I have had these two old and very corroded looking Griswold cast iron skillets sitting in the garage since I picked them up about 2 years ago at a yard sale. For sure they were yucky, bumpy, and rusted.
“Were” is the key word. This morning I came across them and was about to pitch them out when I remembered reading about the self-cleaning oven method and you asking for feedback.
Figured what the heck, I will throw them in the oven and see what happens. I put both skillets bottom up on the middle oven rack. There was some smoke coming out the stove vent and I did put the exhaust fan on for a period of about 1/2 hour or so to keep the smoke moving outside. My stove has an automatic self-clean cycle that runs a little more than 3 hours.
When all was cooled down and the safety latch released, I opened the oven door and thought “this was not a good idea” because there was dusty rusty stuff all over the skillets and on the bottom of the oven. I did not put any aluminum foil on the bottom because I know it can actually cause fire at high temperatures and did not want to screw up my oven. BUT once I took the pans out and gave them a good wash and brillo cleaning they were like grayish when brand new & and smooth as could be…I was AMAZED! I did not have time to season them so I just rubbed a quick light coat of PAM original on them to protect them till I can season them tomorrow night after work.
The rusty looking dust cleaned up easily off the oven bottom (there was a pretty good amount), gave it a good wipe over and it was clean as a whistle. (If I had a shop vacuum handy it would have vaccumed up with ease.)
In my opinion the self-cleaning oven method works GREAT and would recommend it over the EZ Off and other methods. In the future if I come across any grungy cast iron cookware cheap I will not hesitate to buy it and I will always give it a good soap, hot water, brillo scrub, dry it, and put it in the self-cleaning oven cycle first before anything else. WOW!!!!!! Season your cast iron cookware right and it will serve you well for all seasons of many, many years.
Aleta Shea (3/02/06) sent the following information on using a gas oven:
This is in regards to cleaning cast iron in a gas oven using the self cleaning feature. I found it did a great job on the pan but messed up the finish on the bottom of the oven where I sat the pan upside down. I used tin foil which stuck to the bottom but will peel up with some work, the bottom is etched in sprays.
The others did not mention any damage to the oven bottom as I have experienced. My stove is a gas Amana range. Just a word of warning to those thinking of trying their self cleaner to clean cast iron pans. The good news is I can replace the oven bottom and keep the old for any future cleaning. Thank you for all the info you have provided, it has proved very interesting to me.
Question:
I discovered your site when searching for a Dutch oven. I have an old skillet which is dark in color and there is some rust. It was a wedding gift 40 years ago. I do not think I used it that often but here is my question.
Should I put it in the self cleaning oven which goes for 3 1/2 hours at very high temp? I should tell you that I scrubbed it with hot soapy water to clean and remove rust. I then dried it on my electric stove top. The self-cleaning method sounds too easy and I do not want to destroy the skillet. What do you recommend? Thanks for your help. – Audrey (12/18/05)
Answer:
As you read on my cast iron web site, there are many great methods for seasoning your Dutch oven. You can not hurt or ruin your pan, so give it a try. Just remember, that you can always re-season with a different technique if this doesn’t work the way you want.
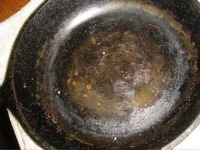
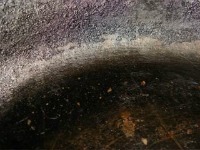
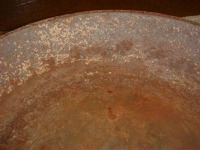
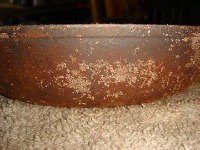
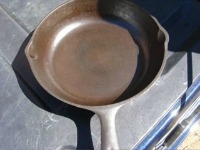
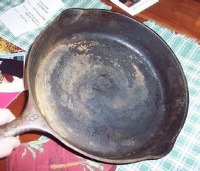
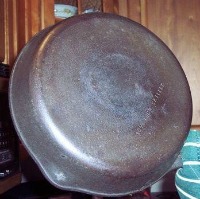
Feedback: Audrey: The below photos show the before and after the self cleaning oven. My husband then scoured it with steel wool.
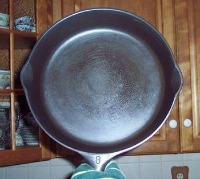
Your pan looks beautiful now! Question – Did you leave your oven racks in when using the self-cleaning cycle? I recently had a question about this, because their instructions say not to leave oven racks in when using self cleaning mode.
Audrey: I did remove the shelves. I put aluminum foil on the bottom of oven but there was no residue on the foil. I think my husband’s ‘elbow grease’ with steel wool did the trick. I do not think I would use the self clean oven again, as I read that high heat could warp or crack the cast iron. It did not happen to my pan.
I roasted a chicken in the oven using an old Griswold Dutch oven. I used a recipe on the Old Bay Seasoning can for the rub. It was delicious and so moist – and to think after all these years of marriage I never thought to use the Dutch oven. I just bought a Lodge Dutch oven for my daughter for Christmas. Merry Christmas!
Question:
Oh how wonderful to find your site! My four cast iron skillets have served me faithfully for 57 years. I always wash them and have had no problems. Somewhere in the past I did season them and two days ago decided I should do them again. Well, I used Olive Oil, as that is what I cook with, turned the oven to 450 F. and baked the skillets for 45 minutes per directions in a cookbook. What a mess! My beautiful trusty skillets look awful and have a sticky feel on the insides. Thank you for the advice on your page. I will try the ‘oven cleaning’ method as steel wool is not doing the trick. Food has never stuck and they brown food beautifully. It is difficult to find iron skillets with the smooth inside surface. However, my daughter does like the one with the pebbly inside surface that I bought her. Then I found her an old one so she now has two. – Patricia (12/13/05)
Answer:
I use olive oil when seasoning my pans. Your pan sounded like it do not need re-seasoning, as it was working great for you. Following is what I do after using my pan:
Every time, after I use my cast iron skillet, I do the following
1. Wash it with soap and water (do not soak)
2. Lightly oil inside of pan.
3. Place on hot burner of stove for a few minutes. Remove from stove and wipe excess oil off the pan with a paper towel.
4. Store. If you need to place another pan on top of your season cast iron pan, place a paper towel between them. I hang mine from my pan rack.
Feedback:
Thank you for the note. I agree that I probably did unnecessary work which required much more work. However, the oven cleaning worked great, but the skillets were covered with a rusty powder. Washing in hot soapy water, drying as I usually do, greasing with Crisco, etc. brought them back to their splendor. I used my #9 tonight and it was great. I plan to find an older Dutch Oven for my one daughter. I do not care for the inside pebbly surface of the new ones on the market.
Question:
I really appreciate your HUGE knowledge on cast iron, cleaning in particular. I picked up a cast iron John Wright teddy bear muffin pan at the thrift store. It is got lots of nooks and crannies that are rusting inside. These are hard to scrub at by hand. It is a very intricate teddy pose. Will time in the “clean” cycle of the oven burn the rust off, or just left-on food? And when seasoning something like this, would you season the whole thing, back side included, every time? Thanks for such a useful website, can hardly wait to try some of your recipes! – Lynette (11/12/05)
Answer:
I, personally, have never tried the cleaning cycle of the oven, but other people seem to recommend this technique. This does seem like the technique you should try with the intricate design on your cast iron. Please let me know how this works for you if you decide to try it.
Yes, I would season the inside and outside of your muffing pans for the first seasoning. After that, you probably would only need to season the insides. I do hope this works for you, as you have found yourself a treasure.
Kari (10/07/05) sent the following information:
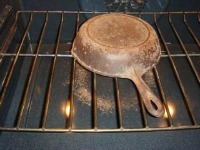
I was reading all the advice on restoring an old pan. Someone was asking if you could put them in a self-cleaning oven. I did this with two of the really small ones that I don’t really use to see what it would do to them before I try it on my Grandmas pans. It worked I could not believe it they look brand new a medium grey color. I put them in the oven clean with no lard on them and my oven cleans for 3 hours. Then I washed them with a soapy steal wool pad and re-seasoned them in the oven.
Patricia Regan (1/18/04) sent the following information:
Hi, I just wanted to share with you how I clean my cast iron skillets. I put them in a self-cleaning oven upside down and clean for 3 hours. My oven and pans are like new. My sister could not clean our Mom’s skillet that was very old. I cleaned it in my oven and it looks like new. I re-seasoned them after cleaning. I could not believe all the burned ash from these pans that was left in the oven. Hope this helps someone. It requires no physical work.
25 Responses to “Self Cleaning Oven for Cleaning Cast Iron”
djordan
I want to HI-LITE some important tips when using the self-cleaning oven to clean their cast iron. They are stated below here and there, but some I read after starting the oven.
1. There will be smoke!!! Make sure your exhaust fan works or/AND have ready, some additional fans to pull smoke out through open windows. Be sure to ventilate!! I left the kitchen 15 mins after starting and came back 10 mins later to a smoke filled room. which is especially toxic for my lungs. I had to open up the whole house and run several fans to clear it out and then left it that way until cycle was complete. (I had been using my pans and they were in pretty good shape. I just wanted to start fresh with a healthier oil.)
2. I used to keep aluminum foil on my oven bottom to catch drippings. Sadly, I learned from experience that my oven gets to temps that melt aluminum foil, so I do not put it on the bottom anymore. The self-cleaning temps get extremely hot and will melt the foil.
Carol Morrison
The instructions with my self-cleaning oven warn you not to put foil in the bottom and to remove the racks. I would love to try using it to clean my iron pans – Since there is no exposed element at the bottom of the oven, can I simply leave the pan on the bottom?
RCrawford
Carol, My oven instructions say it is OK to use enameled racks in the “clean” cycle. These racks are a dark color and not shiny. Exposed metal (shiny) racks are not recommended.
Robin
I would love to know the same thing – can i just put the pans on the bottom of the oven?? I don’t want to use foil and I don’t want to put a rack in during self cleaning cycle.
Elizabeth
I put 2 bricks on my oven floor and balanced the fry pan (upside down) on the bricks. Worked well.
RCrawford
Carol, you can only leave racks in during the cleaning cycle if they are enameled. If they are shiny, they are not enameled. I would not put them on the bottom.
RCrawford
Carol, you can only leave racks in during the cleaning cycle if they are enameled (they are dark in color). If they are shiny, they are not enameled. I would not put them on the bottom.
Staley
I would like to try my self cleaning oven for an old cast iron pan I just purchased.
No-one has mentioned gas vs electric oven???? Mine is gas. If it locks and goes a lot further past suggested time for pan, any recommendation??
I also have the shiny racks, so what is recommended as the heat comes through the bottom of the oven?
Linda Stradley
I do not have a gas oven, so I can not answer this question. Can readers help with this question?
Tracy M
I just bought a pre-seasoned cast iron pan (new). From what I’ve read, it looks like I should strip the seasoning and reseason. Can I strip the seasoning from a brand brew, clean pan in the self cleaning cycle in my oven? Or is that only for pans with old food gunk?
Thanks!
Linda Stradley
Please read Pre-Seasoned Cast Iron Pans
Gordon Barber
Hi:
A warning regarding self cleaning with non-enameled racks from Samsung:
“We do not recommend leaving the oven racks in the oven during the self-clean cycle. The racks may warp and discolor due to the extreme heat created during this cycle. The racks can also damage the rack guides of the porcelain oven cavity due to expansion and contraction.Jul 22, 2014”
Also, to prevent any major fires, try to clean most of the residue off first before putting pans in the oven on self clean. I used a combination of easy-off, a durable dull knife with a rounded tip to act as a scraper then some brass wire wheels in a drill. Spent a good hour prepping the pans for the self clean but worth it.
shayne
I inheritated a wonderful iron skillet I believe belonged to my grandmother. As far a cooking with it, it is great but the outside was heavily coated with…”age.” lol . A good friend suggested I place it in my self-cleaning oven, upside down to clean it. I placed foil below it to catch any drippings. The cycle on my stove is for 4 hrs. I just set it and forgot it. After it had completely cooled, I took it out, dusted it off, and it was perfect, ready to season. My question is, it needs to be cleaned to remove the dust, but I didn’t know – to wash with water first or season the “fresh iron” before I washed it.
shayne
The outside of this pan was so heavily coated. It aLL came off clean – no scraping at all.
shayne
I personally would never use chemicals on porous cast iron. Doesn’t that leach into your cast iron? My dad told me his dad would just build a wood fire and place the cast in the fire and leave it until the fire was cold.
Tiffany Adair
My personal experience: the aluminum will combust when put to flame. I lined the bottom of my oven to protect it and it effectively “cooked” to the bottom and I cant get it off. I think a lot of my smoke was from that. I do scrub my cast iron with a wire pad to get off as much of the caked on grease before putting it in the oven to reduce smoking as well. I was able to end the cleaning cycle early by just hitting cancel/end. It took 20 minutes to unlock the door.
Jimjr
I have a lot of cast iron that’s been laying around for years. Do i have to try and get as much of the rust off before using the oven cleaning method. I don’t want to do anything to hurt the metal. If i need to remove the rust what are the best options for removing it thank you for the help
Terre
JimJr: The rust turns to powder after time in a self cleaning oven that you can brush off with your hand, though of course the skillet should be cleaned with water and a scrubby, then dried, then seasoned.
To season the cast iron, I warm the skillet a bit and then coat it with a liberal amount of coconut oil (flaxseed oil is supposed to be best, though avocado or canola oils have a high smoke point and can be used too). Then I wipe the oil off and bake the skillet at 350* and then do it again once or twice until I get the beautiful dark color. If you don’t wipe the oil before you bake the skillet, it will leave it sticky.
Baked on grease will flake off easily after a turn in a self cleaning oven. If you have rust and baked on grease, just do the one cleaning cycle to get it all off. Then wash the skillet with water and a scrubby, dry and season. I also use salt to scrub the old grease off, and just add more salt when it absorbs into the water (without rinsing) until it’s clean.
I do not use steel wool because it can microscopically scratch and pit the iron, which can mar the smooth finish I’m going for. You don’t need it anyway, as the scrubby and salt are enough after a self cleaning cycle without a lot of work.
Jane Cyktich
Can I put my cast iron stove greats into my self cleaning oven. I have a gas stove, with wire racks.
E. Beukelman
I have a tip for formerly-shiny oven racks that have darkened and gotten hard to slide after using the self-clean cycle: wipe a very thin layer of oil on the sides that come in contact with the oven rails when you are seasoning your pans. I used flaxseed oil, so I can’t say every oil would work as well. My racks now slide like new.
Brenda
One time I placed an old coffee mug in the center of my oven floor, then inverted the skillet on the mug. It worked fine in that electric oven back then. Now I have a gas oven. Would that same method be safe to use in the gas oven???
Thanks!
Karen Telles
FYI…Per Lodge Customer Service- “Steam self-cleaning ovens are not advise as too much moisture will cause cast iron to rust”. I hope this helps. It saved me from ruining my new Lodge Dutch oven.
After many videos and articles, I will sand mine with a Mouse 80grt. What then? use a steel wool and wash off with warm & soap? Thanks in advance for the tips.
Jessie
If something catches on fire in your oven, DO NOT OPEN THE OVEN. The moment you open the door a fresh burst of oxygen enters the oven and the fire will leap up with new and sudden force, probably right out the only opening of the nice metal box it’s been stuck in until now, directly at YOU through the open door.
1. LEAVE THE OVEN SHUT
2. TURN OFF THE OVEN
3. Stand by with a CLASS B fire extinguisher, which is rated for grease fires. Do not use a class A extinguisher, it will make things worse.
4. Wait for the fire to burn out. If it doesn’t burn out or escapes the oven, leave immediately and call emergency services.
billy
I found this site after putting 2 cast iron reversable skillets in the self clean electric oven. One was a lodge pro and the other a texsport. I put them both on a single rack sort of stacked on top of each other. The self clean cycle was around 3 hours if i recall. At the end, after cool down, I took the skillets outside and brushed off the ash with a bench brush. It was really messy, but since it was outdoors it didn’t matter. Next time I will shop vac the cast iron pieces first to get as much of the ash off as possible.
The oven was a dusty mess and I used a shop vac to clean it out.
The griddles, which had defied any attempt to clean, looked almost like new. There were some rust stains but not bad. I re-seasoned them and they are perfect now. The texsport griddle was so caked on with greasy residue that you couldn’t even make out the name on the griddle.
Erik T.
I will say, I was a bit worried after reading Angie’s comment from (2/23/08) when she stated her cast iron skillet caught fire. However I did read a few other comments and was well prepared to turn on my external venting, and open all the windows. I will never understand why anyone would want to put aluminum foil in an over during a cleaning cycle, yet did empathize quite heavily with their plight of having to clean up the atrocious disaster from their mistakes.
I tried the method of only using the cleaning cycle for an hour. I found it was rather insufficient at removing much of the carbonization from my Lodge Cast Iron grill/skillet. So after attempting to scrape some of the carbonization off, I made a second stab at the self-cleaning oven cycle. Yet this time I let it run for the full three and a half hour cycle. This time my “Smart” Smoke detector (I call her “Karen” because she gets easily confused between a “fire” and “cooking” issued a “Warning.” So “Karen” was disconnected and relocated to a “safe” distance.
I opened all the windows and turned on a box fan to help evacuate the extra fumes.
The results were FANTASTIC! Once the oven “unlocked,” I grabbed a oven mit and used a table knife to scrape any ash still loosely attached to the skillet/grill.
Yes I will need to re-season. However the gunky build-up of carbonization and excess grease is gone. I find both do interfere with the overall performance of the cast iron and do need to be removed once every three to five. years. Depending on how much use and abuse these items get.