Have you ever cut into a roast or a turkey to see if it has finished cooking?
Have you ever paid what seemed like a fortune for a beautiful steak and have it come off the grill overcooked and dry?
You DEFINITELY need to use a cooking thermometer or meat thermometer!
Cooking thermometers and meat thermometers take the guesswork out of cooking, as they measures the internal temperature of your cooked meat and poultry, or any casseroles, to assure that a safe temperature has been reached, harmful bacteria have been destroyed, and your food is cook perfectly. A cooking thermometer or meat thermometer should not be a “sometime thing.” Use it every time you prepare foods like poultry, roasts, hams, casseroles, meat loaves and egg dishes.
If you do not regularly use a thermometer, you should get into the habit of using one. A cooking thermometer can be used for all foods, not just meat. It measures the internal temperature of your cooked meat and poultry, homemade breads, and casseroles to assure that a safe temperature has been reached and that harmful bacteria like certain strains of Salmonella and E. Coli O 157:H7 have been destroyed. Foods are properly cooked only when they are heated at a high enough internal temperature to kill harmful bacteria that cause food-borne illness.
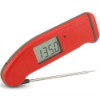 This is the type of cooking and meat thermometer that I prefer and use in my cooking. I get many readers asking what cooking/meat thermometer that I prefer and use in my cooking and baking. I, personally, use the Thermapen Thermometer shown in the photo on the right. To learn more about this excellent thermometer and to also purchase one (if you desire), just click on the underlined: Thermapen Thermometer.
According to the U.S. Department of Agriculture, internal temperature is the only way to gauge whether food is sufficiently cooked. USDA research reveals that the “color test” can give consumers misleading information about the safety of the foods they are preparing, since cooked color varies considerably. For example, freezing and thawing may influence a meat’s tendency to brown prematurely.
A cooking or meat thermometer can help you:
Cook foods to a safe temperature and prevent food borne illness.
Prevent overcooking
Hold foods at a safe temperature
How To Use a Cooking Thermometer
To use a cooking or meat thermometer, insert it through the fat side of the meat, being careful not to touch bone. Bone conducts heat faster, and you will get a false reading of the meat’s internal temperature.
Where to Insert – To be an accurate indicator, a meat thermometer must be inserted properly. The sensing area of thermometers is approximately 1 inch to 2 inches long, and this area must be completely immersed in the deepest area of the food.
Poultry – insert it in the inner thigh area near the breast of the bird, but not touching bone.
Red meat, roasts, steaks or chops – insert in the center of the thickest part, away from bone, fat, and gristle.
Ground meat and poultry – place in the thickest area of meat loaf; insert sideways in thin items such as patties.
Casseroles and egg dishes – insert in the center or thickest area. Hot, cooked foods must be held at 140 degrees F. or higher; cold foods, at 40 degrees F. or below.
REMEMBER: After each use, wash the stem of the thermometer thoroughly in hot, soapy water.
Check out my article on Meat and Seafood Internal Temperature Cooking Chart.
How To Test a Cooking Thermometer
Most dial or digital food thermometers are accurate to within plus or minus 1 to 2 degrees F. The accuracy of the meat thermometer can be verified and the thermometer “calibrated” if necessary. ThermoWorks Thermapen Thermometers should be checked periodically. Follow manufacturer’s recommendations. Some dial thermometers have a calibration nut under the dial that can be adjusted by twisting the small nut beneath the thermometer face with pliers.
The easiest way to check the accuracy of a food thermometer:
Ice Water Method – Fill a large glass with finely crushed ice. Add clean water to the top of the ice and stir well. Immerse the thermometer stem a minimum of 2 inches into the mixture. The thermometer should read 32 degrees F. after 30 seconds.
How To Calibrate a Cooking Thermometer
You should calibrate your meat thermometer on a regular basis:
ThermoWorks Thermapen Thermometer – Remove back label which covers the two calibration adjustment screws. Place tip of the probe in ice water (being careful not to let the probe tip touch the container) and adjusted the “Zero” screw (on the right) until the temperature reads 32 degrees. Repeat the same test, this time using boiling water and adjusting the “Span” screw (on the left) until the thermometer read 212 degrees. (You will need to adjust for the fact that the boiling temperature of water drops 1 degree for every 500-foot increase in elevation above sea level.)
Digital Instant-Read Thermometer – Digital thermometers are not as easily adjusted and usually have to be done by a professional.
Dial-Face Thermometer – Just immerse the thermometer in a slurry of ice water (boiling temperature calibration is not necessary), being careful not to touch the container and, using a pair of needle-nose pliers, adjust the screw on the underside of the dial face until it reads 32 degrees.
Other Safety Tips:
Reheating Foods: Reheat thoroughly to a temperature of 165 degrees F. or until hot and steaming. Soup and gravies should be brought to a rolling boil.
Serving Foods: When holding or serving a buffet, hot cooked foods must be held at 140 degrees .F or higher. Cold foods should be held at 40 degrees F. or lower.
Clean Up: After each use, wash the stem section of the meat thermometer thoroughly in hot, soapy water.
3 Responses to “Cooking Thermometer – Meat Thermometer”
Sandy taimeh
I stumbled upon your site and I love it. The recipes sound delicious, but my favorite part is the extra info you provide. Very interesting.
Ron Amoroso
Your directions for checking your thermometer is to use ice water and you say the thermometer should read 32 degrees F. That’s freezing but most freezers run significantly below 32 degrees so why couldn’t the ice water temperature be below 32 degrees. Same goes for boiling. Boiling “begins” at 212 degrees but continues as the temperature climbs above that number. ??
I have a corded thermometer. You put the sensor in the meat when you begin cooking it and it tells you when it has reached the pre-set temperature. So, it’s not a “instant” read thermometer. Any reason I shouldn’t use your temperatures?? The temperatures given on this thermometer for “rare” beef is 140 degrees. Is that the “government” standard??
Shai
I started using a Meat thermometer when I realized that bacterias remain in a cooked food with the wrong temperature, finally. I have found amazing Thermometer very often and very satisfied with it.