Crop Circle Cake Recipe and Tutorial
By Peggy Weaver


It is Fall and many of the farmers seem to have trouble at this time of year with strange things in their fields. I think I found out part of the problem. It is those darn UFO’s that are making Crop Circles and spooking all of the critters.
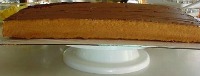
My daughter (Rachel) and I have managed to create an artist’s adaptation of what many farmers have found in their fields mysteriously. We used a half sheet cake pan and decorated it according to our inspiration. We did not have the benefit of magnetic energy to get the frosting to lay down, just good old-fashioned technique and patience.
I had the fun of having my daughter, Rachel, help with this cake. I was teaching her a few new techniques and she came up with additional great ideas for the cake. Two minds are definitely better than one! You will be hearing more from and about her in the future.
To make a crop circle cake, you will need the following:
For this crop circle cake you need a few items that you may have to order on the internet or count yourself blessed if you have a quality cake supply store in your neighborhood.
Cake board that is approximately 19×13 inches. Some brands are 20×14 inches and that is great. Use something to cover it with such as foil, Saran wrap or a fancy foil.
Double recipe of your favorite chocolate cake or two (2) boxes of cake mix (follow the instructions to prepare the cake batter).
Note. I don’t care for chocolate cake so I made a white cake. I needed to make a crumb coat of chocolate icing for the cake. It simulates brown dirt. If you make a chocolate cake, you do not need to crumb coat the whole cake.
17 x 12-inch cake pan (also known as a 1/2 sheet Pan). Again different brands, different sizes.
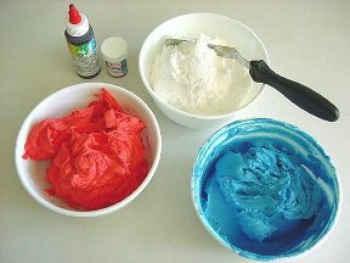
Two (2) batches of Buttercream Icing, divided NOTE: You can pre-make your two (2) batches of white Buttercream Icing whenever you wish (up to 2 weeks in advance). Store in a covered container, in the refrigerator, away from smoked fish, onions, and strong smelling cheeses.
Lazy Susan (It is optional but VERY Very helpful to have)
Decorating Tip #233 grass tip. (Not the Wreath tip. #235 )
Coupler
Piping Bag
1/2 cup brown sugar, dark or light (whatever you have)
1/4 cup turbinado sugar (optional)
Food Gel Colors – Gold, Chocolate, Lemon Yellow (I prefer AmeriColor)
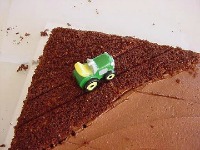
1 small tractor – I used the Wilton Tractor Candle Product #2811-9347 or a toy tractor to scale
Optional Items for the garden patch:
Avocado green and pumpkin Food Gel Color
2 small piping bags
Decorating Tip #1
Coupler or 2 parchment bags with a bit of the tip cut off to make a #1 size hole.
About 10 each, 8-inch bamboo skewer sticks or about 30 toothpicks. The number can vary with how close you put your fence posts and how large you chose to make your garden area.
Instructions:
Preheat oven to 325 degrees F. Prepare your cake pan by greasing and flouring it so the cake will not stick.
Mix your cake batters up, one batch at a time. In a large bowl, gently combine the two batches together.
NOTE: Many times I have noticed that even though I make (I think) the batters the same way, they will have two different textures. If you poured them separately into the cake pan you can have problems with the two batters baking at different rates. I have had of the cake (in the pan) baked, and the other half was sill needing a few more minutes to be properly baked. By mixing the batters gently together, by hand, you can save yourself some problems.
Bake the cake for about 45 minutes. Because ovens are different, check at 40 minutes with a toothpick to see if the cake is finished baking.
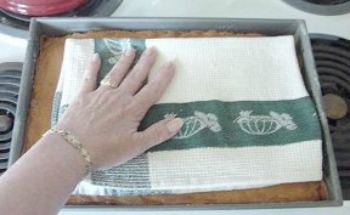
Immediately, when you take the cake out of the oven, place a clean tea towel on the cake and press down with both hands to level your cake. Be careful it is hot! Allow the cake to sit on a cooling rack for 10 minutes in the pan. Remove it from the pan so that the bottom of the cake is now facing up. Allow to cool completely. That will be at least an hour. If you have not pre-made your Buttercream Icing, do it now.
Prepare your cake board by covering it with either saran wrap, aluminum foil, or a fancy foil.
To prepare your “dirt”, place the 1/2 cup brown sugar in a cup and add a few drops of chocolate brown food coloring gel. Mix well. You can add the turbinado sugar for a gravel look to your “dirt”. The consistency you want is like coffee grinds. Set aside for now.
Remove 1 1/2 cups of the prepared Buttercream Icing and place in a bowl. Use the chocolate food coloring gel and mix to a nice rich color of dirt.
If you are making the Vegetable Garden, remove another 1 cup of white icing and separate it into 1/2 cup portions. Tint one a green shade (the color of cabbage), and the other a pumpkin color; set aside.
If you want to have a large garden feel free to chose other vegetables and color the icing accordingly. Be careful not to make the garden too large since this will cut into the area you will need for the fields and the crop circles. I suggest that you practice your piping techniques for the fields. If you are going to practice, remove 1 cup of the Buttercream Icing to practice with later.
Color the remaining Buttercream Icing with the gold food coloring gel to a light gold shade.
A Professional trick:
When mixing the 3 colors for the “wheat”, you should not mix the colors thoroughly.
If there are a few darker and lighter color variation streaks this will give the wheat a slightly mixed up color as it is piped out and look SO MUCH better.
When the wheat is all one flat color, it looks like an amateur made it. The variations of color give your cake the Professional decorator look.
Now separate the gold Buttercream Icing into three (3) batches:
1. One will remain the same color.
2. To one batch, you will add enough Lemon Yellow food coloring so the color of the Buttercream Icing will look like French’s Yellow Mustard.
3. To the third batch, you will add a few drops of chocolate brown so that the color looks like a light colored Peanut Butter. Set Aside.
Just a bit of info for you. As the icing sets and crusts on the cake, the color will get a little darker and more intense.
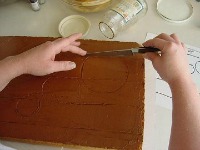
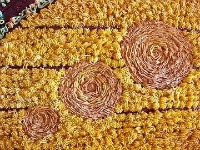
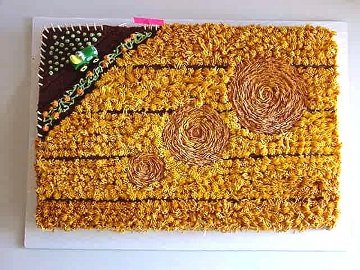
Draw a sketch of what you want to do on the crop circle cake. On this cake we wanted a dirt patch at the top corner, lots of room for the field and the crop circles.
Find three different sized lids in your kitchen that will fit the scale of your field nicely. You can also use glass jars or anything you can find that works. You are going to use the shape to gently mark the cake so that you have a guide to follow when you start piping.
When the cake is thoroughly cooled, you can start decorating.
If you have made a Chocolate cake you will need to only cover the garden corner with the brown frosting. If you have made a white cake like I did you will need to apply a crumb coat of the dark icing so that the “dirt” will show through on the field lines.
Now is the time to transfer your design to your cake.
Draw the area you will be using for the garden. We use the back of a knife because it was long and handy but feel free to use anything that will work for you and can be easily cleaned. Next mark the crop circles by gently placing the lids or what ever you have chosen on the cake or icing. Just press hard enough so that you can see the circle marks. Last, mark the field lines. It is OK to go through the circles, you will never see any of these marks when the cake is finished. Again we dragged the knife through the crumb coat icing.

 Next comes the “dirt” that you set aside earlier. If the cake was not crumb coated you will need to place a coating of the brown icing on your garden area and on the sides of the cake where the garden flows over the edge.
Gently crumble the brown colored sugar over the icing and lightly press the sugar into the icing. Do not forget to also cover the sides of the cake where the brown icing is.
You can mark tractor tire lines for a little more detail if you want to.
If you have a Lazy Susan, place the cake on it now.
Be careful!!!!! The corners of the cake board can catch on your cloths, move the cake around and possible dump the cake.
If you do not use the Lazy Susan or turntable, you will have to work carefully on the counter and turn the cake board by hand.
If you want to practice your techniques now is the time.
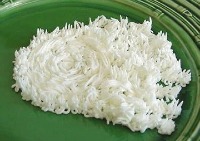
Prepare your piping bag with the coupler, grass piping tip and white practice icing.
While you are practicing, you can reuse that you have piped on the plate. Just scoop it up and replace it back in the bag. You will not be eating this icing so reusing it is perfectly OK.
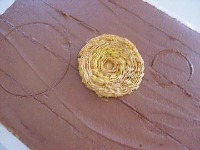
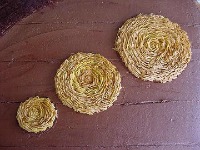
You will first make a circle that will be the center of the circle. The size of a nickel will do very nicely but do not worry if it ends up being the size of a quarter. After that is completed you will start making the rest of the circle.
My daughter uses a little Mantra for each “plant”. It is Squeeze, Plant, Slide.
Hold your piping bag straight up and down all of the time. Hold the tip about 1/8 inch above the practice plate. Squeeze the bag and allow the icing to fall to the plate, plant, then slide the bag to the right about 1/2 inch to 3/4 inch. Release the pressure and the icing will break off and make your grass tips. Your icing should look like the plants in a crop circle. It is straight at the “root” and then is bent to the side.
The next step is to turn the cake board a little and repeat the same action by moving to the left about inch and Squeeze, Plant, Slide. The tips of your grass will cover over the “roots” of the previously made plant. Turn your plate again and repeat.
Repeat the process and many times as necessary to make your circle the desired size.
Now practice your field work. Hold the bag straight up and down. Hold the tip about inch above the plate. Squeeze the bag and allow the icing to fall to the plate. Rapidly move the bag straight up, releasing pressure on the bag. The fast up movement will break the little strands off. They should be about inch long. The little plants will sometimes stand straight up and will sometime fall over. Make sure that the tall field plants are taller than the crop circle for the best look
.
Practice until you have the technique that you want.
Clean the piping bag out and the tip with very hot water (no detergent) and gently dry the inside of the bag with a paper towel.Discard any practice icing you have left.
Now you will start loading your bag with a color.
Fill your bag about half way with the peanut butter colored icing. This should be the darkest of the 3 golden shades. Start making the middle of the middle sized crop circle. You will find this is the easiest way to work. Finish the other 2 circles.
To start making your tall field wheat you will need to place all 3 shades of the gold icings in the bag at one time. Start with a clean piping bag and add each color to the bag, about 1 tablespoon at a time. When the bag is half filled, use a log straw, the long end of a spoon, a bamboo skewer or any long thin thing you can find in the kitchen and very gently swirl it in the bag. You are trying to slightly mix the 3 color together in the bag. Practice a few plants before you start decorating the field wheat.
Avoid placing your plants on the field lines you marked on the cake. This will allow the dark cake below to show through and give the impression of field lines.
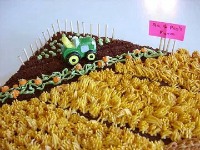
When you are finished with the top of the crop circle cake, you need to finish the sides. Pipe long straight plants that start on the cake board and are gently stuck to the side of the cake.
For those of you that want to make a little garden patch, fill one of your little piping bags with the green and the other bag with the orange icing. Use tip #1 or trim a tiny bit off of the parchment bags point to match the size 1 tip.
I made little cabbages behind the tractor and a little pumpkin patch in the front.
Place the toothpicks into the edge of the crop circle cake or cut the bamboo skewers into 1/3 and place them around the edge.
This part is up to you so you can be as creative as you care to be. Just remember to keep things very tiny so that you keep the proper scale.
Check out some of Peggy Weaver’s many Cake Decorating Articles, Tutorials, and Q&A pages below.
Peggy’s Baking Corner Home Page
Peggy Weaver, author of Peggy’s Baking Corner, has generously answered all the above question on cake baking during the last 15 years. Peggy will not be able to continue with the Question and Answer pages in the future. She thanks you for all your interesting questions.
Fondant Icing/Covering:
Fondant Icing 101 (Recipe and Tutorial on making & using fondant icing)
Covering Cakes with Fondant Icing
Decorating Cakes with Fondant Icing
Fondant does not freeze well at all, as a matter of fact, downright lousy. Do not even think about refrigerating it either. The condensation that can occur when you defrost or bring to room temp can destroy the finish of the fondant.
Now, if you are going to freeze the cake, as many folks do until the first anniversary, yes go ahead and freeze. The cake will not look as beautiful as it did originally but you just have to keep the idea in mind that it was perfect on the day of the wedding.
Buttercream Icing/Covering:
Buttercream Icing 101 (Recipe and Tutorial on making & using buttercream icing)
Wedding Cakes:
Assembling Cakes/Wedding Cakes
Decorating Wedding Cakes (Lots of Q&A’s on decoration a wedding cake)
Other Cake Baking and Decoration Topics:
Peggy’s Cake Decorating Idea Photos (The idea page has photos only and no detailed decorating instructions.)