Father’s Day Tie Cake

Father’s are very special people and we should show them everyday how much we care and do something special on Father’s Day. Learn how to make and decorate this Father’s Day Cake by following Peggy Weaver’s simple tutorial with lots of helpful images.
So – what is the most common gift he is given by his adoring family? You guessed it – ties. Some ties are beautiful silk ones, others are funny. We have all seen weird ties and even a few hideous ones that will spend their whole existence in the closet collecting dust. So in that fine tradition we are going to make a Father’s Day Cake.
There are three levels of decorating on this cake, so you can take it as far as you have the time and the desire. I want you to think creatively. If your Dad is a car lover, you could use a silhouette of a car, or if he is a cowboy, how about a hat silhouette or a boot. Think about what he loves or something that is important to him.
Cut that picture out of fondant with the tip of a very sharp knife. Do not get too detailed. I advise that you do not try things like fishing poles. You just want to get the idea across, then put it on his tie. The word “Dad” could fit above or below the picture. You can find all kinds of clip art silhouettes on the internet. The second Tie picture is inspired by a child’s quilt. So, find that inspiration from anywhere you can.
Tie Cake Recipe:
Ingredients:
1 Batch Buttercream Frosting (click on the underlined)
1 Batch MM (Marshmallow) Fondant 101
9” x 13” cake pan (do not use a Pyrex Glass casserole)
1 box Spice Cake Mix (preferably Duncan Hines)
1 1/4 cups water
1/3 cup vegetable oil
4 eggs, room temperature
1/2 teaspoon ground cinnamon
1/4 teaspoon ground ginger
1/4 teaspoon ground nutmeg (fresh is best)
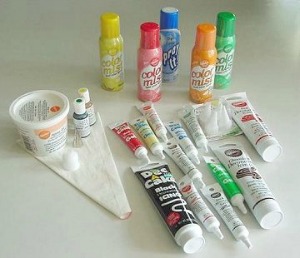
I picked these items up at my local craft or party store:
Blue Food Spray or Food Gel Colors (or any color you prefer for the tie background)
Red food coloring (please use Food Gel Colors if you can)
White Writing Gels
Preparation:
Preheat oven to 325 degrees F.
Prepare a 9” x 13” cake pan by greasing and flouring the bottom and the sides of the pan. Knock out the excess flour and set aside.
In a large bowl combine water, eggs (eggs only required by cake mix directions), and oil; set aside.
In a large bowl, place the Spice Cake Mix and beat for a moment to break up any clumps. Add cinnamon, ginger, and nutmeg; mix again to incorporate. Add the water/egg/oil mixture to the dry ingredients. Mix with an electric mixer, on low, for 2 minutes. Stop and scrape down the sides and the bottom of the bowl. Continue mixing for another 2 minutes on low.
Pour the batter into the prepared cake pan. Tap the pan on the counter to help trapped bubbles escape from the batter. If you need to, pop the bubbles with a toothpick.
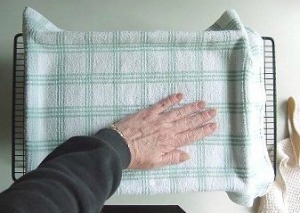 Place the pan on the oven’s middle rack. Bake approximately 37 to 42 minutes. Check for doneness with a toothpick or cake tester. Remove the cake from the oven and place on a cooling rack. Immediately take a clean tea towel, and with your hand, flatten the top of the cake to remove the dome that usually occurs with the baking process. Be careful, the cake will be very hot.
After cooling for 15 minutes, remove the cake from the pan and allow the cake to finish cooling completely.
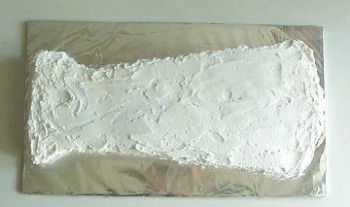
While the cake is cooling, prepare the cake board. You will need a board of some sort that is at least 20” long and 11” wide. You can usually purchase the cardboards from craft stores or Cake Decorating stores on the Internet. You can also look around your house for a suitable item. In the past I have use floor tiles, plywood, Masonite, and cut up cardboard boxes. If I am using an item that is not designated “Food Safe,” I will cover with wax paper and then the board covering.
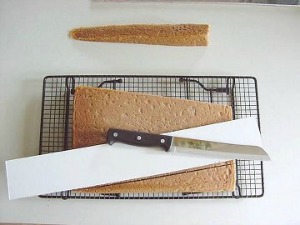
Study the pattern and decide if you are comfortable just looking at the pattern and doing the cutting or if you need to make a template. A couple of other options are 1 draw directly on the cake with food safe markers or to make tiny holes with the end of a toothpick. When you cut you will just follow the dots. To keep the integrity of the cake, cut with a serrated knife from the largest are to the smallest.
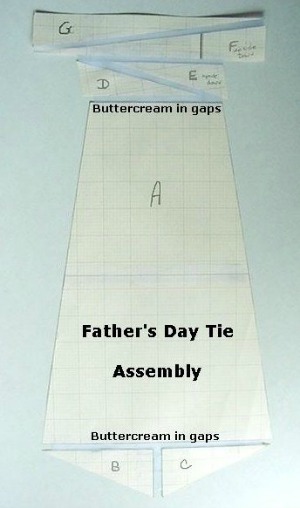
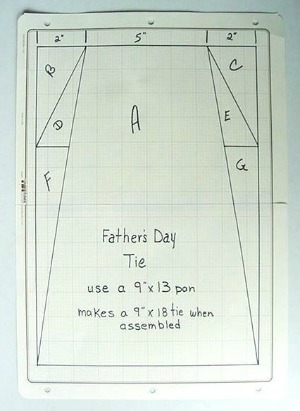
When the cake has been cut, you need to do a “dry “ assembly of your cake. Look at the pattern and arrange your cake on the cake board. The pattern will help you figure out where to place pieces so that the cake is balanced on the cake board.
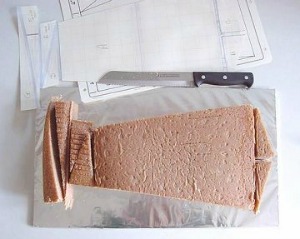
Gently pick up the small pieces and move them to the side in the same order, and “glue” your cake together with Buttercream Icing. Also fill in any deep trenches from where the pieces are joined.
Notice that I also trimmed he collar are a bit. I decided that I wanted a little softer look. You might want the bottom of the tie to be more rounded or a sharper point, one style for Dad and another for Grandpa. Make the cosmetic changes at this point just remember to keep it symmetrical thought.
When you are finished, cover the whole cake with a coating of buttercream frosting. You can stop here or go on to the next steps. NOTE: If you are shopping, you can purchase Icing or Writing Gel at most markets. I always keep a supply of colors of both for a fast and easy way to apply a greeting.
When you are finished, cover the whole cake with a coating of buttercream frosting. You can stop here or go on to the next steps. NOTE: If you are shopping, you can purchase Icing or Writing Gel at most markets. I always keep a supply of colors of both for a fast and easy way to apply a greeting.
If you are going to cover the cake with fondant icing, try to do a fairly smooth finish to the buttercream frosting. You do not need to be perfect but a smoother finish will make your smoothing step that comes later, easier.
Set aside a portion of the white fondant icing a little bigger than a Jumbo sized Egg (about 3/4 cup). Grease it lightly, wrap up and place in back in the Ziploc Bag.
Roll out the fondant in a rectangle to 13-inches wide x 22 inches long. For detailed help on how to do this, please refer to the Fondant Icing 101 article. This will give you the recipe for the fondant icing and lots of helpful hints.
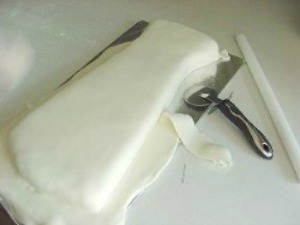
As you apply the Fondant, it always stretches a bit. Trim away the excess with a Pizza Cutter or a knife. If you notice the icing is being pulled by the knife, stop and wash the blade in hot water, dry and dip the knife in a bit of corn starch.
Gently buff your icing with your hand or fondant smoothing tool. If there is the tiniest hint of dragging, lightly dust the surface and continue smooth the top and sides.
If you need to shape your cake gently do it with your hands or fingers. Your fingers can sense a bump the eyes do not see but when you change the lighting, it is there. Let your sense of touch work for you. As you can see in the picture, I added a bit of accent to the knot of the tie with the indentations.
 You have two choices if you want your tie to have a color.
 You have two choices if you want your tie to have a color.
#1. You can mix Food Gel Colors into your icing (If you use the liquid type that you by in your local market, it can radically change the consistency of your fondant. It is really better to avoid that product for this project.)
#2. Blue Food Spray. It is fun to use but it can be a bit messy.
If you are going to use the Food Gel Colors, use a toothpick to get the gel out of the bottle rub on the fondant. Do not use the toothpick a second time. Throw it away. Remember you are using a food item. By “Redipping” you can contaminate the gel. Add a little color at a time, knead, and add more until you get the shade you like.
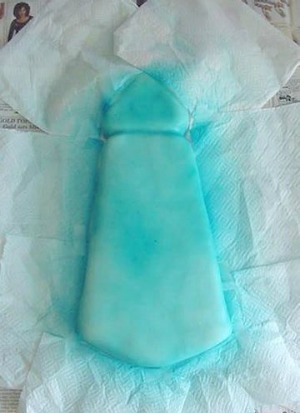
I would normally use the gel food color but I want a “sky” on the tie. If I color the icing with a gel, the sky will be a very solid, flat blue color. By using the spray color, I get tiny variations in color that hints at light reflections that you see on cloth.
Prepare your spraying area by covering an area about three feet out to each side. Some cans have a greater overspray area than others so it better to be safe than sorry. Cover you cake board with pieces of paper towels. I tape them together so that they don’t shift while I am spraying.
Follow the instructions on the can. Generally it’s Shake, Point, and Spray. Again each can has a different width of spray point so it is good to practice on a piece of paper first so that you do not get any surprises.
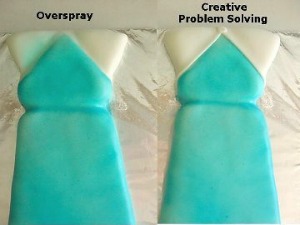
Notice that I covered the “collar” of the cake with the paper towel. I wanted to keep the collar white, but many times things don’t go as planned. I had an overspray problem. I did not tape the paper towel down well enough so the color got under and made a mess.
It was time to get creative. Remember the fondant we sat aside? I took a little of that, rolled it very thin, cut one straight edge, dampened the collar area slightly, and placed the fondant over the problem area. Patted it down and used the pizza cutter to cut off the extra. Then I repeated on the other side.
AKA Creative Problem Solving.
Now you need to decide which type of Father’s Day Tie do you prefer to make:
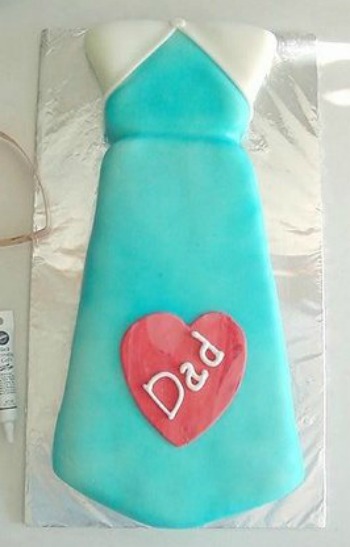
Father’s Day Cake Silhouette Tie:
Put a little Crisco shortening on your hands; The red food coloring will also stain your hands (you might want to use plastic gloves).
Take your ball of dough and color it with red food coloring. Knead it well to blend the red in. Roll it out thin, using cornstarch as necessary on the counter and rolling pin. Cut out the shape of a large heart (I used a large 5-inch cookie cutter). Dampen the cake just in the area the silhouette is to go. Keep it at least 1/4-inch from the edge. When you dampen the cake, do not over wet or you will end up with a mess because the sugar in the fondant will melt.
Here is a trick if you are using a cookie cutter: Very lightly touch the cutter to the cake where you want the shape to go. Now you have the exact place you want to place the silhouette.
Carefully pick up the shape put in place on the cake. With the White Writing Gel, write the word Dad on, above, or below the heart (or the other silhouette that you have chosen).
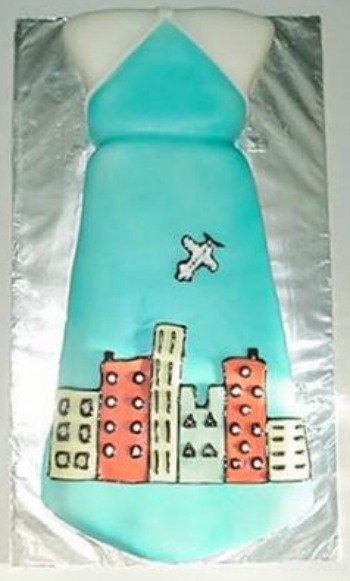
Father’s Day Cake with City Skyline:
Additional item you will need:
2 Black Writing Gels
Red Food Gel Color
Yellow Food Gel Color
Green Food Gel Color
Take the leftover fondant and divide it into 3 parts. Color one red, one yellow, and one green. Keep the colors fairly light or you won’t be able to see the windows.
There are no instructions for the buildings. Just cut as many shapes as you need to fit across the tie, one right next to the other. Vary the heights, and widths.
Lay them gently on the cake as you go so you know how big the next size should be. Remove them, one at a time, dampen the spot under it, and replace the fondant building. I usually dampen a spot about inch smaller that the actual piece. Some decorators will dampen the piece itself and then put it in place.
Outline the building with the Black Writing Gel. You only want the black to be an outline so don’t get to heavy it. The line of Writing Gel spreads a bit as your hands warm the tube so don’t be to surprised if you need to go a bit faster than you did as your started outlining. Draw windows on each building using any shape you want.
To make the your little airplane, refer to the photo. It is a cigar shape with 2 small bumps for the tail and 2 larger bumps for the wings. Fill inside the lines with White Writing Gel. If it seems to thick or lumpy, take a toothpick and move the gel around until your satisfied. Put tiny drops of black on the white so that you have windows on your plane and add props to your plane.
Back to Peggy’s Baking Corner Home Page
Peggy Weaver, author of Peggy’s Baking Corner, has generously answered all the questions on cake baking during the last 15 years. Peggy will not be able to continue with the Question and Answer pages in the future. She thanks you for all your interesting questions.
Check out some of Peggy Weaver’s many Cake Decorating Articles, Tutorials, and Q&A pages below.
Fondant Icing/Covering:
Fondant Icing 101
(Recipe and Tutorial on making & using fondant icing)
Covering Cakes with Fondant Icing
Decorating Cakes with Fondant Icing
Fondant does not freeze well at all, as a matter of fact, downright lousy. Do not even think about refrigerating it either. The condensation that can occur when you defrost or bring to room temp can destroy the finish of the fondant.
Now, if you are going to freeze the cake, as many folks do until the first anniversary, yes go ahead and freeze. The cake will not look as beautiful as it did originally but you just have to keep the idea in mind that it was perfect on the day of the wedding.
Buttercream Frosting/Covering:
Buttercream Frosting 101
(Recipe and Tutorial on making & using buttercream icing)
Wedding Cakes:
Assembling Cakes/Wedding Cakes
Decorating Wedding Cakes
(Lots of Q&A’s on decoration a wedding cake)
Other Cake Baking and Decoration Topics:
Peggy’s Cake Decorating Idea Photos
The idea page has photos only and no detailed decorating instructions.)