Ski Slope Cake Recipe
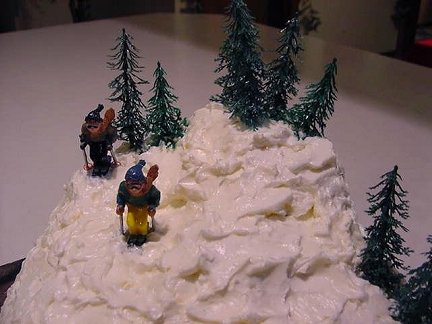

This is a fun Ski Slope Cake to make – plus it let’s you use your imagination in decorating this mountain of a cake. It is all downhill from here!
It is cold outside where I live and the local ski areas are making a fine living. Many busy folks need to take a cake to a Christmas or winter gathering – so here is an easy cake that the kids can help with. No matter if you are an avid skier or just prefer to enjoy the snowy view, you will love this wonderful outdoor Ski Slope Cake. Hit the slopes this winter with this skiing cake.
Ski Slope Cake Recipe:
 Equipment and Cake Ingredients you will need:

2 white cake mixes (with a few changes to the recipe)
2 (9-inch) cake pans, prepared
2 (8-inch) cake pans or 1 (8-inch) and 1 (6-inch) cake pan, prepared
2 batches (a total of 6 cups) of Roberta’s Fluffy Icing (see recipe below)
2 (10-inch x 14-inch) Cake Boards and aluminum foil to wrap the cake boards. – You need two (2) for weight and stability.
A spoon and your fingers to put the icing on the cake
Plastic skiers and trees from a local craft shop or online baking site (Location suggestions at the bottom of the page.)
TIP: The cake will be about 6-inches tall, not counting the trees. On this occasion, you will not have to use internal cake structures to hold up the height. If the cake collapses a little, no one will ever notice. I would advise that if you are going to be traveling a distance in the car, put three bamboo skewer sticks down the tallest part of the hill to help keep things from sliding around and give stability.
Preparation of Cake:
Preheat oven to 325 degrees F.
You need to make the cakes one at a time because you will not have enough space in your normal size oven to bake all of the cakes at the same time.
(1) Prepare one cake mix making these changes:
Use whole eggs instead of just the whites and
Add an additional tablespoon of vegetable oil to the recipe.
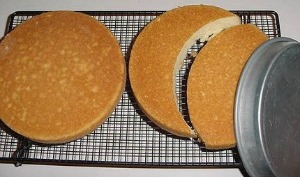
Mix as directed and divide into the two prepared 9-inch pans. Bake in a 325 degree F. oven for about 30 minutes. Check with a toothpick to see if they are done. Cool on a baking rack for 10 minutes and turn out the cakes to completely cool.
(2) Prepare the batter again and pour into the two (2) prepared 8-inch pans or the 8-inch and 6-inch prepared pans.
You will not use the second layer of this cake so that is why I used the 6-inch cake pan. I will have a little cake in the freezer waiting for the day that I need a fast cake. Wrap that cake in at least a double layer of foil to help preserve it for when you need it.
Bake at 325 degrees F. for about 35 minutes and again make the toothpick check to determine when the cakes are finished.
Allow to cool on a baking rack for 10 minutes then turn out the cakes to completely cool.
While the cakes are baking and cooling you can prepare Roberta’s Fluffy Icing (see recipe below) and cover the cake boards with the aluminum foil. This Icing is a nice recipe for a “not to sweet” icing that is loved by many folks. You may prepare two (2) recipes at the same time if you wish, but have a big bowl to make it in.
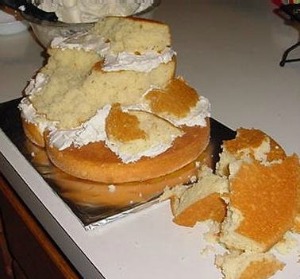
After the cakes are completely cooled, you will need to trim one of the 9-inch cakes. I did it the easy way and placed the 9-inch cake pan over the cake to be sliced about mid way and trimmed the cake using the pan as the template. Set the remaining cake piece to the side, you will use it later.
Place the whole 9-inch cake on the right end of the prepared cake boards. Place the trimmed, crescent moon shape next to it and fill the joint area with icing.
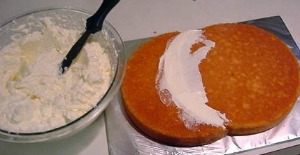
Ice the top of the cake with about 1/2-inch of the icing. This will glue the layers together. Place the 8-inch cake over the joint and to the back edge so that you see about an inch of the bottom cake in the front. If it overhangs a little at the back, no problem.

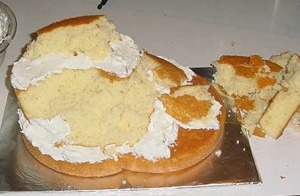
Now you need to start tearing away parts of the 8-inch cake. Randomly pull away pieces so that you have a sloping effect.

If you need to, this is the time to put in the stabilizing bamboo sticks into the cake. I would put about 3 skewers all the way in, around the highest point of your cake. If you can, also pierce the cake board with the bamboo sticks.
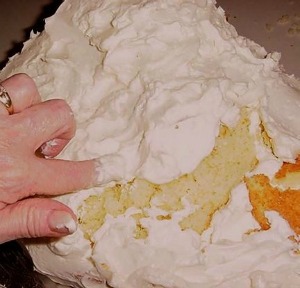 It is time to ice the whole cake now. Glop on some of the prepared icing and start covering the cake with the spoon and your fingers.
The reason that I am suggesting that you use your fingers is that if you use a knife you will most likely pull up parts of the cake and get large crumbs in the icing. I found that by using my fingers, I had much better control and when I did get lose crumbs. A little icing on my finger and dabbed over the crumb covered up the offending bit of cake
Ice the back side, the top, the slope, and the sides. If you do get a little icing on the aluminum foil, just gently push the icing into the foil so that you have a continuous look from the cake down all the way to the foil. We will not be using a fancy piped edge on this cake so relax and just have fun.
Place your skiers and trees on the cake slopes to your liking and you are done. Serve with a smile and a laugh.
If you need to order the skiers and trees online, you can get them from Kitchen Krafts and from Sugar Crafters. All three companies will mail the decorations to your home. I ordered the skiers (two in a package) and an additional package of the taller trees that are about 4-inches tall. I have also seen these items at my local craft store.
Roberta’s Fluffy Icing Recipe:
 You will need to double this recipe for the Ski Slope Cake. You will need about 20 minutes to make this recipe.
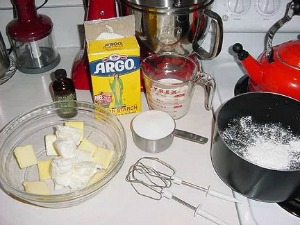
Ingredients:
1 cube (4 ounces) butter, room temperature*
1 cup (6 ounces) Crisco shortening
1 cup (8 ounces) granulated sugar
1 cup milk
2 tablespoons cornstarch
2 teaspoons pure vanilla extract
* You can use either salted or unsalted butter. I prefer the salted version myself. The little bit of salt in the icing actually enhances the flavors.
Preparation of Icing:
In a small pan, heat milk and cornstarch until thickened. This will thicken quickly so keep an eye on the pan and stir and stir. Set aside to cool to about room temperature. If you do not allow the milk mixture to cool down before adding, you can get a deflated icing. In other words, you will lose about 1/3 of the fluffy volume.
Whip together the room temperature butter and Crisco shortening. Add sugar and vanilla extract and mix in.
Add the milk mix to the whipped sugar mix, 2 tablespoons at a time, over a period of over 5 to 10 minutes of mixing. You want to make sure that the sugar has completely dissolved and there is no sense of the grains of sugar in the icing.
Makes about 3 cups icing.
Back to Peggy’s Baking Corner Home Page
Peggy Weaver, author of Peggy’s Baking Corner, has generously answered all the questions on cake baking during the last 15 years. Peggy will not be able to continue with the Question and Answer pages in the future. She thanks you for all your interesting questions.
Check out some of Peggy Weaver’s many Cake Decorating Articles, Tutorials, and Q&A pages below.
Fondant Icing/Covering:
Fondant Icing 101
(Recipe and Tutorial on making & using fondant icing)
Covering Cakes with Fondant Icing
Decorating Cakes with Fondant Icing
Fondant does not freeze well at all, as a matter of fact, downright lousy. Do not even think about refrigerating it either. T he condensation that can occur when you defrost or bring to room temp can destroy the finish of the fondant.
Now, if you are going to freeze the cake, as many folks do until the first anniversary, yes go ahead and freeze. The cake will not look as beautiful as it did originally but you just have to keep the idea in mind that it was perfect on the day of the wedding.
Buttercream Icing/Covering:
Buttercream Icing 101
(Recipe and Tutorial on making & using buttercream icing)
Wedding Cakes:
Assembling Cakes/Wedding Cakes
Decorating Wedding Cakes
(Lots of Q&A’s on decoration a wedding cake)
Other Cake Baking and Decoration Topics:
Peggy’s Cake Decorating Idea Photos
(The idea page has photos only and no detailed decorating instructions.)