
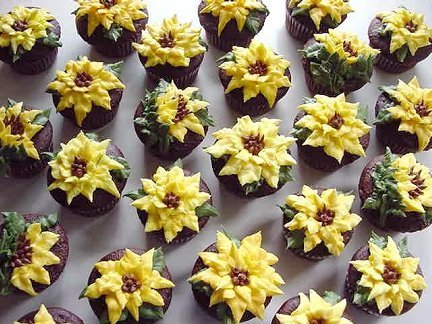
Sunflower Cupcakes Recipe
Sunflower Cupcakes will brighten up your day or a loved one’s day. These cupcakes will definitely impress and dazzle everyone, especially when they look as good as they taste.
To make this recipe, you will need to have prepared cupcakes. I made chocolate cupcakes, but you can use any type of cupcake you’d like. By using a boxed cake mix, you say so much time in preparing these beautiful and delicious Sunflower Cupcakes.
Equipment Needed:
Decorating Tip #352 – I have 2 of them because I am lazy and do o’t want to keep washing while I am working.
Decorating Tip #5
Couplers for the 3 tips
3 each (10-inch) piping bags – You can use (1) one piping bag if you are willing to wash between color changes. Another option is to use the disposable bags. You could also use your parchment paper and cut into triangles to make your own piping bags.
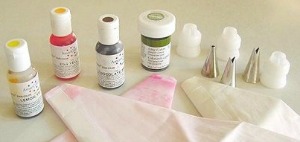 Food Gel Colors – Are a liquid Gel in colors of Egg Yellow, Lemon Yellow, Willow Green, and Chocolate Brown. You could also make your life easier by purchasing the Wilton’s Icing in a Tube. You would need 3 tubes of Yellow, 1 of the Leaf Green, 1 Brown if you are making 2 dozen cupcakes.
Personally, I do not much care for the taste of tube icing so I prefer to make my own buttercream. Also, you will not be able to get the varied colors of yellow that you can get from making your own batch of Buttercream Icing. Do not forget you will still need the tip and couplers for the tubes but you can pipe directly from the tube and save on the piping bags and a lot of the clean up.
- 1 batch of Devil’s Chocolate Cupcakes (from a boxed cake mix) or use your favorite recipe for two dozen cupcakes.
- 1 batch of white Buttercream Icing
-
Bake 2 dozen cupcakes and cool completely. Prepare 1 batch of Buttercream Icing.
-
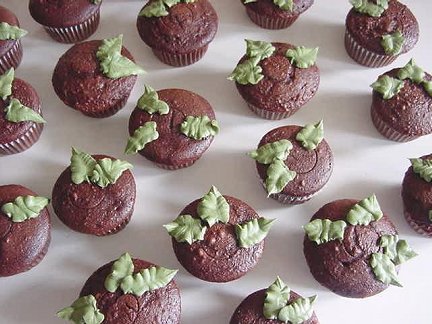
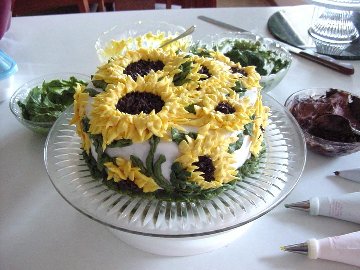
We are not going to cover the cupcakes with the traditional coating of white icing. The sunflowers will be enough and the chocolate cupcake peeking out from under the flower is a pretty contrast.
-
1. In one bowl, you will use 2 parts of your icing to make a dark, intense, Egg Yellow.
-
2. In another bowl you will use 2 parts of the icing that will be a light shade of Lemon Yellow.
-
3. In a third bowl, use 1 part icing to make a Willow Green.
-
4. The last bowl will be Chocolate Brown.
-
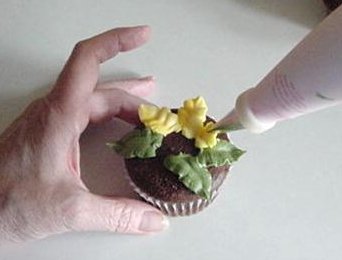
Prepare the Willow Green icing bag first with your # 352 tip. Fill it to only 2/3 of the way for ease of handling.
-
If you only have one bag available, you will need to pipe the leaves on the top of the cupcake first. Then clean out the bag and fill with the yellow icing as directed below.
-
Prepare the Sunflower Yellow Piping bag with the #352 tip. Drop into the bag about 2 tablespoons of Egg Yellow and 1 tablespoon of Lemon Yellow icing, etc. until the bag is 2/3 full.
-
The reason we are doing a two-colored yellow is because the different shades of yellow will give you the varied colors that you would get on a natural flower. You are adding highlights and shadows to the petals. This little trick will greatly improve the look of your flower and give it the “Wow” effect.
-
Last but not least, use your #5 tip and fill your last piping bag with the Chocolate Brown icing.
-
-
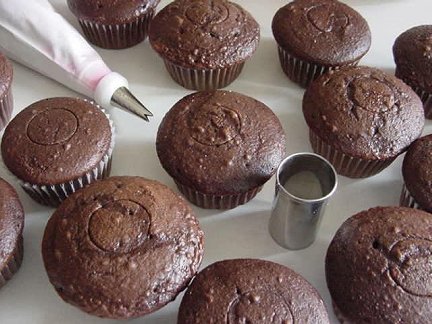
You do not have to do this step but it sure makes your life easier. I also use this technique on many of the flower cakes that I decorate. It gives me and idea of the flower layout in advance.
-
Use a 1-inch cookie or biscuit cutter to just lightly mark the top of the cupcake.
-
I only go down about 1/8 inch, just enough so that I can see the marking.
-
You have a couple of choices here. I usually use the color for practicing that I will use the least of in my decorating. In this case, it is the brown color or you can make a little extra icing just for the purpose of practice.
-
If you would like to practice, you can try doing a few “dry runs” on the bottom end of a drinking glass. Pretend the round, flat bottom is the top of the cupcake. You can turn/spin the glass as needed for your piping ease. By turning the glass and/or your cupcake, you will have a free flowing look to your flower. The more relaxed you are the more professional the look.
-
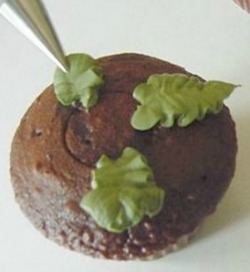
Using the Green colored icing first, place your tip at about a 45 degree angle along the marked circle in the center of the cupcake. You will have the metal part of the V on the top and the “slits” to the side.
-
Squeeze the bag and the icing will start to flow and ripple. Pull the tip away from the center toward the edge. As you are pulling away from the marked circle, slowly relax your pressure on your piping bag and the tip of the leaf will turn into a point from the lack of pressure. Let the leafs and points gently twist, turn, or even stick up a bit into the air. This adds realism to your work.
-
Repeat the procedure for each leaf. Vary the number of leaves on each cupcake 2, 3 or 4, just like you’d find in nature.
-
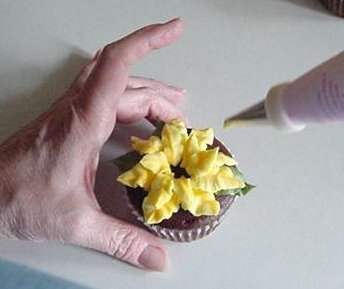
Using the piping bag filled with the Yellow icings, pipe 7 or 8 big colored petals from the marked circle out. Some of the petals will be on top of the green leaves. Let some of the tips “float” in the air.
-
Then pipe 4 or 5 smaller petals as the top layer.
-
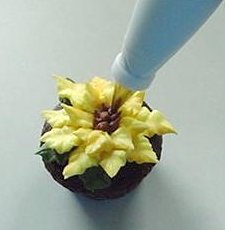
Finish with as many small Chocolate Brown dots as needed for the flower center. I like to start around the outside and work my way in but do it the way that is most comfortable for you. Remember, don’t worry if they are not evenly spaced. Mother Nature rarely makes flowers totally symmetrical.
-
Makes 24 cupcakes.
-
Now all you have to do is to eat your cupcakes and of course - clean up the kitchen.
-
Make a few of the flowers on the cupcake look different by having the view from the side instead of face on:
-
Mark your 1-inch circle on the cupcake. Now imagine your cupcake is divided into halves.
-
Pipe 2 or 3 green leaves as you did in the previous instructions. On one half of the cupcake, pipe 5 to 6 yellow petals on top of the leaves. You will be encroaching on your marked circle and slowly covering it up in the next steps. Make another shorter, smaller row of yellow petals on top of the first row.
-
Pipe a few brown dots to look like Sunflower Seeds. Hold your chocolate brown piping bag at a 45 degree angle when you pipe the dots so that they tip in the same direction as the petals. Pipe 2 more little rows of petals that stand up in the air and even bent a bit over the tops of the seeds.
-
The last step is to make the flowers Sepal. All you have to do is pipe a few more green leaves at the outside edge, also waving in the air and bent over the second group of petals.

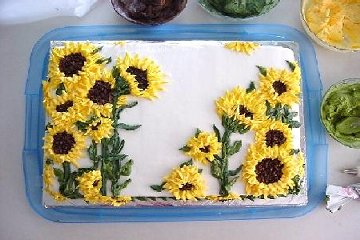
Cake Photo Ideas:
Check out some of Peggy Weaver’s many Cake Decorating Articles, Tutorials, and Q&A pages below:
 Peggy’s Baking Corner Home Page
Peggy Weaver, author of Peggy’s Baking Corner, has generously answered all the above question on cake baking during the last 15 years. Peggy will not be able to continue with the Question and Answer pages in the future. She thanks you for all your interesting questions.
Check out some of Peggy Weaver’s many Cake Decorating Articles, Tutorials, and Q&A pages below.
Fondant Icing/Covering:
Fondant Icing 101
(Recipe and Tutorial on making & using fondant icing)
Covering Cakes with Fondant Icing
Decorating Cakes with Fondant Icing
Fondant does not freeze well at all, as a matter of fact, downright lousy. Do not even think about refrigerating it either. The condensation that can occur when you defrost or bring to room temp can destroy the finish of the fondant.
Now, if you are going to freeze the cake, as many folks do until the first anniversary, yes go ahead and freeze. The cake will not look as beautiful as it did originally but you just have to keep the idea in mind that it was perfect on the day of the wedding.
Buttercream Icing/Covering:
Buttercream Icing 101
Recipe and Tutorial on making & using buttercream icing.
Wedding Cakes:
Assembling Cakes/Wedding Cakes
Decorating Wedding Cakes
Lots of Q&A’s on decoration a wedding cake.
Other Cake Baking and Decoration Topics:
Peggy’s Cake Decorating Idea Photos
The idea page has photos only and no detailed decorating instructions.