If you are diabetic, please try my delicious Sourdough Banana Diabetic Bread recipe – you will not be sorry.
My doctor recently diagnosed me as a diabetic. Because of this, I am having to kick my sugar and gluten habit! I have been experimenting with various low gluten flours and sugar substitutes in my baking and I have been amazed at all the different types of flours available that are lower in gluten than regular flour. I have also discovered Xylitol, a wonderful sugar substitute that does not have an after-taste. Your family will never realize that they are eating sugar-free Sourdough Banana Diabetic bread.
I am also always looking for new ideas and recipes for using my Sourdough Starter. I adapted my Sourdough Banana Bread recipe to reduce the gluten and be completely sugar free. This bread is so so easy-to-make and delicious!
More great Bread Recipes, Sourdough Bread Recipes and Quick Bread Recipe for all your bread making.
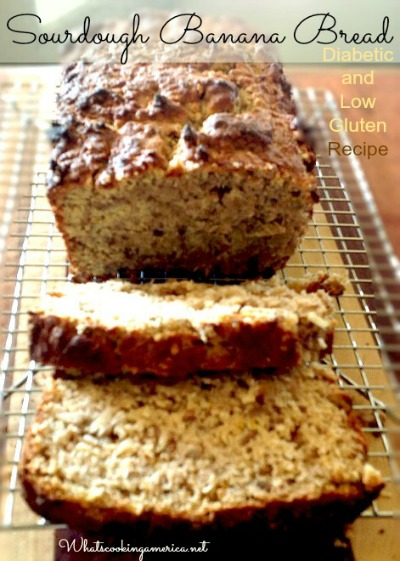
Low Gluten - Sugar Free - Diabetic Friendly
- 1/3 cup butter (room temperature) or 1/3 cup warmed coconut butter*
- 1 cup Xylitol**
- 3 large eggs, slightly beaten
- 3 ripe bananas, mashed (preferably overripe)
- 1 cup Sourdough starter ***
- 1 teaspoon orange zest (rind), grated or 1 teaspoon pure vanilla extract
- 1 cup whole wheat pastry flour, sifted****
- 1/2 cup oat flour****
- 1/2 cup coconut flour****
- 1 teaspoon baking powder
- 1/2 teaspoon baking soda
- 1/2 teaspoon cinnamon, ground
- 1/4 teaspoon nutmeg, ground
- 1 cup pecans (or your favorite nut), coarsely chopped
- 3/4 to 1 cup unsweetened coconut, shredded
- 1 (8-ounce) package unsweetened coconut, shredded
- 1 tablespoon coconut oil, melted
- 1 teaspoon pure vanilla extract
- Pinch of coarse salt or Kosher salt
-
Grease one (1) 9x5-inch loaf pan (or spray sides and bottom of loaf pan).
-
In the bowl of you mixer, cream together the butter and Xylitol (sugar substitute) until light and fluffy; add eggs and mix until blended. Stir in the mashed bananas and the sourdough starter. Stir in the vanilla extract or orange zest; set aside.
-
In another bowl, sift together the whole wheat flour, oat flour, coconut flour, baking powder, baking soda, cinnamon, and nutmeg.
-
Add the sifted flour mixture, chopped nuts, and shredded coconut to the prepared sourdough mixture, stirring just until blended.
-
Pour batter into prepared loaf pan; set the filled loaf pan aside for 15 to 20 minutes. This is not your usual sourdough bread recipe where you let the dough rise until doubled. You only let it rest for approximately 20 minutes.
-
Preheat oven to 350 degrees F. Adjust oven rack to middle position.
-
Bake approximately 75 to 80 minutes (it took me 80 minutes to achieve the proper temperature) or until a toothpick inserted in the center comes out clean. Be sure and poke the toothpick already to the center of the loaf. A good check is to use an instant digital thermometer to test your bread. The internal temperature of the bread should be at 200 degrees F. when done.
-
Remove from oven and cool on a wire rack 10 minutes; remove from pan. Cool completely before slicing.
-
Storage: Breads that contain fruit, nuts, or butter may be stored for 2 or 3 days, well wrapped in plastic wrap or aluminum foil. May be frozen for longer storage. After thawing frozen breads, reheat them in a 400 degree F. oven for a few minutes before serving.
-
Makes one (1) large loaf.
-
-
Coconut butter is simply just coconut flakes blended into a buttery consistency.
-
Pour the coconut flakes in your blender or food processor (I used my Vita-Mix blender) and turn it on. Process approximately 5 to 6 minutes. Scrape down the sides of the bowl of the blender as needed and then continue processing again until creamy. I actually scraped down the sides of my blender several times. If using a Vita-Mix, blend approximately 5 to 6 minutes. A food processor will take approximately 10 to 15 minutes. If using a Vitamix, you may want to use the tamper to push the flakes down.
-
The shredded coconut will go through three stages before turning into butter. First the texture will be finely shredded, then thin out into a grainy liquid, and then finally turn into a smooth, thick liquid. The finished coconut butter looks very smooth, but it actually has a slight grain texture when you taste it.
-
The coconut butter will solidify or harden after making. To use in your recipe, slightly warm it. I usually warm the coconut butter by placing the sealed jar in a bowl of hot tap water. Warm in the microwave 10 seconds.
-
Store the prepared Coconut Butter in a sealed glass jar at room temperature for up to 7 days. For longer storage, store in the refrigerator for up to a month.
-
Makes approximately 1 (8-ounce) cup.
-
* Also know as Coconut Concentrate. Use either purchased or homemade coconut butter. I made this recipe using regular butter and using coconut butter. My husband and I liked the one using coconut butter better. See directions below on making homemade coconut butter.
** Xylitol is five percent less sweet than sugar, it has 40 percent fewer calories (9 calories versus sugar's 16), and a low glycemic index. It can be made from many different things, but it is primarily extracted from corncobs and hardwoods. It is considered diabetic friendly. It looks and tastes like granulated sugar. It is safe for you and safe for you children.
*** Make sure your sourdough starter is fresh and bubbly by adding equal amounts of water and flour to it the day before using. If you do not presently have a sourdough starter, either make your own sourdough starter or purchase Packaged Sourdough Starter Mix by mail-order.
**** Learn about the different types of flours available to use in your baking. To achieve success in baking, it is important to know what the right flour is for the job!
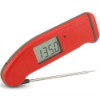 I get many readers asking what cooking/meat thermometer that I prefer and use in my cooking and baking. I, personally, use the Thermapen Thermometer. Originally designed for professional use, the Super-Fast Thermapen Thermometer is used by chefs all over the world. I only endorse a few products, on my web site, that I like and use regularly.
You can learn more or buy yours at: Super-Fast Thermapen Thermometer.
Sponsored Content
Did you know that the name sourdough comes from San Francisco and their famous sourdough breads? It is thought that French bakers brought sourdough techniques to Northern California during the California Gold Rush in the late 1800s. If you don’t want to make your own sourdough starter, you can buy a San Francisco sourdough starter from Amazon.
sponsored content