Dogwood Cake Tutorial and Recipe

Working with gum paste scares many people, but it can be as simple or as hard as you want it to be. I find it to be very addictive. I started teaching how to make the Dogwood Cake because the flowers are simple flower to make and quite impressive to look at. I purchased a cutter and Silicon mold set to make my life easier.
You have to start in advance with this decorating project. You can make the Buttercream Icing and the fondant the weekend before, but you have to start the flowers at least 4 days earlier. I like to make the flowers a couple of weeks in advance when I have a free evening. The day before the cake is needed, bake, cool and crumb coated the cake. Cover the cake with a thick coating of Buttercream Icing, then roll out and place the fondant on the cake. With tip #5, pipe the branches and either leave them brown or paint them with Super Gold Luster Dust or Metallic Gold Highlighter. Place the finished flowers on the cake with a dot of Buttercream Icing and your ready for the presentation.
Back to Peggy’s Baking Corner Home Page.

For this project you will need:
2 layer, 6-inch cake (your choice of cake flavors)
Marshmallow Fondant (MM Fondant Recipe).I used a leaf green Food Gel Color for the fondant.
You will need at least 54 flowers, but I always make 5 or 6 more just in case of accidents. This also gives me the option of picking out the best ones.
 To make the flowers you will need:
Gum Paste
Crisco Shortening
Cornstarch
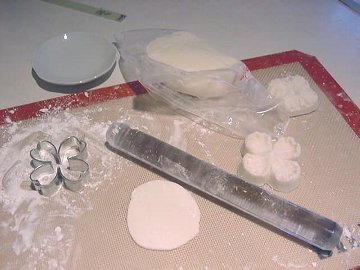
Silicon Mold Kit (go to gumpaste section – scroll down to the Dogwood flowers) Silicon flower center mold is optional but it makes it easier and prettier
Non-Stick Rolling Pin (A silicon or Lucite is preferred)
Silicone Baking Mat is optional but it is the easiest way to roll out the gum paste
Prepare the gum paste mix by greasing a bowl with Crisco. Place the mix into the bowl and add water. You will use about 10 parts of mix to 1 part of water. (I always make a larger batch than I think I will need. Place leftovers in the refrigerator, well wrapped for later use.) Add Crisco as you need it. Gum paste should be about the same consistency as the MM Fondant (a firm but kneadable ball that is not sticky). I like to grease up my hands and start kneading until I get the right consistency.
If the ball cracks as you are kneading, add a few drops of water at a time and knead thoroughly until mixed.
If it seems sticky, put more Crisco shortening on your hands and knead it in. Keep playing with it until you get the firm, non-sticky texture. (Remember the Play Dough you played with as a kid? That consistency is what you want.
When you are content, grease the gum paste lightly and store in a Ziploc type of bag. There should not be pellets of dried mix in the gum paste. If there is, add a few more drops of water, knead, grease the ball, place in the Ziploc bag and let the gum paste rest for an hour or more.
Warning: Gum paste dries out VERY quickly. Keep it covered at all times and only work with a little at a time. When I have the gum paste in the bag, the bag it is always folded over. In the fold is where I keep the gum paste tiny bits and leftovers when I pull it off of the cutter. It stays moist that way and is convenient to grab that tiny pinch that you need. I save the tiny scraps and incorporate them into the next flower that I’m making. You can refresh the gum paste with a drop or 2 of water and a bit more Crisco shortening.
When you are ready to make your flower you need to do a couple of things in advance:
Lightly cornstarch your counter or use a Silicone Baking Mat. I like to put a little mound on the counter for easy dusting of the counter, mold, and cutter.
Lightly apply cornstarch to the Silicon Mold and the Dogwood cutter.
Have a tiny bit of water ready for applying the flower center.
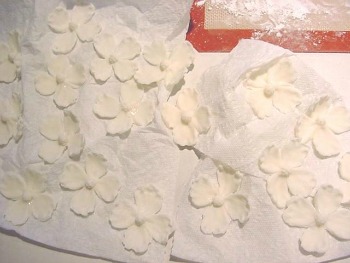
Prepare your drying surface. I like to wad up paper towels, open them up and lay the flowers on the towels in awkward positions. This way each flower has an individual look with its own gentle twists and bends.
Starch your hands. Now you are ready to go:
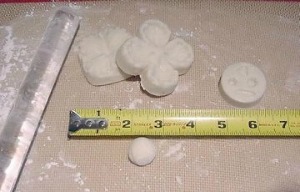
Pull off a ball of gum paste that is between 3/4 and 1 inch in diameter.
Roll it out so that it is a little larger than the cutter and between 1/32 and 1/16 of an inch thick (1 to 2 millimeters). Keep the gum paste lightly starched so that it does not stick to the counter and can be turned/spun easily.
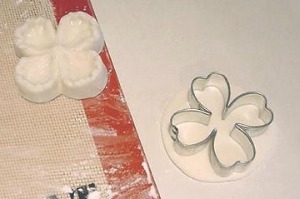
Cut out the flower with the cutter. Make sure that if you are using the Silpat you DO NOT cut on the mat. Move the gum paste patty to the counter before cutting. You do not want to take the chance of damaging the mat.
Place the cutout on the mold, place the top on the gum paste and gently press. Take the top off and gently let the flower fall off into your waiting hand. That is all there is to it. Place the flower on the waiting paper towels.
 Take a tiny ball of gum paste about the size of 1/2 pea and press into the flower center mold. Remove the center from the mold by gently bending the mold and allowing it to fall out into your hand. In the center of the flower, place a TINY drop of water and place the center on the dot. That’s it! You’ve just made a Dogwood flower. Repeat the process until you have the quantity you need.
Allow the flowers to completely dry. This will take at least overnight and possible longer if your area is high in humidity. If you are not going to be coloring the flowers right away, you can store the THOROUGHLY DRIED flowers in an airtight container. I always place a few extra paper towels in the container just to help absorb atmospheric moisture. I find that if you dry the flowers just overnight, they have a tendency to be brittle and very fragile. It seems that if I let them dry 3 or 4 days, they gain strength and are easier to work with.
I like to leave the flowers, that I store, white. If I do color them in advance, I make sure the container is totally clean of colors from a previous batch. You must avoid contamination of any foreign color. You can not remove color, dirt from your hands, or the container or brush, from the flower. You only get one chance.
To color your flowers you will need:
Soft paint brush
3 dry paint brushes
Food Gel Colors
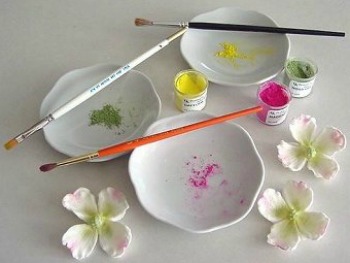
Petal Dust that matches the cake color*
* I like to put a tiny bit of petal dust on a little plate. It easier to load the brush without tipping the container over. I used Moss Green, Daffodil Yellow and Magenta.
Cup your hand and gently place the flower into it. Be Careful – gum paste flowers are fragile and can crack unexpectedly. Sometimes you can fix them with a drop of water and letting it thoroughly dry again before coloring. I know of one lady that if she is SURE that no one will be eating the flowers, will repair them with a tiny drop of Super Glue.
I like to use a Flower Lifter to move the flower when I need to turn it but you can use anything that works for you. Try a fork or chopsticks, maybe. Picking the flower up by the petals though, is asking for trouble. Try to move it from the bottom. Notice in the picture that there is a broken flower. That is why you always make extras. Better to be safe than sorry.
I like to use at least three (3) colors on a flower or leaf:
I usually use yellow as the first color that I apply and then I add the accent colors. In the case of the Dogwood flower the yellow is applied first with a round brush.
Next is the green, to the center and on the petals. I used a flat brush so that I could get a heavy load in the brush bristles and really force the color into the flower center.
The pink tip is the last color applied with a round brush.
Remember to color the back of the petal. It can be seen so the color adds to the feeling of the flower.

You are now finished with the coloring and ready to apply them to the Dogwood Cake or store the finished product in an airtight container until needed.
To make the Dogwood Cake you will need:
1 each 6-inch cake (I always make 2 cakes and freeze one)
1 batch Buttercream Icing, divided
1 batch Marshmallow Fondant (MM Fondant Recipe) Colored Leaf Green Food Gel Colors for the Fondant Icing
Brown Food Food Gel Colors for the piped branches
Optional – a flavored filling for your cake, your choice
Piping Bag and Coupler
#5 Piping Tip
The day before the cake is needed, bake the cake and let completely cool.
Prepare a cake board by covering it in aluminum foil and place the cooled cake on the cake board.
Cover the cake with a 1/4-inch thick coating of prepared Buttercream Icing.
Then roll out and place the prepared Fondant Icing on the cake. Smooth to perfection and trim the bottom edge neatly.
If you need info on how to make and cover a cake with fondant, please check out the following link to Fondant Icing 101.
If you need a Buttercream Icing recipe, here is the link: Buttercream Icing 101
For the bottom edge of the cake, make a ball of the colored fondant and rolled it thickness of 1/4 inch. Place a few drops of water around the extreme bottom of the fondant and place the rope. Gently push it into place and trim the excess where the edges meet.
Back to Peggy’s Baking Corner Home Page
Peggy Weaver, author of Peggy’s Baking Corner, has generously answered all the above question on cake baking during the last 15 years. Peggy will not be able to continue with the Question and Answer pages in the future. She thanks you for all your interesting questions.
Check out more of Peggy Weaver’s many Cake Decorating Articles, Tutorials, and Q&A pages below.
Fondant Icing/Covering:
Fondant Icing 101
(Recipe and Tutorial on making & using fondant icing)
Covering Cakes with Fondant Icing
Decorating Cakes with Fondant Icing
Fondant does not freeze well at all, as a matter of fact, downright lousy. Do not even think about refrigerating it either. The condensation that can occur when you defrost or bring to room temp can destroy the finish of the fondant.
Now, if you are going to freeze the cake, as many folks do until the first anniversary, yes go ahead and freeze. The cake will not look as beautiful as it did originally but you just have to keep the idea in mind that it was perfect on the day of the wedding.
Buttercream Icing/Covering:
Buttercream Icing 101
Recipe and Tutorial on making & using buttercream icing)
Wedding Cakes:
Assembling Cakes/Wedding Cakes
Decorating Wedding Cakes
Lots of Q&A’s on decoration a wedding cake
Other Cake Baking and Decoration Topics:
Peggy’s Cake Decorating Idea Photos
The idea page has photos only and no detailed decorating instructions.
Categories:
Cake