Cookie Cutters and Gumpaste Cutters
Things I have learned…..

Remember that you are making Cookies. Do not worry if it is not perfect. When the cookies bake in the oven, they will spread and change shape.
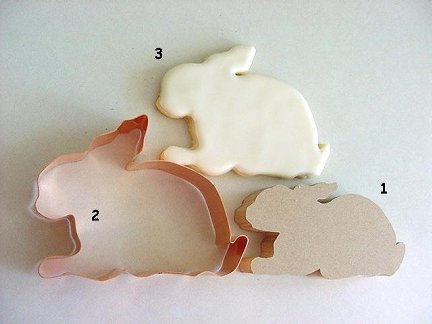
Do not make really tight bends. Look at where the bunnies ears and back come together on the picture below. When the cookie bakes, these two parts often touch and blend together. Details will be lost in the baking process.
Do not make your cutters too big. There is not a problem with the cutter, but you will most likely have a problem with handling the dough and the soft cookie after baking. A large dough shape has a tendency to move and bend when you place it on the cookie sheet. You can lose your shape. To help remedy this, place the cookie dough on the cookie sheet and cut the cookie out while on the sheet. Remove the excess dough and place in the oven. Less handling means less distortion.
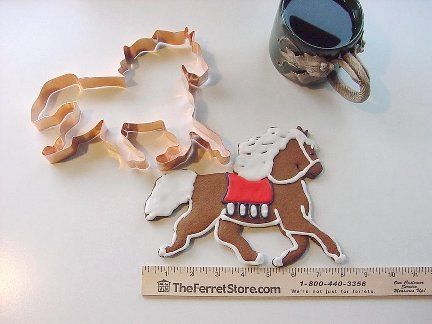
Avoid making long and skinny extensions in your design. Referring to the picture below, look at the horses legs. This is about as long and as narrow as you can go. I had to use two 4-inch wide cookie spatulas to pick up the horses and I had to be very careful to support the legs to prevent breakage. Wash and dry your cutters by hand. The dishwasher is rough on the metal and the closing overlap.
Peggy Weaver, author of Peggy’s Baking Corner, has generously answered all the questions on cake baking during the last 15 years. Peggy will not be able to continue with the Question and Answer pages in the future. She thanks you for all your interesting questions.
Following is a list of the items you will need:
Newspaper or something to cover your counter. The metal you are working with can scratch counters and tables badly. Trust me on this.
Your design, drawn on paper
Shears or tin snips to cut the metal ribbon. I have a pair that I use for nothing else.
Metal or copper ribbon — 1-inch wide is the easiest to use.
Needle nose pliers
String
A dowel to help you make curves. (I have used pens, bottle lids, lipstick tubes, film canisters). Anything that is about the size of the curve you want to make. Just search your kitchen, the husbands shop, or kids toy box.
The side of your kitchen drawer will help you bend the metal to get right (90 degree) angles.
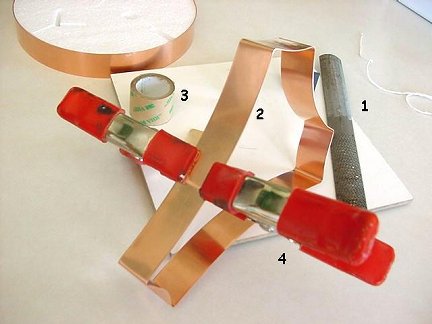
A metal file or rasp is nice to have to round off the sharp edges of the ribbon.
3M Permanent Double Sided Tape – 3/4 to 1-inch is the easiest to use.
A few small plastic clamps. I borrowed clamps from my husbands shop but I also have little plastic clamps that I got at the hardware store, 6 for $2. They look like toys in bright colors,
Or cloths pins and flat sided toothpicks or chopsticks.
NOTE: You can also pick up a kit called Cookie Crafting Kit by Acorn Meadow Designs. I have seen the kits in craft stores and on quite a few baking good sites for about $19. The kit includes instructions, 72” of the copper ribbon, 2 sided adhesive, a working base, and a few forming tools.
Copper ribbon and parts of the kit mentioned above. The ribbon length varies with the project. I like to use 1″ wide copper. I have for Gumpaste leaves and flower petals cutters, used stainless steel .01 thickness with very good results.
String.
After you have your design drawn, measure out how long you will need the ribbon to be by laying the string on the line and adding 1/2 inch if it is a simple cutter to as much as 1 inch if there are lots of bends.
My husband cuts out the shape in wood for me. I use this method of measuring with the string if there are many bends and curves as you would have if you were doing a rabbit or a leaf.
Clamps to hold the cutter edges together while the tape ages and sets.
After you are done with the bending you will need to somehow fuse the ends together. Most folks use 3M Permanent Double Sided Tape this is the easiest way.
Whatever beverage you like to help you relax and have fun.
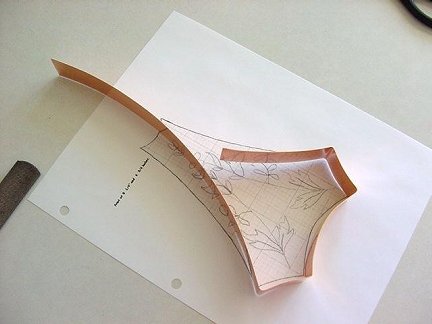
Here is the easiest way to bend your shapes, just make them fit around a piece of wood.
If you can not get the wooden shape to work with, you can work from a paper drawing.
Photo shows how you can use a paper drawing to bend your ribbon.
You need to move slowly and double check your measurements to make sure that your bends will be in the right place.
 I find that you often have jagged edges that can cut you. If you round the ends gently, you can save yourself and others from some nasty cuts.
Number I Is the cutter itself. Thoroughly wash the cutter in soap and water then dry thoroughly before you use the double sided tape. Manufactures put a light coating of oil on most metal. This coating can prevent the tape from sticking well and the cutter popping open.
An example of the tape. This tape is one inch wide.
This shows how I clamp the cutter together so that the tape can age and firm up the overlap. The manufacture’s recommendation is a minimum of 24 hours of clamping, for best results let the clamps remain on for 72 hours. Remember it is best to have a 1/4 inch to 1/2 inch overlap.
I added this picture to show you the results. Notice that the cutter is quite a bit larger than the wooden cutout. This will probably happen to you also. This is why you cut the ribbon 2-inches longer than that the string measurement when you are doing intricate bending.
When you have completed bending the cutter and before you wash the cutter, you need to cut off the excess, REMEMBER you need to overlap the ends, again 1/4″ to 1/2″ overlap is best. I forgot once and had to remake the cutter.
When I have lots of bends, I use any trick I can to get the bends in the right place, but that often doesn’t happen. Just try to keep the proportions correct.
More of Peggy Weaver’s many Cake Decorating Articles, Tutorials, and Q&A pages below.
Fondant Icing/Covering:
Fondant Icing 101
(Recipe and Tutorial on making & using fondant icing)
Covering Cakes with Fondant Icing
Decorating Cakes with Fondant Icing
Now, if you are going to freeze the cake, as many folks do until the first anniversary, yes go ahead and freeze. The cake will not look as beautiful as it did originally but you just have to keep the idea in mind that it was perfect on the day of the wedding.
Buttercream Icing/Covering:
Buttercream Icing 101
(Recipe and Tutorial on making & using buttercream icing)
Wedding Cakes:
Assembling Cakes/Wedding Cakes
Covering Wedding Cakes with Fondant
Decorating Wedding Cakes
(Lots of Q&A’s on decoration a wedding cake)
Other Cake Baking and Decoration Topics:
Peggy’s Cake Decorating Idea Photos
The idea page has photos only and no detailed decorating instructions.