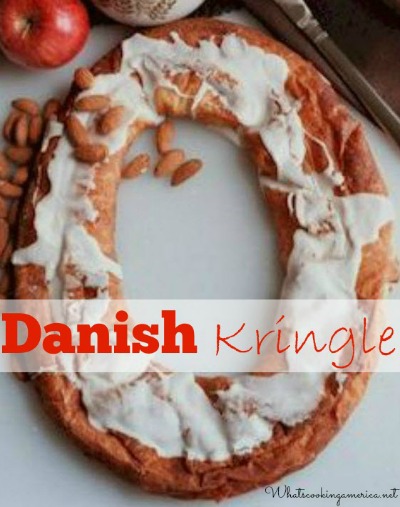
Danish Kringles is a Danish-like pastry, filled with fruits, nuts, cheese, etc., then drizzled with icing. Over the years, a variety of fruit and nut fillings were added, and in the United States (not Denmark, the pretzel shape was changed to its present oval shape to eliminate the unfilled, overlapping parts.
True kringles are very labor intensive and can take up to three days to prepare, as they are made with up to thirty layers of delicate pastry dough. The challenge for a kringle baker is to roll butter thinly between several layers of yeast-raised dough. According to kringle bakers, you must roll very slowly to make the layers thinner. The traditional Racine bakeries offer a flat, oval kringle. The best places to enjoy kringles are in the bakeries in Racine.
History of Danish Kringles:
Danish Kringles are butter-layered Danish pastries that were first introduced to Racine, Wisconsin in the late 1800s by immigrant Danish bakers. In Denmark, they are traditionally pretzel-shaped, almond-filled coffee cakes called Wienerbrød (Viennese bread). At one time Racine was home to more Danes than anywhere else in the country and as a result there are more Kringler shops in Racine than you’ll find anywhere else.
The kringles were created by German bakers from Austria who introduced their method of rolling butter between layers of yeast dough and letting it rest for hours before baking. When Danish bakers in Copenhagen went on strike, the bakery owners fired them and hired replacements from Austria. Once the Danish bakers returned to their jobs, they continued to make dough the Austrian way. It is the shape of a kringle (pretzel-shaped) in Denmark, which is the Danish sign for a bakery (hence the name kringle). Outside every bakery in Denmark, you will find a sign with a kringle on it. A kringle is not only the dough, as it can be made of different types of dough.
Racine, Wisconsin, is known as the “most Danish city in America.” One of its favorite Danish treats is the kringle.
There is a story (or folk tale) about one resident:
Lars Larson, was on his deathbed in an upstairs bedroom. His doctor had said Lars would last for only a matter of hours. Lars woke from a deep sleep and sniffed. His wife must have just returned from the bakery, and the aroma of freshly baked kringles bought a spark to Lars. He whispered, “If I could just have a taste of kringle before I die, it would make my dying sweeter.”
He mustered every ounce of strength and got out of bed. Slowly he made his way downstairs and into the kitchen. there he spied two kringles on the counter. Just as he was reaching out to take a piece, his wife swatted his hand away. “Stop that,” she said, “We’re saving these for the funeral.”
- 1 package active dry yeast
- 1/4 cup warm water (110 degree F. to 115 degree F.)
- 1/2 cup butter, cold
- 2 cups all-purpose flour
- 1/2 teaspoon salt
- 1 tablespoon granulated sugar
- 1/2 cup milk, warmed to 110 degrees F. to 115 degrees F.
- 1 egg, beaten
- Nut Filling recipe follows
- 2 tablespoons pecans or walnuts, chopped
- 1 1/2 cups pecans or walnuts, finely chopped
- 1 cup (firmly-packed) brown sugar
- 1/2 cup butter, room temperature
- 1 cup powdered sugar (confectioners' sugar)
- 4 to 5 teaspoons water
- 1/2 teaspoon pure vanilla extract
-
In a small bowl, dissolve yeast in warm water.
-
Using a pastry blender or two knives, in a large bowl, cut butter into flour and salt until particles are the size of small peas. Add yeast mixture, sugar, warm milk, and egg; beat until smooth (dough will be very soft). Cover and refrigerate at least 2 hours but not more than 24 hours.
-
When ready to use, remove from refrigerator. Punch dough down and divide in half; return other half to refrigerator. On a well-floured board, working quickly before dough softens, roll into a 15 x 10-inch rectangle, approximately 1/4 to 1/2-inch thick (if dough gets too warm from handling, return to refrigerator).
-
Spread half of the prepared Nut Filling down the center of the rolled-out dough rectangle in a 2-inch strip. fold sides of dough over filling, overlapping 1 1/2 inches; pinch edges to seal.
-
Oval Shape: Form roll into a circle and pinch ends together. Place seam side down on a large greased baking sheet. Repeat same process with remaining dough and filling. Cover and let rise in a warm place for 30 minutes or until double in size.
-
Pretzel Shape: Lift the filled roll from both ends firmly and center the middle of the roll onto the baking sheet as if you were forming a circle. Pull the ends of the roll so that they make a cross above the roll, then pull the ends down and tuck the ends under the top part of the roll so that the ends stick out from under the roll.
-
Cover the dough and let rise in a warm place approximately 30 minutes or until double in size.
-
Preheat oven to 375 degrees F.
-
After the dough has risen, bake approximately 20 minutes until golden brown or when the internal temperature registers approximately 205 to 209 degrees F. on your cooking thermometer. Remove from oven and let cool for 15 minutes.
-
Spread prepared Glaze over the warm Kringle. Sprinkle with chopped pecans or walnuts. Serve Kringles warm or at room temperature.
-
To re-warm, preheat oven to 300 degrees F. Slide a whole, uncut Kringle onto a baking sheet lined with aluminum foil. Cover loosely with a large piece of aluminum foil and heat for 12 to 15 minutes. Remove from oven and remove aluminum foil before slicing.
-
Makes 2 Kringles (each serves 10 to 12).
-
In a large bowl, combine pecans or walnuts, brown sugar, and butter.
-
In a medium bowl, combine powdered sugar, water, and vanilla.
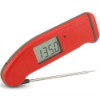 I get many readers asking what cooking/meat thermometer that I prefer and use in my cooking and baking. I, personally, use the Thermapen Thermometer. Originally designed for professional use, the Super-Fast Thermapen Thermometer is used by chefs all over the world. I only endorse a few products, on my web site, that I like and use regularly.
You can learn more or buy yours at: Super-Fast Thermapen Thermometer.
15 Responses to “Danish Kringle History and Recipe”
Linda Petersen Queen
I just saw your feature for almond cherry Kringle limited time. Lived all my life with Danish Kringle and find myself in Germany for a year and miss it. Wonders! I found your recioe on line after looking for my grandmas. Thank you!!! Gonna make one now.
Jerry Sivets
I just made two but I found I had too much dough when making them 15 x 10. It made them too fat and there was no center opening. I used the exact ingredient measurements given in the recipe. What do you think I did wrong?
Whats Cooking America
Make sure you are rolling dough between 1/4 to 1/2 inches in thickness before adding filling and folding dough over.
Stephen Rafe
Can I just use packaged Fila dough?
Linda Stradley
I have never tries using packaged file dough.
PattiB
No, packaged Fila dough will not work. Kringles are make with yeast dough that is layered with butter. Fila has no yeast in it and it would not rise. In the recipe directions you have to let the dough double in size. Fila dough would not do this.
JessicaC
I (Racine WI Native) believe that this recipe is an easier method to try than the true method used. It looks more like a rough puff pastry dough with the butter cut in. Racine bakeries kringle have more pockets in the pastry than just a cut in butter. This recipe also does not call for any layering or turns. My grandmother’s recipe has at least two turns and takes place over 3 days. I also wonder at the thickness of the rolled dough. The pastry I grew up with, the 3-4 bakeries depending on which relative’s house and neighborhood, the layer baked was no more than 1/4 inch thick and more usually thinner with a definite crisp layer exterior at some of them. This recipe would likely be more authentic if the rested dough wast then rolled to 1/4 inch thickness, and butter layered on top of two thirds of rolled dough, folded over the non-buttered third, then the buttered third, wrapped and chilled (3 layers). Then do a similar letter fold after rolling again (9 layers), twice (27 layers), chilling in between.
Lynne Crandall
You explained rolling the dough and how to butter the layers perfectly. Thank you!
Michelle
Tried this today. The dough was too bready. More like a danish. Tastes good though.
Maggie
There is no layering in the recipe. I imagine its like making croissants, roll, butter, fold in thirds, roll, fold in thirds, etc. The article explains there is rolling, but you do not describe any of this in the recipe. Disappointing.
Whats Cooking America
The butter is cut into the flour, which makes the dough nice a flaky. Layering is not required for this recipe.
C Q
My grandmothers recipe had about 27 layers too
It took forever but worth it
No joke , I really only had it at funerals
Nikki
Just an FYI, it’s not “wienerbroth” but “wienerbrød”, or “wienerbroed”. No broth.
Nancy
Thank you!
Grethe
My Danish relatives always used sliced almonds and did the roll,fold,refridgerate and repeat at least 3 times.
Good recipe though 🙂