Levain, Sourdough, or Starter
Whatever you call it – it is the secret to authentic artisan bread

Sourdough: The name sourdough comes from San Francisco and their famous sourdough breads. It is thought that French bakers brought sourdough techniques to Northern California during the California Gold Rush in the late 1800s.
Levain: A French word for a natural leaven mixed to a dough-like consistency. Levain has been used for centuries for making bread. It is thought to date back to the time of Moses, on the banks of the Nile.
The principle is the same when making a levain or sourdough starter. A small paste of dough of flour and water is used. The starter is freshened with new food and water on a consistent schedule, and develops a colony of organisms that ferment and multiply. In order to retain the purity of the culture, a small portion of starter is taken off before the mixing of the final dough. This portion is held back and used to begin the next batch of bread.
Creating your own starter to use for sourdough baking is very easy, plus there is real joy and satisfaction in sourdough baking when you create your own starter and keep it alive to use. A good sourdough starter or levain can last for years, even decades, with the proper loving care!
Check out Linda’s Bread Making Hints: Secrets to using the bread machine, About yeast in bread making, and Quick Breads. Check out all of Linda’s wonderful Sourdough Bread Recipes.
Amazon affiliate links are displayed in green font.
You can buy dried versions and then activate them or you can make your own. Ways to get some sourdough starter:
Get a cup of starter from a friend or another baker. You take a cup of the starter and add flour and water to make more of it. The starter can go on for years.
You can make a starter with normal packaged yeast you buy at the store (see recipe below). Or you can purchase a Packaged Sourdough Starter Mix from Amazon.
I have found that working with a sourdough starter can be very time consuming. Especially if you follow what most sourdough books say and feed them everyday. That is too much work for me as I already have a cat! You even need a sourdough sitter when leaving town!
Because I do not use my starter everyday, I store it, covered with plastic wrap, in the refrigerator until ready to use. When I decide I want to use my starter, I then remove it from the refrigerator and let it come to room temperature (usually I let it sit overnight on the counter). I then feed it with 1 cup flour and 1 cup warm water. I let this sit 8 hours or preferably overnight. It is now ready to use in your sourdough recipes!
- 2 cups all-purpose flour or bread flour
- 2 teaspoons granulated sugar (optional)*
- 1 packet (2 1/4 teaspoons) active dry yeast
- 2 cups warm water (105 to 115 degrees F.)**
-
Mix the flour, sugar, and yeast together in a clean and sterile container (use only glass, glazed ceramic or crockery to hold your starter. No metal or plastic) that can hold two quarts. Gradually stir in the water and mix until it forms a thick paste (do not worry about any lumps, as they will disappear).
-
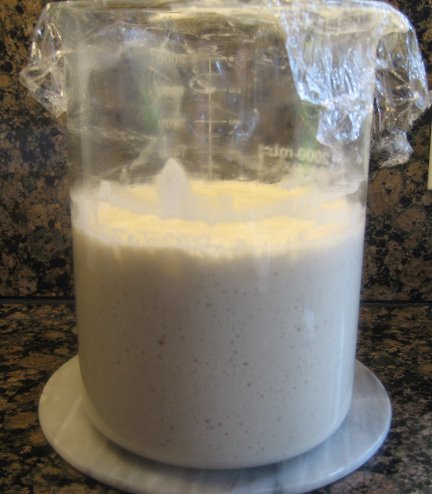
Cover the container with a dish cloth and let it sit in a warm (70 to 80 degrees F.), draft-free place. NOTE: Temperatures hotter than 100 degrees F. or so will kill the yeast. The dish cloth will let wild yeasts pass through into the batter. The mixture should bubble as it ferments (this will foam up quite a bit). Sometimes I place the container in my sink (if sourdough spills out onto your counter, it is hard to clean off once it has dried).
-
Let it sit out (at room temperature) for 2 to 5 days, stirring it once a day. The starter is ready when it develops a pleasant sour smell and looks bubbly.
-
Once your starter starts bubbling, then start feeding it daily with flour and water according to the directions below. Then stir it, cover loosely with plastic wrap (allow a little breathing space), and store it on your counter top or in the refrigerator (your choice).
* Adding a little sugar will help jump start the yeast process, as yeast feeds on sugar for its energy. Yeast rises by feeding on the sugars in flour, and expelling carbon dioxide in the process. That is why using just a little sugar can help boost this process. Do not overdo the sugar.
** If the water you use contains chlorine, use distilled water, bottled water, or tap water that you have allowed to set out for 24 hours when you make your starter. Chlorine can stop the development of yeast.
Feeding your Sourdough Starter:
Your starter should be fed daily if left sitting on the counter – Ideally every other week if refrigerated.
Counter Stored Sourdough Starter: When you feed your starter, feed it with approximately equal weights of flour and water.
Remove approximately 3/4 to 1 cup of starter (use this starter in a baked item, give it to a neighbor, or throw it away. Do not thow it down your sink drain). Replace it with same amount (3/4 to 1 cup) of warm water (105 to 115 degrees F.) plus (3/4 to 1 cup) flour. I have also had excellent results using some rye flour. I usually alternate using rye flour and regular flour for my daily feedings of the starter. The rule is to use at least 50% wheat flour (all-purpose flour or bread flour) to get the best texture and volume.
Let it sit out for a few hours, covered, to become active before using in your baking. Do not place your sourdough starter in an airtight container! As a general rule of thumb, the amount you feed your sourdough starter depends on how much starter you have. When practical, you want to approximately double the amount of starter you have each time you feed it.
Refrigerated Stored Sourdough Starter:
When I decide I want to use my starter, I then remove it from the refrigerator and let it come to room temperature (usually I let it sit overnight on the counter). I then feed it with one (1) cup flour and one (1) cup warm water (105 to 115 degrees F.). I let this sit eight (8) hours or preferably overnight. It is now ready to use in your sourdough recipes!
NOTE: If I have stored my sourdough starter in the refrigerator a long period of time, like a couple of months, I usually need to do the feeding process 2 to 3 times to “wake” it up and get it real active. I take it out of the refrigerator 2 to 3 days before needing to bake with it and proceed with the feeding process every day.
Sourdough Too Sour: If you think that your sourdough is too sour, throw all of it away except 1 cup. Add 2 cups of flour and 2 cups of warm water to it, and let it ferment for a day or so.
Freezing Sourdough Starter: If you will not be using your starter for some time, freeze it. Two (2) days before you need to use it, let it defrost. Then feed it and let it ferment for a day.
Remember:
Utensils: Use only wood or plastic mixing spoons. Measure starter in liquid-type measuring cups. Amazon link for Bamboo Sourdough Bread Starter Stirrer Mixing Spoon
Containers: Use glass, plastic, or stoneware bowls or crocks. Do not use copper or aluminum. Use a large enough container that can hold 3 times of amount of ingredients as the starter expands as it ferments. Amazon link for stoneware crock.
Temperature: Before feeding your starter, let the ingredients come to room temperature. Do not try to hurry the process by raising the temperature higher than 85 degrees F. DO NOT EVER allow your starter to be subject to a temperature above 95 degrees F. or it may die. A warm place means 85 degrees F. and draft free.
Covering Starter: Cover your starter container loosely to let fresh air in and keep out unwanted flavors. Never seal with a tight lid as sourdough needs to breathe.
Water: Use the inside of your wrist for determining the proper temperature of warm water to be added. Never use hot or cold water. If the water you use contains chlorine, use distilled water, bottled water, or tap water that you have allowed to set out for 24 hours when you make your starter. Chlorine can stop the development of yeast.
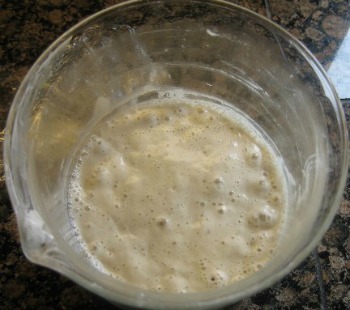
Liquid on Top: Remember that a clear yellow liquid (hooch) may rise to the top of your starter. This is normal – just stir it back in. (See Hooch below)
Mixing/Stirring Starter: Avoid mixing the starter too much. Over-mixing knocks the gases out of the dough. T hese gases are needed for rising. Do not worry about any lumps, as they will disappear.
Strange Color or Smell: If the starter turns a strange color (pink to orange) or smells bad – discard it and start over.
What is Hooch?
As your starter sits or goes quiet in the refrigerator, the mixture separates and a layer of liquid will form on the top. This liquid contains about 12% to 14% alcohol. Hooch is the alcoholic by-product of the fermentation process. The hooch will have a brownish color. The alcohol dissipates during the baking process. Stir that liquid back into the starter before using.
Hooch builds up in your starter, especially when being stored in the refrigerator. You can either pour it off or stir it back in. If your sourdough starter is on the dry side, just mix the hooch back in. If your starter is already too moist, discard. Regular feedings of your starter will reduce the amount of hooch.
Important: If your sourdough starter or hooch starts looking pinkish or orange color, throw it away and start over as this means that something bad or nasty has started growing in your starter.
Using Baking Soda (bicarbonate of soda or soda bicarbonate):
Many sourdough recipes call for baking soda. The baking soda reacts with the sourdough starter to give a good rise and it also sweetens the dough or batter by neutralizing some of the acidic taste. Soda is also a leavening agent.
Add just a small amount of baking soda, 1/8 to 1/4 teaspoon baking soda (never add more), will also give your sourdough a little extra rise. The baking soda will cause your starter to instantly start bubbling. Add the baking soda at the very last minute before baking. This allows the air in the batter to produce a fluffy sourdough when baking.
Check out my family’s favorite Sourdough Pancakes that uses baking soda. So easy-to-make and so good!
Linda’s Favorite Sourdough Recipes:
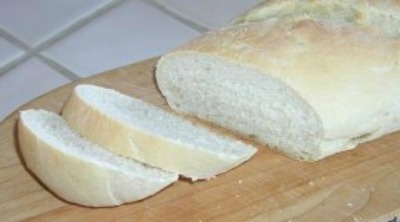
San Francisco-Style Sourdough French Bread
I have spent much time experimenting with sourdough to come up with a recipe that I feel can rival the famous San Francisco Sourdough French Bread.
Sourdough Semolina Bread
My husband loves the coarser texture of this sourdough bread recipe. He said to be sure and tell you that it is even better served with honey.
Sourdough Raisin Pumpernickel Bread
Sourdough starter gives moisture to this dark, dense sourdough raisin pumpernickel bread
Sourdough Fruit Bread
My husband and I loved this bread! We couldn’t stop eating it!
Sourdough Cinnamon Rolls
Enjoy making these wonderful cinnamon rolls with your sourdough starter.
Sourdough Pancakes
You couldn’t ask for an easier pancake recipe that this one, and the pancakes are so light that they “melt in your mouth.” My family loves these pancake, and it has become a tradition to make them when they come to visit.
Sourdough Biscuits
Another great recipe to use your sourdough starter. Who doesn’t like biscuits?
Sourdough Pizza Dough
Enjoy some delicious pizza with my sourdough pizza dough!
Sourdough Pumpkin Chocolate Chip Bread
The combination of pumpkin and chocolate with some of my sourdough starter makes a fantastic dessert bread that only takes 20 mins to rise.
Comments and questions from readers:
I almost never contact people whose recipes I glean from the net, but I wanted to let you know that your recipe was perfect for my needs. We were faced with buying a starter which I doubt we could find locally or making our own. We had promised to bring sourdough for a party our son is throwing tomorrow and he is making a giant batch of cioppino, which as you know demands sourdough to sop up the goodness and nothing else – LOL. Anyway like an idiot, I neglected to do anything about it until Thursday night, so I quickly found your recipe and started one. Based on what I was reading there wasn’t a chance in hell that I could do it by the time I needed to bake. Luckily yours was among the first results and looked to be something I could get to where it needed to be by tomorrow morning (3 1/2 days later). Anyway it smells great and even if my bread flops (I use a bread machine and I have never tried sourdough with it). I can still use it for Christmas dinner.
Anyway a few things that I tried seemed to speed it up. I proofed it right away in the over at 100 overnight, it was roaring the next morning. I fed it as you said and the only thing different I did was because my kitchen this time of year is 68 all day long, I proofed it for a half hour to an hour or so each time. Thinking about it for a minute makes perfect sense, the temperature does nothing to harm and microbes you would want in the starter but obviously if it isn’t sitting out there isn’t much of a chance to get any wild yeasts or Lactobacillus going. I think I am lucky in that Candida is very common on apples and we make cider every year in November, so it has to be flying around the house now. Also I used a paper towel which I don’t think made any difference, I don’t like dish towels because you can never get one as clean as a paper towel off the rack.
You might want to check out this site: Sourdough Myths and Folklore. I did since I am pretty familiar with organic chemistry so was dubious about the metal thing, and I think they are right on. Stainless steel really can’t react with much of anything you would put in it, which is the whole point behind it being used in so much cooking equipment. You would have to put it in a strong base like lye or a strong acid like muriatic to get much of a reaction going, and I doubt that even that would harm food. Steel is steel and all it can do is make rust, and nothing else, without a lot of chemistry. Rust doesn’t matter to anything living unless you immerse it in it. Also I agree with their chlorinated water statement. I brew beer and cider all the time and chlorinated water has never killed my yeast. All you need to do is let it sit for 5 minutes to let the chlorine dissipate into the air, it doesn’t like being in water at all. There is so little chlorine it can’t have time to react with anything before it dissipates, if it did the EPA would come down on chlorinating drinking water like a ton of bricks
Again thanks for the recipe!
Tim Fisher at OreRockOn.com (12/22/12)
Question:
I am so excited. I’ve just made your sourdough starter and am ready to make my first loaf of bread. Being new to sourdough I have a question. What consistency should my starter be? Mine is, what I would call, a medium pancake batter consistency. Does this sound right? – Judy (11/15/07)
Answer:
Congratulations on making your sourdough starter. A medium pancake batter consistency sounds good. That is approximately what my sourdough starter is. Remember, when making your homemade sourdough bread, the consistency of your sourdough will determine how much flour or water will need to be added when making the dough. You cannot follow a sourdough recipe exactly because of this. – Linda Stradley
11 Responses to “Sourdough Starter Recipe”
Judy Peterson
I started my sourdough starter 3 days ago. I have fed it 2 times since starting. Last night it doubled in size and then fell a bit later. Is it really a must to remove half the starter ? I hate throwing this away. seems like such a waste. I now have 2 jars of starter going. How soon can I begin baking with the starter ? Thank you.
Linda Stradley
Since your sourdough starter sounds like it is active, go ahead and start baking with it. Yes, it is a must to keep feeding your sourdough starter. Your starter should be fed daily if left sitting on the counter – Ideally very other week if refrigerated.
When I know I will be using a lot of starter (like when I am expecting company), instead of discarding 1 cup of starter, I leave it in the pot and add additional flour and water.
Boyd Wicks
Hi :
Great article! Simplest one to follow I have seen.
2 questions :
I made my mix yesterday and stirred it today. Should I add the flour and water starting today or wait until it smells sour?
Also, my mix is VERY thin – should i add bit of flour to thicken it?
Thanks !
Linda Stradley
Let it sit out (at room temperature) for 2 to 5 days, stirring it once a day. The starter is ready when it develops a pleasant sour smell and looks bubbly.
Once your starter starts bubbling, then start feeding it daily with flour and water according to the directions in the recipe. Then stir it, cover loosely with plastic wrap (allow a little breathing space), and store it on your counter top or in the refrigerator (your choice).
If you think the batter is to thin, then add some additional flour.
Teri Lee
Years ago I used to make sourdough bread with a starter that I was given and loved making sourdough bread. This was a great article and I would like to start baking it again. I have a question for you. I no longer eat gluten or wheat. If I used a different flour (almond, sojourn, or rice) would the starter work on it. If so, can u suggest which one?
Darlyene Spann
This is my first ever starter and I couldn’t be more pleased. The bubbling stays active so i know its going to work hard for me. Thank you.
Katy
Hi! I just made my starter a few hours ago, and it’s already bubbly. Is it possible for the dough to be ready before 2 days?
Whats Cooking America
Per my instructions, it takes 2-5 days of fermenting before the sourdough starter is ready to use. I recommend waiting at least 2 days. Before using make sure the starter develops a pleasant sour smell and looks bubbly.
Vitraxyn
Just wanna say that this is very useful, Thanks for taking your time to
write this.
Cindy
I just made the starter today and thankfully put the container in an easy clean place since it overflowed within a few hours! I caught it quick enough that not much was lost. It’s now in bigger crock and looks to be happily bubbling away. I love this recipe since it doesn’t need to be babied and can be refrigerated. Way too busy for all that. looking forward to making some good bread in a few days!
Sherry Klusman
How many days do I need to feed my sourdough starter before I can use it? I feel like I’ve missed something. Thanks so much.