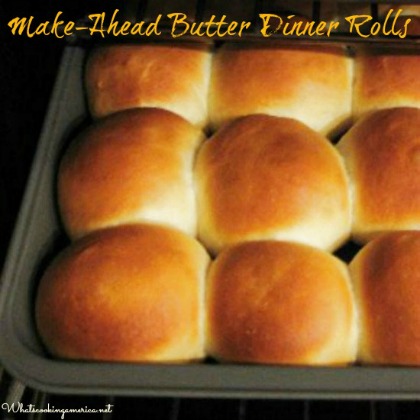
In our family, these Refrigerator Dinner Rolls are always made for the holidays (especially Thanksgiving, Christmas, and Easter dinner). They are wonderful tasting and so easy to make.
My mother received this Refrigerator Dinner Rolls recipe from my grandmother, who got this recipe from her elderly neighbor in the 1930s. We figure this recipe is over 100 years old. Do not worry – This Refrigerator Dinner Rolls recipe has been tested in today’s kitchen. You can make the dough and shape these Refrigerator Dinner Rolls up to a day ahead of baking. This takes the hassle out of your holiday dinner.
Check out Linda’s Bread Making Hints: Secrets to using the bread machine, About yeast in bread making, Sourdough Starter, and Quick Breads.
More great Bread Recipes, Sourdough Bread Recipes and Quick Bread Recipes for all your bread making.
- 1/4 cup granulated sugar
- 3 tablespoons vegetable shortening
- 1 1/2 teaspoons salt
- 1 cup milk
- 1 package active dry yeast
- 3/4 cup lukewarm water (105 to 115 degrees F.)
- 1 eggs, beaten
- 4 to 4 1/2 cups all-purpose flour, divided
- Butter, melted
-
In a large bowl, combine sugar, vegetable shortening, and salt; stir until well blended. In a small saucepan, scald milk; pour over sugar mixture. Cool to lukewarm (105 to 115 degrees F).
-
In a small bowl, combine yeast and water; stir until yeast is dissolved. Mix in egg until well blended; stir into milk mixture.
-
Add 2 cups flour. Gradually stir in as much of the remaining flour as dough will absorb, mixing well. Check the dough. It should form a nice elastic ball. If you think the dough is too moist, add additional flour (a tablespoon at a time). The same is true if the dough is looking dry and gnarly. Add warm water (a tablespoon at a time). If you can not judge your dough by looking, stick your finger in and feel the dough. It should be slightly tacky to the touch.
-
Place dough into a well-greased bowl, turning to grease top. Cover bowl (with dough in it) with plastic wrap. Refrigerate at least 8 hours but no longer than 5 days.
-
Grease a baking pan or muffin cups. To bake, shape into desired amount of rolls (cloverleaf rolls, Parker House rolls, or crescent-shaped rolls) and shape dough into tight balls).
-
As you shape the rolls, you want to stretch the top of the dough ball while simultaneously sealing the bottom. The stretching helps the dough hold up to the expansion that occurs in the oven, while the sealing prevents the rolls from opening up while baking and becoming wrinkled and doughy on the bottom.
-
As you work, keep the rest of the dough pieces covered with plastic wrap so they will not dry out. The easiest way to get rolls the same size, is to weight the dough:
-
For 16 small rolls - weigh dough into 2-ounce pieces.
-
For 13 large rolls - weigh dough into 3-ounce pieces.
-
Place the balls (in the desired style you want) onto prepared baking pan or into prepared muffin cups. Cover and let rise in a warm place (85 degrees), free from drafts, until double in bulk, about 1 hour.
-
Preheat oven to 375 degrees F.
-
Bake 15 to 20 minutes or until golden brown. Remove from oven and remove from pans.
-
Yields 16 to 24 rolls (depending on size).
-
Types Of Dinner Rolls – How To Make Different Styles of Dinner Rolls:
CLOVERLEAF DINNER ROLLS – Form dough into one-inch balls. Place three balls into each greased muffin cup. Brush with melted butter.
CRESCENT-SHAPED DINNER ROLLS – Roll dough into a twelve-inch circle, about one-fourth-inch thick. Spread with melted butter. Cut into sixteen wedges. Roll up, beginning at rounded edge. Place rolls, with point underneath, onto greased baking sheet, curving slightly. Brush with butter.
PARKER HOUSE DINNER ROLLS – Roll dough into an oblong shape, about one-fourth inch thick. Cut into three-inch circles and brush with melted butter. Make a crease across each circle; fold so top half overlaps slightly. Press edges together. Place close together onto greased baking pan. Brush with butter.
ROUND ROLLS – After resting, shape the dough into 24 tight balls between the palm of your hands. To make uniform rolls, weigh the dough into 2 ounces each. As you shape the rolls, stretch the top of the dough ball while simultaneously sealing the bottom. This stretching helps the dough hold up to the expansion that occurs in the oven, and the sealing prevents the roll from opening up while baking. As you make each roll, transfer the roll to a non-sticking baking sheet (sealed side down).
Categories:
Christmas Easter Heirloom Recipes Holiday Turkey Dinners Holidays & Events Rolls & Bread Sticks Savory Yeast Bread

One Response to “Mom’s Refrigerator Dinner Rolls Recipe”
Pam
Should I punch the dough down every once in a while? The dough is in a covered bowl in the fridge but it keeps pushing the cover off! The bowl was twice the size of the original dough mass. I thought it would be large enough.