How To Use A Dutch Oven
The following informative and interesting article and photos are by Eileen Troemel of Janesville, Wisconsin (near Madison).
Camping usually means you eat hot dogs on a stick, cold sandwiches and not a lot of appetizing food. But what if it didn’t mean that? What if you could have Salisbury steak, mashed potatoes, steamed vegetables, and cherry cobbler? Or any other meal you would normally cook at home? Would campfire food be more appealing? Well it can be if you utilize a very old and versatile tool; something your grandmother probably had more than one of – a Dutch oven.
Learn more about restoring and seasoning Cast-Iron Pots and Pans and check out the large selection of Cast-Iron Cooking Recipes.
History of Dutch Ovens:
The Dutch oven is believed to date back to the early 1700s in Holland. How and when it came to the U.S. is unknown but supposedly Paul Revere created the flanged lid and the final design of the oven. Some reports indicate that George Washington used Dutch ovens to feed his troops during the Revolutionary war.
As Americans moved west and expanded into the new world, the Dutch oven became a valuable commodity being a popular trade item with mountain men and Native Americans. As the United States expanded, this tool was taken along. When pioneers, homesteaders, miners, and ranchers moved west, the Dutch oven was one of their most valuable items especially since entire meals could be cooked in them. Records show that Lewis and Clark cooked wild game as well as dog and horse during their trek to the west coast. Another common use was during cattle drives, drive cooks fed the famous beans and stew to the cowboys during the long cattle drives. The famous 49ers in California commonly used the Dutch oven to make sourdough bread. Likewise soldiers used it for cooking during the Civil War.
In 1896 Joseph Lodge built a cast iron foundry in Tennessee. The best known product from this foundry was the Dutch oven. Lodge still produces this well known product today and is currently the leading producer of the cast iron Dutch ovens.
Another place the Dutch oven appeared is in the work camps following World War I. However, the popularity of the product waned. A renewed interest began in the 70s and 80s with a cook off contest. In fact, the Dutch oven became popular enough that the International Dutch Oven Society formed in 1984 and Utah made the Dutch oven the cook pot of the state in 1997.
All very interesting but grandma doesn’t go camping anymore and you have no idea how to work with Dutch ovens. A search on the web or through the cooking aisle only offers a multitude of products and a lot of confusion. So where do you start?
Type of Dutch Ovens:
Standing in the aisle with Dutch ovens you are likely to be bombarded with choices. Do you get aluminum or cast iron? What is the difference between a kitchen or camp oven? Where do bean pots fit in? Should you get a pre-seasoned pot or not?
Aluminum Dutch Ovens – Most traditionalists will tell you that cast iron is the way to go, but there are advantages to both aluminum and cast iron. Aluminum is a light weight alternative for those hiking in to their campsite or for cooks with physical limitations. For a 12-inch pan, aluminum pans weigh about 7 pounds rather than the 18 pounds for a cast iron pot. Aluminum is also easier to care for as it won’t rust and can just be washed as any other pan is washed in soap and water. It also doesn’t require seasoning like a cast iron pan. Some of the newer models even come with a non-stick surface. Aluminum will not discolor the food like cast iron does. It also heats faster; however, there are also two disadvantages to this. On windy days the pan will have more fluctuations than cast iron and if you get an aluminum pan too hot, it will melt. Two areas aluminum excels at are baking bread and making gravy.
Cast-Iron Dutch Oven – While some of the newer aluminum pans come close to cast iron, cast iron is still the preferred material for a Dutch oven. Good quality cast iron can be passed down through generations because the material is so long lasting. A cast iron pot distributes the heat evenly and less heat is needed to cook the food. It will also retain heat longer, often a pan can be removed from the heat before the food is done cooking and the heat retained in the pan will finish the cooking process. Since the cast iron will retain heat, there is less fuel needed for cooking. The heavy lid seals the pot and steams the food, which keeps it moist and tender. Unlike the aluminum pan, cast iron tolerates the higher temperatures better and is not likely to melt. It reacts more slowly to the heat changes so is less affected by windy weather. Food can sit in a closed cast iron oven for longer and retain the heat needed for serving. Since the cast iron Dutch oven cools slowly, if food has to be a certain temperature then remove it from the oven. There is the added benefit that cooking in a cast iron pan adds iron to the food cooked in it. Dutch ovens come with a variety of stove names. Camp, outdoor, kitchen, or bean pots are the most common names. As you are standing in the aisle at the store, don’t let all the names confuse you. First camp or outdoor Dutch oven are the same type of oven. Likewise the bean pot or kitchen Dutch oven are the same. The name bean pot dates back to a colonial cooking technique described under Types of Cooking in this article.
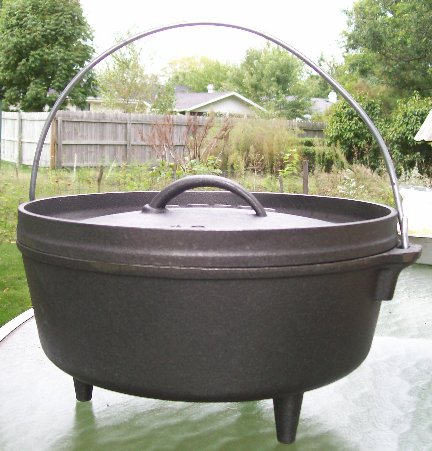
Camp or outdoor Dutch ovens have the following features:
 The camp or outdoor cast iron Dutch oven is the preferred oven for outdoor and campfire cooking.
- Flat bottom
- Three short legs which allows the oven to be above the ground to allow the circulation of air onto the coals.
- Strong wire handle which may have the option to stand up at a 45 degree angle. By having the handle stand up it will give better access when positioning or removing the oven from the fire.
- Flat lid with a lip of 1 to 2 inches; the lip allows you to place hot coals on top of the oven1 or can be used as a frying pan.
- Small loop handle on lid, make sure it is attached at both ends to make it easier to lift off with a hook.
- Skillet type handle attached to the lid which helps when using the lid as a griddle or fry pan.
- Size of ovens range from 5 to 22 inches in diameter for the rim. Depth is around 3 inches but some can be as deep as 9 inches with the larger diameters. Remember that the larger the oven the heavier it will be when it is full of food. A 12-inch Dutch oven full of food can weigh as much as 25 pounds.
Kitchen, stove, or bean pots have these features:
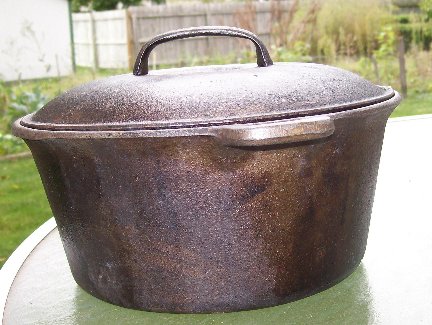
- Flat bottom with no legs which are good for using on wood burning stoves.
- Lid may be domed or have spiked nodes for basting
Generally the kitchen (stove/bean pot) version of the Dutch oven works best on the stove at home, on a propane burner, or hanging from a tripod. However if you have a couple of bricks, you can place the oven on them and coals underneath.
Purchasing A Dutch Oven:
New, the cast iron Dutch oven can be very costly. If you check junk shops, rummage sales, or thrift stores you might be able to save yourself a lot of money. However, make sure you are getting a good quality Dutch oven.
If buying a used Dutch oven here are a few things to look for:
- Cracks, chips, casting imperfections and rust spots
- Examine the pot and lid both inside and out
- Make sure the lid fits properly
- Make sure there is no rocking motion when the lid is on the pot
- Make sure the lid does not fit too tightly on the pot
- Check the wire bail for strength and that it moves easily
- If looking for a camping pot, then only buy a Dutch oven with legs and determine that these are in good condition
- Check the thickness of the metal – inconsistencies will mean inconsistencies when cooking
- Make sure there is a loop handle which makes it easier to pick up with a hook
- Avoid Dutch Ovens with riveted tabs
If you have purchased a ready to use Dutch oven follow these steps:
- Before using for the first time rinse with hot water but no soap, and towel dry
- Before each time cooking, prepare the cooking surface by wiping it down with vegetable oil
- After each time cooking, clean with a stiff brush under hot water with no soap and towel dry
- After it is dry and while still warm, wipe all surfaces down with oil
- Allow the oven to cool and then store in a cool dry place, do not store with the lid on top
How To Use and Care For A Dutch Oven:
You have conquered the cooking aisle or the rummage sale and come home with the prized Dutch oven. So what’s next? Well whether you purchased an aluminum or cast iron oven most manufacturers put a protective coat on the item. Before you begin cooking, this coating needs to be removed. Also if you inherited or purchased a used Dutch oven it will need to be seasoned.
If your oven is aluminum you only have to do one simple step – wash the oven in soap and water. This should remove any coating. However, if you treat the aluminum pan like a cast iron and season it (see steps below) then the oven will have almost a non-stick surface.
Prior to seasoning, wash the Dutch oven with warm water. Some experts suggest that when an oven is new is the only time you should use soap. Most experts; however, suggest only using a good scrubbing with steel wool and some elbow grease. For a cast iron oven, you need to follow a seasoning process. Aside from removing the protective coating, there are many reasons to season your cast iron Dutch oven. Here are a few important reasons:
- Creates a patina which helps prevent food from sticking
- Makes cleaning easier
- Prevents rusting
- Add flavor
- Oil forms a carbon non-stick coating when heated
There are four methods to season a cast iron Dutch oven, one indoor and three outdoor methods:
Indoor method:
- Preheat oven to 350 F.
- Open windows and turn off the smoke alarm
- Place pot and lid in oven and heat until they are almost too hot to handle
- Remove pot and lid from oven
- Use paper towel to rub a thin layer of oil (can use olive or vegetable oil or solid shortening – do not use margarine or butter.
- Avoid using spray oil as it may leave a sticky residue
- Cover all surfaces including legs
- Place pot and lid on top rack of oven
- Put a cookie sheet on the lower rack to catch any run off and prevent oven from catching fire
- Bake for one hour
- Turn off the oven and let pot and lid cool in the oven
- Repeat the process
- Remove the pot and lid from oven and wipe with clean dry cloth
Note: If you have a fireplace in your home, you can use this to season your oven. Its best to have a hook in the fireplace. If the chimney flue has a good draw, it can minimize the grease smoke in the house.
Outdoor method A:
- Use your oven as a deep fryer to fry fish, hush puppies and fries
- Once done cooking pour oil out and wipe pot with paper towel
Outdoor method B:
- Fry thick sliced unsalted bacon on the lid and in the pot
Outdoor method C:
- Using a propane gas grill with a cover turn grill on to low and place the Dutch oven in the grill to preheat
- When warm wipe on a thin layer of oil
- Place lid and oven in the grill and lower the lid
- Cook for one hour
- Repeat the process
- Remove and wipe with clean dry cloth
Note: this can be done with a charcoal grill as well but be careful not to overheat the Dutch oven
Regardless of the methods used to season the oven, it will darken with use. This is preferred as it is an indication of a well seasoned oven. Also these seasoning techniques work for any cast iron cookware hiding in the back of your cabinet.
When seasoning an oven do not use butter, margarine, or salad oil. Additionally for the first few meals after seasoning avoid cooking high acid content dishes or high sugar content after seasoning. The acid and sugars can break down the seasoning before it has a chance to properly harden.
If you don’t want to go through the steps of seasoning your pot then you can usually buy one which is pre-seasoned. Bear in mind though, these are usually more expensive.
Here is one additional method which is a bit different that uses hay and water to season the Dutch Oven:
- Fill Dutch oven with water and a handful of clean hay
- Boil for 20 minutes
- Rinse
- Rub with oil
Accessories for Dutch Ovens:
In addition to a cast iron Dutch oven, there are a variety of tools which can help when cooking with a Dutch oven. Here is a list of accessories you might consider having accessible. If you are interested in purchasing any of the below items, just click on the green links:
Steel table can put coals around and on the oven and it is at a comfortable height for cooking
Cake racks and pans – racks allow good circulation and eliminates hot spots – the Dutch oven becomes an oven rather than a pot; pans prevent the need for re-seasoning after cooking high acid or sticky foods.
Lid lifter– is a long sturdy tool with a hook on the end and is used to lift the lid.
Charcoal Chimney Starter – gets charcoal to cooking temp and does not require starter fluid; simply wad newspaper in the bottom and then stack charcoal on top, light the paper.
Dutch Oven Lid Stand – gives cook clean stand to set the lid on, can put charcoal around stand, then turn over the lid to use as a griddle; can be used to preheat the lid.
Heavy Leather Gloves – welders gloves or Dutch oven gloves helps prevent burns.
Campfire Tripod – sturdy and for use over a camp fire – recommend one made with at least 1/2-inch bar stock to hold the weight of a hanging Dutch oven filled with food.
Hot Coal Shovel – long handled to move coals from campfire to heat the Dutch oven.
Whisk broom – small size, helps brush off the ash from the lid.
Wooden utensils – protects the seasoning of the Dutch oven – longer is better – use wood, plastic or Teflon tools as these will not scrape away the curing of the Dutch oven.
Care of Wooden Utensils:
Hand wash with regular dish soap, rinse and dry
Lightly sand if they get the fuzzies
Rub with mineral oil or beeswax, do not use vegetable oil
Do not soak
Matches – to light the fire
Hot Pot Pliers – special jaws grip the oven lid securely
Dust covers – for use during storage, also protects clothing from getting oil from oven, look for ones with holes for the legs, canvas is a good material for use with the ovens
Volcano Cook Stoves – allows you to cook your favorite dishes using fewer briquettes – ventilated design helps keep the outside cool to the touch even when loaded with coals
Dutch Oven Cooking – Dutch Oven Recipes:
Now you have a seasoned Dutch oven ready to go on your next camping trip. Hurray – no more hot dogs on a stick! But what exactly can you make in a Dutch oven? The Dutch oven can be used to create an entire meal from appetizers to desserts.
If you are cooking a full meal then you may want to have several Dutch ovens to cook with or in. You might even consider having racks and smaller pans to use inside the ovens. Almost any recipe you love at home can be done in a Dutch oven. You may need to adapt the amount of liquid since the closed lid creates a steaming affect on the food. Rather than trying to adapt your own recipe there are cookbooks available. If you are a novice and trying a recipe from a Dutch oven cookbook, you might want to follow the directions exactly for the best results. Only make adjustments after you have tried it at least once. Also make sure your Dutch oven matches the size in the recipe or you could have an unintended overflow.
There are several methods for cooking with a Dutch oven including Bean Hole and Crock Pot cooking (see directions below). In general, there are two broad techniques. You can cook with it or in it. When you cook with the Dutch oven, the food is placed directly into the oven. When you cook in the Dutch oven, food is placed in a secondary pan and then on a trivet in the oven, usually this is done to prevent burning on the bottom. This is one technique where the Dutch oven actually acts as an oven.
 Recipe and photo tutorial for
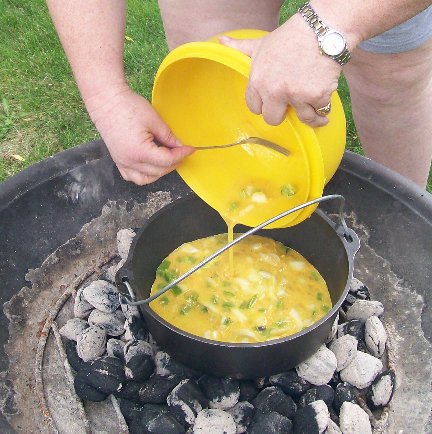
Dutch Oven Scrambled Eggs and Biscuits.
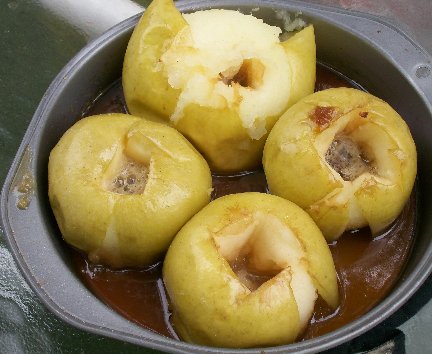
Recipes and photo tutorial for
Dutch Oven Baked Caramel Apples.

Recipe and photo tutorial for Dutch Oven Swiss Steak.
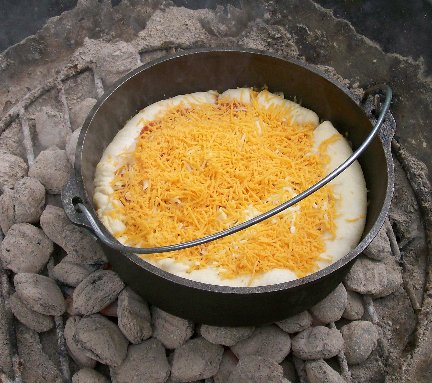
Recipe and photo tutorial for
Dutch Oven Baked Pizza.
Additionally the lid can be used as a griddle or skillet. It’s placed upside down on the coals and works great for bacon, eggs, pancakes, etc. The lid is shaped like a shallow bowl so food typically stays towards the center.

If the food cooked in the Dutch oven is black food or has a metallic taste indicator of one of two things:
- Dutch oven not properly seasoned
- Food was left in the pot after cooking
In a single Dutch oven, you can perform deep and shallow frying, roasting, baking, boiling, stewing, simmering and steaming. Use these quick hints for each heating method:
- Deep fat frying – all heat should come from bottom – place coals all underneath
- Shallow frying – all heat should come from bottom – place coals all underneath
- Roasting – heat source should come from top and bottom equally – place coals under and on top in a 1-1 ratio
- Baking – usually done with more heat on top – under and on top ratio of 1 – 3
- Boiling – all heat should come from bottom – place coals all underneath
- Stewing – almost all heat from the bottom – under and on top ratio should be 4 – 1
- Simmering – almost all heat from the bottom – under and on top ratio should be 4 – 1
These are a few general hints for temperature control based on the type of dishes:
- Liquid dishes – (soups and stews) more heat on bottom (2/3 of coals) and less on top (1/3 of coals)
- Meat, poultry, potatoes, veggies, cobblers – equal distribution
- Cakes, breads, biscuits and cookies – 2/3 on top and 1/3 on bottom
Bread is a nice addition to any meal. This may seem impossible to do but actually is quite simple. Many stews, soups, and chili adapt well to biscuits or dumplings on top. When I did my cooking in the backyard, I made biscuits from a tube on the lid of the Dutch oven. Check out my recipe and photo tutorial on making Dutch Oven Biscuits.
Here are some hints for making your bread baking experience better:
- When done take the bread out of oven to prevent overcooking and to keep the bread from getting soggy
- Many recipes call for floured baking – this flour coating will burn but the bread should be fine and cleans up fairly easy
- Roll biscuits in oil to get them brown on both sides
Cooking bread:
- Put a light coat of oil on the interior of a cool oven including the lid and let the bread/rolls finish the last rise in the pan prior to applying coals.
- Place the oven on the coals with 2/3 of the coals being placed on top.
- When there are 5 to 8 minutes left, lift the lid and butter the top of the bread, place all the coals on top of the oven, then check every couple of minutes to see if it is done.
Desserts: After a long day of being outdoors, you build up an appetite. One of the best parts of most meals is dessert. Desserts can be made in a Dutch oven, one of the recommendations is to use a pan inside the Dutch oven like a small 8-inch round aluminum cake pan. This puts the sugar in the aluminum cake pan and makes clean up much easier. It helps prevents the cast iron Dutch oven from losing its seasoning.
Bean hole cooking dates back to at least colonial times. Follow these steps:
- Dig hole (side of knoll so can have open for raking)
- Line with stones
- Build fire in and above hole and keep going till stones are hot
- Rake out coals and ash
- Put in Dutch oven which must have a tight lid
- Cover with ashes, live coals, and dirt
- Close mouth of hole with flat rock
Try this Outdoor turkey Pit or Bean hole Turkey Recipe
Stack Cooking:
One other technique involves using multiple Dutch ovens called Stack Cooking. This is best done when the food needs the same amount of heat on top and bottom. To do stack cooking, simply place coals under the largest Dutch oven and place food inside. Place coals on the lid but make sure to leave room for the legs of the small Dutch oven. Once the smaller Dutch oven is in place, fill it with food and cover, then place coals on top.
Somewhat similar, crock pot cooking uses these steps:
- Dig a hole 18 to 20 inches deep and 20 to 24 inches in diameter in the center of the campfire.
- Line the sides of the hole with flat stones and check to make sure the oven will fit in the hole.
- Start a campfire in the bottom of the hole to get coals going.
- Keep adding wood to the fire until it is 1/2 to 2/3 full of coals.
- Kick the fire out and remove the larger pieces of wood.
- Dig a hole in the coals that the Dutch oven containing the evening meal can be set in.
- Cover the Dutch oven with the remaining coals 2 to 3-inches of coals on top of the lid followed by 2-inches of dirt spread over the coals.
- Spread wet burlap bags over the dirt and cover them with rocks so they don’t blow away.
- Leave the oven to sit for the day.
- Dig out the oven and the food should be ready.
- Lift out the oven and brush it off with a whisk before opening.
Here are some hints for making your Dutch oven cooking experience more successful:
- May want to brown meat at home and freeze it – then just heat it up at the camp site.
- Prepare dry mixtures in zip lock bags ahead of time – write mixing directions on the bag and use the bag as a disposable mixing bowl.
- Fajita spice and cinnamon are magic spices and can be used in almost anything
Using Charcoal Heat:
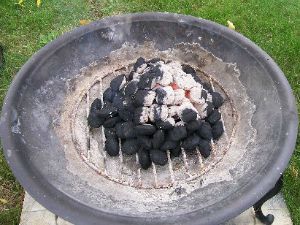 Now you know what and how you can cook but there is one more key component to cooking with a Dutch oven. What will be your heat source? With a kitchen style Dutch oven you can use your stove or oven at home as well as a grill or propane burner. With a camp Dutch oven you can use a campfire of wood or charcoal.
Cooking with charcoal can be in a grill, at a campfire site, or even in a backyard fire pit. In my backyard I have a small metal fire pit, which my family often sits around with a wood fire going. So when I tried Dutch oven cooking, I used charcoal in my fire pit and had good success.
If you opt for charcoal remember to leave room for the bag in your gear. Here are a few advantages of using charcoal:
- burns longer and more evenly
- starts easier especially with a chimney
- easy to transport
- easy to cleanup after
 Charcoal can be arranged in a variety of patterns. You want to avoid bunching of the briquettes as this will cause hot spots in your cooking. Here are three possible patterns:
- checkerboard pattern under oven and on lid
- circle pattern under oven and on lid
- circle under oven and checkerboard on lid
Obviously when working with any kind of fire there are hazards. Here are a few safety tips for working with charcoal:
- never burn in homes, buildings etc due to odorless toxic fumes which may accumulate.
- never use gas to light
- do not add lighter fluid to burning or hot coals
- cook away from overhanging roofs or limbs and flammable items, away from children and sports activities
Follow this formula for temperature control:
- Take the size of the Dutch oven and add 3 more to the top and subtract 3 for the bottom
- This maintains a steady temperature of 325 – 350 degrees F.
Note: 2 coals = 25
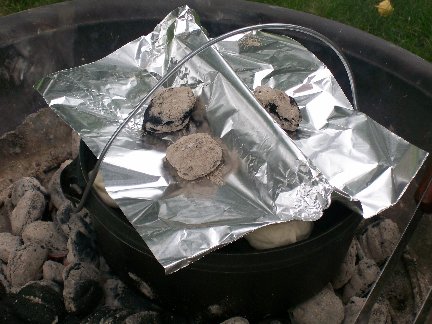
Wind, food type, and outside temperature can affect the temperature when cooking. Cool air temperatures, high altitudes, shade and high humidity will decrease the amount of heat generated by briquettes. Hot air temperatures, low altitude, direct sunlight, and wind will increase the amount of heat generated by briquettes. Additionally the more metal, volume of food, and internal air space you have to heat up the more heat will be required to bring your oven to the desired temperature. If you are in a hurry or short on coals you can cover the Dutch oven with aluminum foil to help keep the heat focused.
Using Wood Heat:
Using wood as a heat source takes a bit more skill. When cooking on an open fire, you need to watch your food carefully since these can have hot spots. You can use a fire ring which can produce good coals. A keyhole design is another way to get coals from a wood fire. The fire is built in the round part and hot coals are pulled into the rectangular section for cooking. With all these formats you may need a cooking platform in order to provide a flat dry surface.
Material is very important when cooking on a wood fire. If the wood burns quickly to ash it is difficult to get coals for cooking with the Dutch oven. Soft woods tend to burn hot and fast. Using soft wood often results in burned food on the outside while the inside remains raw. As they don’t produce hot long lasting coals, some woods to avoid are:
- Poplar
- Cherry
- Elm
- Aspen
- Birch
- Gum
- Yarpon – take special care to avoid this wood as cooking with it will make you sick
Hardwoods, when burned, hold heat better. Some woods to use are:
- Mesquite
- Hickory
- Oak
One advantage of wood, depending on where you are camping, is that at most campsites it is readily available. Some woods, hickory and mesquite in particular, can add flavor to the meals. Here are some hints to make this style of cooking easier:
- start early – hardwoods burn slowly so start the fire well ahead of time to start cooking
- tools – long handled shovel, whisk broom, supply of firewood
- try to get the same size coals
- don’t heap coals
- don’t bury the Dutch oven in the campfire
- turn the Dutch oven 1/4 turn every 15 minutes or 1/3 turn every 10 minutes and turn the lid in the opposite direction
- replenish coals regularly
- avoid high flames except to clean the oven
Here are two helpful hints for cooking with either charcoal or wood:
1. If twice as much heat on top is needed then just have twice as many pieces of charcoal on top as are on bottom – this is not as easy to control if using wood
2. Estimate heat of oven – place your hand about 6 inches over the coals on the lid and count one thousand one; one thousand two; one thousand three… remove your hand when it is uncomfortable – one is hot, two is moderate, and three is low heat – more you are just warming food not cooking.
Clean up and Care of Dutch Ovens:
The meal is over and hopefully has been a great success. However, just like any other meal, clean up comes next. If you’ve purchased and used an aluminum Dutch oven then you can wash it as you would any other dish. If you have used a cast iron Dutch oven, follow these steps:
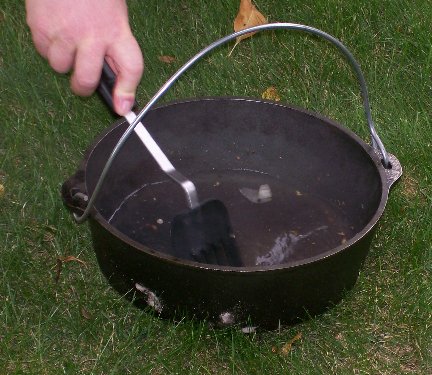 Remove food:
- some say never use soap and others say only MILD soap
- if food is stuck fill partially with clean warm water and bring to a boil
- if needed use a plastic scouring pad or brush
- Never pour hot water into a cold oven or cold water into a hot oven as this may crack the oven
- once all food is gone rinse with warm water
- dry quickly to prevent rusting either with a towel or place on heat (there’s a reason grandma kept her cast iron in the oven
Oil:
- coat entire Dutch oven and lid – all surfaces with a light coat of oil
- do not use lard
- mineral oil is good if it will be stored long term
When cleaning your Dutch oven there are a few things you definitely do not want to do:
- Never use strong soap or harsh detergent
- Never use metal scouring pads, scrapers, or clean in a dishwasher
- Never allow cast iron to sit in water as this will cause rust
- Never use soap as it may get in the pores and food may taste soapy
- Never place an empty Dutch oven in a fire as it will crack and warp
- Never be in a hurry to heat as this can cause food to burn or damage the Dutch oven
- Never put cold liquid in a hot cast iron oven, it could crack
Some experts feel soap will break down the seasoning, get in the pores, and cause a bad taste in food. Additionally soap will not necessarily help clean the Dutch oven. If you’ve cooked sticky, sugary food in the Dutch oven then place water in the Dutch oven and bring it to a boil to clean. When scrubbing you can use almost anything abrasive like oak leaves, scrub brush, sand, or salt. I f the pan is still hot be careful not to burn yourself. One way to avoid an extremely dirty Dutch oven is to line the inside of the oven with foil. If despite your best efforts the Dutch oven still doesn’t come clean then place it in the fire and let the stubborn food burn away. Unfortunately this means you will need to re-season your Dutch oven.
Between uses keep the oven in a dry place to prevent rusting. Also try to prevent dust from accumulating. Do not store with the lid on tight. This prevents the interior from rusting and the oil from turning rancid. One technique is to use a few sheets of paper towel folded or a small roll of aluminum foil to keep the lid ajar. Another technique is to wrap a small piece of real charcoal, not the briquettes, in a paper towel. This absorbs odor and moisture from the Dutch oven.
If rust has damaged the Dutch oven, here are some techniques to get rid of it:
- use a steel wool or wire brush to clean it off. Once the rust spot is gone you need to re-season your pot.
- Soak in Coca cola for a couple of hours before you scrub with a wire brush.
- Set the self cleaning oven to clean for 2 hour and let it be. Allow the oven to cool completely before removing the Dutch oven.
Campfire cooking or grilling out does not need to be hot dogs on a stick. With the right tools and a bit of practice you can create almost any meal you would have off your stove. The Dutch oven is a versatile tool to use in creating these outdoor meals.
Sources:
Stone-Jackson, Alicia – my sister learned to cook in a Dutch oven through boy scouting. She was an invaluable experienced resource.
Ragsdale, John G., Dutch Oven Cooking, Gulf Publishing Company, 1973.
Fears, J Wayne, The Complete Book of Dutch Oven Cooking, Stoeger Publishing Co 2004.
http://www.cowboyshowcase.com/dutch_oven_cooking.htm
http://www.dutchovencookware.com
Beattie, Roger L, Seven Secrets of Dutch Oven Cooking, http://y2kchaos.entrewave.com/view/y2kchaos/s35p644.htm
http://www.usscouts.org/cooking/cook_05.asp
Bills, Byron, Dutch Oven Cooking, http://papadutch.home.comcast.net/~papadutch/dutch-oven-intro.htm
Dutch Oven Cooking, http://macscouter.com/Cooking/DutchOven.asp, July 1995
3 Responses to “Dutch Oven Camp Cooking”
Martha A Morris
Useful information I`m teaching Boy Scout cooking merit badge to our troop and its a requirement so thank you for making it so easy for me to learn and teach.
Mike Thaxton
Remember Robert Duvall’s character in Lonesome Dove was baking biscuits on a camp fire using one. Did the same and they are great .
Joan kelly
I want to buy iron pot for cooking outdoors