Easter Egg Cake Recipe
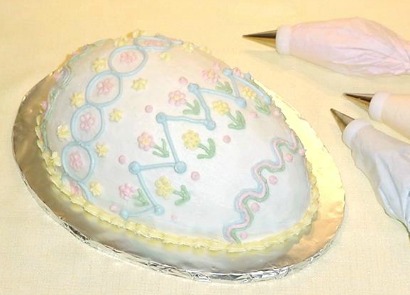
Learn how to make and decorate this adorable Easter Egg Cake to share with your family this year. Just follow Peggy’s easy-to-follow instructions and have a ball! This beautiful cake uses a boxed white cake mix.
This beautiful Easter Egg Cake was made and photographed by Peg Weaver of Meridian, Idaho. For more of Peggy’s beautiful and delicious bakery items, check out Peggy’s Baking Corner and also check out Peggy’s fantastic Buttercream Frosting Recipe.
Equipment Needed for Easter Egg Cake:
You can purchase these items in our Amazon store, just click the green links.
This recipe will make (2) two half Egg Cakes. We will be using only one of the halves.
3D Cake Egg Pan (4 parts)
Bowls for cake batter and for mixing your icings
Hand or counter mixer
Cookie sheet
Measuring cups and spoons
Cake board
Equipment Needed for Buttercream Frosting:
Recipe for Buttercream Frosting (see recipe ingredients below)
Parchment Paper
Wax Paper
Offset Spatula (I like a 4-inch blade for this cake)
Food Gel Color (Pink, Green, Blue, Yellow)
Toothpicks
Coupler
Decorating Tips #4, #16, #18
- 1 (18.25-ounce) box white cake mix (Duncan Hines preferred)
- 1 cup all-purpose flour
- 1/2 cup granulated sugar
- 1 tablespoon cornstarch
- 1/2 teaspoon baking powder
- 4 extra-large eggs, room temperature
- 2 tablespoons vegetable oil
- 1 teaspoon pure vanilla extract
- 1 teaspoon butter extract
- 1 1/2 cups warm water
- 2 cups Crisco shortening (NOTE: only use Crisco)*
- 1 stick (1/2 cup) butter, slightly soft but not mushy
- 2 pounds powdered sugar (only use C&H Powdered sugar)**
- 1/4 to 1/2 cup heavy cream
- 1 teaspoon clear vanilla extract
- 1/2 teaspoon almond extract
- 1 teaspoon butter extract
- 1/2 teaspoon salt
-
Important: Please follow my instructions listed below instead of the instructions printed on the cake box. We are making a dense cake with this recipe so the cake will hold its shape and moistness longer. This will give you a longer time to do your decorating.
-
Preheat oven to 325 degrees F.
-
Prepare the Egg Pans by greasing them well with vegetable shortening. Place about 2 tablespoons of flour in the pan and shake the pan allowing the flour to completely cover the shortening. Dump out any excess. Repeat with the second pan.
-
In a large bowl, combine all the cake mix, flour, sugar, cornstarch, and baking powder; beat with the mixer to combine and to fluff up the mix (this will give you a lighter texture to the cake).
-
In another bowl, combine the eggs, vegetable oil, vanilla extract, butter extract, and warm water; stir gently to break up the eggs. Pour the liquid mixture over the dry ingredients; using your mixer, mix on low for 2 minutes. Stop the mixer and scrape the bowls side and bottom. Mix for an additional 1 minute on low.
-
Pour half (1/2) of the prepared cake batter in each prepared Egg Pan (about 3 cups each). Gently tap the pans and swirl the batter up the sides of the egg pan, approximately 1/2 inch. NOTE: By doing this, you are helping the batter creep up the side and rise easily white it is baking.
-
Place the pans on the rings on the cookie sheet. The pointed ends of the egg pan should be in the middle of the pan. This will help keep the ends from baking much faster than the deep part. NOTE: It is very important to make sure the pans are as level as possible.
-
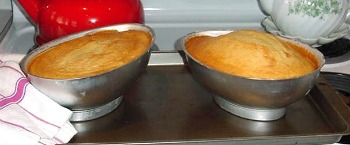 Bake for 40 to 45 minutes or until the cake is golden and a tooth pick comes out cleanly. Remove from oven and place the egg pans, cake side up, on a cooling rack. Allow the cakes to cool completely before removing them from the pans. Cakes have a tendency to flatten out if they are removed from the pans while they are still warm.
 -
Most likely, the cake will have quite a dome in the center after baking. When you remove the cake from the oven, take a clean tea towel, place it on the dome and gently press the dome down with your hand, flattening it out. Please be careful, do not burn yourself.
-
Now, here is where you occasionally get into trouble. If your cake does not want to release from the pan there are a few things you can try to help:
-
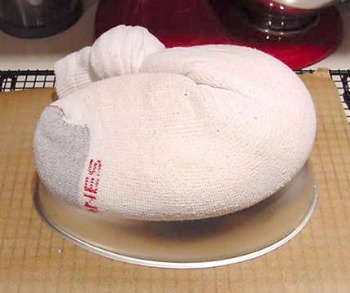
Trick 1 - Take a long clean sock. Fill it with about a pound of rice and tie a knot in the sock top. Heat this in your microwave for 2 to 3 minutes. The rice should be quite hot, so be careful handling the sox.
-
Snake the hot sock over the top of the inverted (cake side down on the cooling rack) and let it sit. In a couple of minutes, the cake should gently release and be sitting on the rack. Remove the sock and pan and proceed with the second egg pan. Allow the cake to re-cool completely.

-
Trick 2 - Place the inverted cake on a piece of parchment paper.
-
Get out your hair dryer and gently warm the pan. After a few minutes, your cake should release and drop on the parchment. Remove the pan and allow the cake to re-cool completely. While you are waiting for your cakes to cool there are a few thing to do. Make your Buttercream Icing and prepare your cake boards (if you have not already). If you are going to place your cake on a platter, you will not need to cover a cake board.
-
Cake Filling:
-
After your cake is on the cake board, you are ready to slice the cake and put in your filling. I like to use a long, serrated bladed knife (bread knife).
-
Gently remove the top layer and set aside. Gently place spoons of icing on the bottom cake layer, and with the spatula, move the icing around (I like to use about 6 ounces, about 1/2-inch thick, for this cake).
-
Place the top layer on and gently push the layer down into the icing. If the filling oozes out, remove the excess but do not mix this in with the icing (it might have crumbs in it). Now is also the time to fill in any holes in the filling layer. For the best look, you want everything on the outside edge of the cake as smooth as possible.
-
Crumb Coat:
-
Simply put, it is no more than a thin layer of Buttercream Icing. You will be using about 2 ounces of ButtercreamIFrosting here. If I have scraped any leftovers from the filling oozing out, I use that icing now in the crumb coat. Try to get it on smooth and don’t worry about a few lines, your final coat will cover them up.
-
Place your cake in the refrigerator for at least one (1) hour to help firm up the coating. Often I will crumb coat last thing at night and let the cake sit in a cool room, overnight, to firm up completely.
-
Final Icing:
-
Now you will be doing your final icing. Place spoonfuls of Buttercream Icing over the cake so that you don’t have to “pull” the icing too much over the cakes surface. Using an offset spatula, gently move the icing about so that you have as smooth coating as possible all over the cake.
-
When you make frosting, many things can go wrong and you can get a mess instead of a great tasting, smooth frosting. One of the easiest ways you can prevent problems is to use quality products. On this recipe, I am a real stickler, and I always get compliments on my Buttercream Frosting.
-
In your mixer bowl on low speed, beat the Crisco shortening until it is smooth; add butter and continue beating. Add the powdered sugar in 4 or 5 additions.
-
In a small bowl, add 1/4 cup cream; stir in vanilla and almond extracts. Slowly add the cream mixture to the shortening/butter mixture while the beater is running. When making Buttercream Icing, always ADD ANY LIQUID IN VERY SLOWLY, and only enough to make the mix easy to spread. Cream together until smooth and the mixture is light and fluffy. This should take approximately 5 to 7 minutes. Only add additional cream, if necessary, to adjust the consistency. If you want a dense buttercream icing, only mix and be done. For a lighter one, beat the buttercream on a low medium speed for an additional 10 minutes.
-
Before using your icing on the cake, beat it vigorously with a heavy spoon to take away the spongy texture. NOTE: For a super smooth Buttercream Icing, don't beat as long. This Buttercream Icing will be more ivory when it is beaten longer. It is easiest to smooth out when it is fresh.
-
For this Easter Egg Cake, you will need (1) one batch of icing. You will use 6 ounces for the filling, 2 ounces for the crumb coat, and 4 ounces for the final coat.
-
There is a debate about wax paper under the cake edges while decorating. Personally, I like to use it. I am just careful about getting the icing on the cake. I try to avoid getting the icing on the wax paper. There usually is a little gap at the bottom after I am finished with the icing, but just before I do the last decorating step, I remove the wax paper and then I pipe shells or some type of decoration right on the cake board.
-
Preparing the colored icing:
-
A few hints about using Food Gel Colors:
-
Do not use the liquid food colors that you purchase at your local grocery store. To get an intense color you will have to use so much of the color that you can change the consistency of the icing. I prefer using the Food Gel Colors.
-
I always line all my colors up together to see if they go together. Now is the time to make the necessary changes. Also, make sure that you mix enough of your colors. It is very difficult to try to match a second batch of color to the first batch.
-
In bowls or in plastic cups, prepare 10-ounces light yellow icing, 4-ounces light blue icing, 6-ounces light pink icing, and 4-ounces of light green icing.
-
Start with a tiny bit on a toothpick and blend well, then decide if you need more. Remember, you can always add more color - but you can’t remove color!
-
We will be doing straight piping - Bead, Star, and a Shell to finish at the bottom edge of the cake. Prepare your icing bags. You will need four (4) piping bags, couplers, and the tips mentioned above
-
Decorate as desired or following my decorating idea in the Easter Egg Cake photo.
* I will only use Crisco Shortening. I know that it is a bit more expensive, but it is the best! Your icing will turn out the whitest and the other ingredients will combine easily.
** Please, only use a sugar that has Pure Cane Sugar on the label. Many cheaper brands are made from beets or a combination of beets and cane sugar. I have found that these sugars can turn grainy because of the cornstarch that is used in the powdered sugar. To me, there is nothing worse than gritty icing! Also, there is something about beet sugar that is very weather sensitive. You can make a batch of icing - one day it works just wonderfully and the next you seem to have no control over your icing. There really is such a thing as bad buttercream days! If you are working on a humid day, you will most likely struggle with your icing. Just knowing that will help keep you from pulling your hair out.

Back to Peggy’s Baking Corner Home Page
Peggy Weaver, author of Peggy’s Baking Corner, has generously answered all the questions on cake baking during the last 15 years. Peggy will not be able to continue with the Question and Answer pages in the future. She thanks you for all your interesting questions.
Check out Peggy Weaver’s many Cake Decorating Articles, Tutorials, and Q&A pages below.
Fondant Icing/Covering:
Fondant Icing Recipe – Marshmallow Fondant
Recipe and tutorial on making and using marshmallow fondant icing.
Making Fondant Icing
Q&As on making fondant icing.
Fondant Recipes
Additional fondant recipes plus Q&As on making other flavors of fondant icing.
Bubbles in the Fondant
What causes bubbles in your fondant icing and how to fix the problem
Covering Cakes with Fondant Icing
Peggy’s hints and tips for covering your cakes with Fondant Icing.
Decorating Cakes with Fondant Icing
How to add color, how to make fondant flowers, using fondant decorations, repairing tears, and much more.
Marbling Fondant Icing
Learn how to marble fondant icing.
Buttercream Icing/Covering:
Buttercream Icing 101
Recipe and tutorial on making and using buttercream icing.
Buttercream Recipes
Additional buttercream recipes plus Q&As on making other flavors of buttercream icing.
Decorating with Buttercream
How to use decorations on buttercream icing.
Wedding Cakes:
Assembling Cakes/Wedding Cakes
Cake Fillings
How to use caking fillings with wedding cakes.
Decorating Wedding Cakes
Lots of Q&A’s on decorating wedding cakes.
Other Cake Baking and Decoration Topics:
Recipes & Baking Ingredients
Q&As on different cake baking ingredients.
Peggy’s Cake Decorating Idea Photos
This idea page has photos only and no decorating instructions.
One Response to “Easter Egg Cake Recipe”
Lauren
Does anyone know where I can find the egg shaped cake pan like this one nowadays?