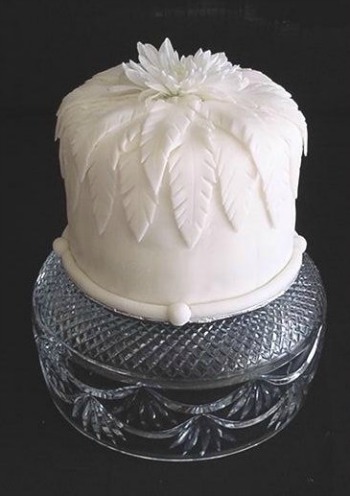
A fondant that is not only beautiful to look at, but also delicious to eat!

Marshmallow Fondant Icing – To many folks, even the pros, covering a cake in fondant icing is scary and avoided at all costs. It has a beautiful satin like finish that is desired by many Brides, but it is extremely difficult to make the traditional fondant icing recipe. So much so, that there are a few companies that are willing to sell you their product for $6 per pound and up. That will cover an 8-inch two-layer cake. If you do the numbers, you will quickly realize that a three-tier cake is going to be a big headache and costly. The worst thing about this problematic and expensive cake icing is the fondant icing doesn’t taste good and is usually peeled off the slice of cake, like an orange rind, and left on the plate.
So – you have got to ask “Why bother.” Well, this Marshmallow Fondant Icing recipe that I am sharing with you is easy-to-make, very delicious, and great to work with – plus beautiful on the cake. That is why you should bother. You will amaze the bride, guests, and family with your skills in the kitchen. This recipe uses a commercial product as the base, so that is why it is a dream to make compared to the traditional recipe.
Advice from Peggy: One of the first things that I learned in cake decorating is to relax and have fun. Try to remember that you are working in a medium that is meant to be eaten. It will not be around 50 years from now. The memories and pictures might be around, but I can promise you that the important part of all of this is that you went to the effort and everyone was delighted.
Lesson two is that no cake decorator creates a perfect cake; the pros just know how to correct the errors and go on. The cake that I am going to use today is a dense, moist cake that will hold its shape under the weight of what can be a heavy bit of icing and decorations.
MM (Marshmallow) Fondant Icing Recipe:
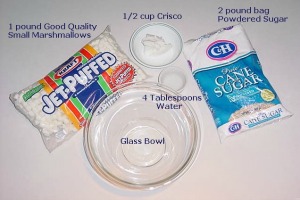
Ingredients:
16 ounces white mini-marshmallows (use a good quality brand)
2 to 5 tablespoons water
2 pounds icing or powdered sugar (please use C&H Cane Powdered Sugar for the best results)
1/2 cup Crisco shortening (you will be digging into it so place in a very easily accessed bowl)
NOTE: Please be careful, this first stage can get hot.
In a large microwavable bowl, melt marshmallows and 2 tablespoons of water in a microwave. To microwave, place the bowl in the microwave for 30 seconds, open microwave and stir, back in microwave for 30 seconds more, open microwave and stir again, and continue doing this until melted. It usually takes about 2 1/2 minutes total.
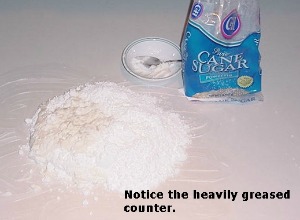
Kneading the fondant dough: Place 3/4 of the powdered sugar on the top of the melted marshmallow mix.
 Now grease your hands GENEROUSLY (palms, backs, and in between fingers), then heavily grease the counter you will be using and dump the bowl of marshmallow/sugar mixture in the middle. By the way, this recipe is also good for your hands. When I am done, my hands are baby soft.
Start kneading like you would bread dough. You will immediately see why you have greased your hands. If you have children in the room they will either laugh at you or look at you with a questioning expression. You might even hear a muttered, “What are you doing?” Keep kneading, this stuff is sticky at this stage! Add the rest of the powdered sugar and knead some more. Re-grease your hands and counter when the fondant starts sticking.
If the mix is tearing easily, it is to dry – so add water (about 1/2 tablespoon at a time and then knead it in). It usually takes me about 8 minutes to get a firm smooth elastic ball so that it will stretch without tearing when you apply it to the cake. It is best if you can let it sit, double wrapped, overnight (but you can use it right away if there are no tiny bits of dry powdered sugar). If you do see them, you will need to knead more and maybe add a few more drops of water.
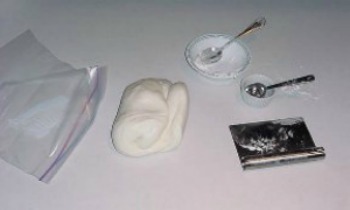
Storing prepared fondant: Prepare the fondant icing for storing by coating it with a good layer of Crisco shortening, wrap in a plastic-type wrap product and then put it in a re-sealable or Ziploc bag. Squeeze out as much air as possible.
MM Fondant icing will hold very well in the refrigerator for weeks. If I know that I have a cake to decorate, I usually make two (2) batches on a free night during the week so it is ready when I need it. Take advantage of the fact that this fondant icing can be prepared well in advance.
Adding coloring: Now is the best time to add your food coloring. I prefer to store my fondant icing in it’s natural color of white. Some colors can change the consistency of the icing. If you do need to store colored fondant icing, wrap each color very well in plastic wrap or Saran Wrap. Colors like red and burgundy are notorious for “bleeding” into other colors and ruining them. It is better to be safe than sorry! Bag everything in Ziploc bags. Remember that food coloring can also stain your hands and nails. I have food-grade plastic gloves that I keep around. Add your food coloring, a little at a time, and knead it in. You can always go darker but it is difficult to go lighter. Red has a tendency to get darker as it sits and “ages”.
If marshmallow fondant icing has been stored in the refrigerator: You will need to sprinkle a bit of cornstarch on your counter to help prevent sticking (rub it in). The marshmallow fondant will be pretty stiff when you try to knead it again, but it can be micro waved for 10 to 20 seconds, if necessary. Start off with 10 seconds (please be careful as items that have high sugar contents can get hot in the microwave very quickly). The marshmallow fondant icing will soften right up and be perfect for rolling out and playing with. You want the temperature to be close to your body temperature.
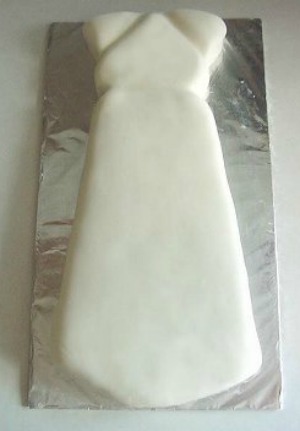
Covering cake with marshmallow fondant icing: Now it’s time to start. Your cake should be baked, and completely cooled. If you have a shaped cake, you can trim it now and then place the cake on a prepared cake board. In other words, you are assembling the cake puzzle on the board. You can also place the cake on the board first and then trim (you must be extra careful not to damage the covered board). I personally find that shaping first is the easiest and then transferring the cake.
Give the top and sides of the cake a nice thick 1/4-inch coating of Buttercream Icing (click on the underlined for buttercream icing recipe). NOTE: At first I was wondering why I needed to bother with this step. Well, there are a couple of reasons: The buttercream icing helps the fondant icing to “stick” to the cake and this cushion of undercoating icing helps to give you the beautiful smooth nearly perfect finish that you are looking for.
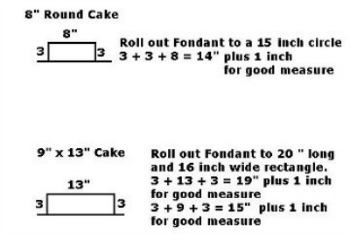
When you are ready to use the rested fondant icing, the first thing you need to do is decide what size you will need to roll your icing to. Pre-shape your icing into approximately the shape of your cake. For a round cake, make a disk shape. For a rectangular make a log shape.
OK – here is a point of controversy about the next step. Some instructors tell you to only sprinkle cornstarch on your counter before you put the fondant icing down, sprinkle with more corn starch, and then roll fondant icing out to desired shape. Some teachers advise that you grease the counter, put the fondant icing down, and lightly grease the top of the fondant icing as need to prevent sticking.
I prefer the cornstarch myself, but during very dry atmospheric conditions, I have been known to use the shortening method. The grease will help to hold in the moisture and keeps the fondant icing pliable. If necessary, add drops of water and knead it in thoroughly before proceeding. You will need to try out both ways in the future and decide what you like the most. A third alternative is a large-sized Roulpat Mat (31 x 23 inches). It really does work well and it can also help you with moving a large piece of rolled out fondant. I have never done it, but I was told that you just gently bend the mat edges downward with the icing still on it. Place the edge of mat and the icing next to the edge of the butter-creamed cake and flip the fondant icing over the cake. What was the top of the fondant icing that you rolled out, is now touching the buttercream and what was the bottom side is now the topside that you see.
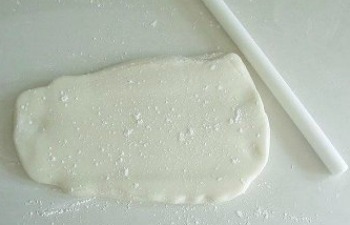
Most folks do not have a nonstick rolling pin, but if you do, now is the time to use it. If not, lightly rub cornstarch on the surface of the rolling pin and roll out to the desired size. I like to roll my icing at least 1/8-inch thick. It is thick enough for ease of handling and strength integrity. I would not go any thinner than 1/8-inch for the cake covering. When I am making decorations with the fondant icing, I will sometimes roll it thinner. The MM Fondant icing is very forgiving and rarely tears but everything has it limits.
The technique that I use is to gently roll the icing on the nonstick rolling pin like a piece of fabric. DO NOT FOLD! An edge will be hanging down.
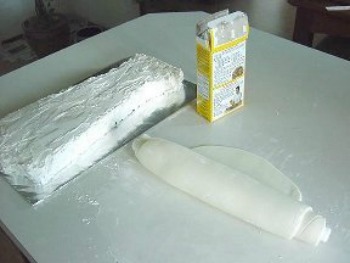
Quickly place the marshmallow fondant icing at one bottom edge of the cake and unroll the rolling pin, holding it about 2 inches over the cake. Your fondant icing will then “fall” into place. You should also have a bit of overhang over the edges. You might need a little cornstarch at this stage, but only use it very sparingly if you have a dark colored icing. I very lightly sprinkle the cornstarch over the surface and use a buffing motion with my hand to move it around and to level the surface. This motion seals the fondant icing to the buttercream, works out the bumps in the icing below the surface, and removes flaws from the joined areas in the cakes surface below. Please use a VERY gentle pressure to rub the surface of the icing. I often have a little pile of the cornstarch on the counter and dip my hands in it as needed.
Here is an important tip: Watch out for your fingernails as long nails can mark up your surface quickly and it is very difficult to smooth them back out.
If you notice a bubble in the surface, take a thin sharp needle and poke a tiny hole, at an angle, in the bubble. If you poke straight down, you can almost always see the hole even after the most careful smoothing. The angled hole lets the air out of the bubble, and with a tiny bit of rubbing you can reseal the hole.
I keep a clean, soft pastry brush close by, to move the cornstarch around. Do this lightly or you can leave brush marks on the surface that are almost impossible to remove. A number of companies make Fondant Smoothers for around $10. I have one, but I have used it only once and I have used my hands ever since. For me, it is easier and quicker. If you do not handle the smoother correctly, you can damage the fondant’s finish.
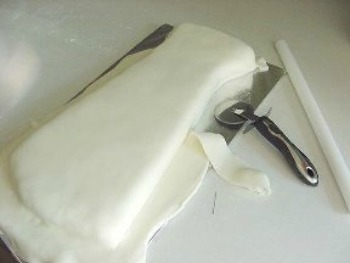
Gently, with the side of your hand, push the fondant into the sides of the cake against the cake board.
To trim the excess fondant icing, you can use a sharp knife. I find that the easiest and neatest way is to use a pizza Cutter. Hold it at a 45 degree angle from the cake board and the side of the cake. Go slow and follow the shape of the cake. If you hold the cutter at the correct angle, you will have an almost perfect bottom edge. Gently, with your finger tips, push any little leftovers in against the cake for the neatest appearance. If the edge isn’t as nice as you want, you can always add a fondant rope or pearls. Buttercream shells, stars, or flowers look wonderful also.
If your cake needs a bit of shaping, do it now. I used the outside edge of my hand to make the indents to define certain areas of the cake.
Well, you have finished the covering of your cake.
Many professional decorators feel that a marshmallow fondant icing covered cake will hold the moisture in the cake for 3 to 5 days, depending on your atmosphere. I personally do not want to go beyond 3 days. I like the cake to have a fresh taste.
Do not refrigerate your covered cake!
When you take the cake out of the refrigerator, moisture will condense and destroy your beautiful surface.
Your best option is to store the cake in a sealed bakery box. The cardboard sides of a box will keep the dust in the air off the cake, but allows the Fondant to breath.
Back to Peggy’s Baking Corner Home Page
Peggy Weaver, author of Peggy’s Baking Corner, has generously answered all the above question on cake baking during the last 15 years. Peggy will not be able to continue with the Question and Answer pages in the future. She thanks you for all your interesting questions.
Fondant Icing/Covering:
Making Fondant Icing
Q&As on making fondant icing.
Fondant Recipes
Additional fondant recipes plus Q&As on making other flavors of fondant icing.
Bubbles in the Fondant
What causes bubbles in your fondant icing and how to fix the problem.
Covering Cakes with Fondant Icing
Peggy’s hints and tips for covering your cakes with Fondant Icing.
Decorating Cakes with Fondant Icing
How to add color, how to make fondant flowers, using fondant decorations, repairing tears, and much more.
Marbling Fondant Icing
Learn how to marble fondant icing.
Buttercream Icing/Covering:
Buttercream Icing 101
Recipe and tutorial on making and using buttercream icing.
Buttercream Recipes
Additional buttercream recipes plus Q&As on making other flavors of buttercream icing.
Decorating with Buttercream
How to use decorations on buttercream icing.
Wedding Cakes:
Assembling Cakes/Wedding Cakes
Cake Fillings
How to use caking fillings with wedding cakes.
Decorating Wedding Cakes
Lots of Q&A’s on decorating wedding cakes.
Other Cake Baking and Decoration Topics:
Recipes & Baking Ingredients
Q&As on different cake baking ingredients.
Peggy’s Cake Decorating Idea Photos
This idea page has photos only and no decorating instructions.
14 Responses to “Marshmallow Fondant Icing Recipe”
Mar
Thank you so much for the recipe! It came out wonderful! Even me, an amateur, could make it work out.
Jack
Used it tonight for a birthday cake. It was easy, and perfect. Thank you for the great recipe!
Laura
Could I substitute something else for the shortening? I live in Ecuador and have yet to see shortening. Thank you!
Linda Stradley
There are recipes on the internet using marshmallows instead of shortening. Just do a search.
Renuka Zaheed
I tried the Marshmellow Fondant it turned out perfect!! It was so easy to follow your instructions.. 🙂 Loved it!! Thank you!! Peggy..
Brenna
Thank you so much for being so thorough! Corn starch and no refrigeration at the end should solve my problems????
Ranell
Ok I never leave comments but always read them. This time I have to. I am a professional wedding cake maker and have been for years.
I’ve bought and tried all brands of fondant.
Last weekend I did not get my order in due to the holidays. So for the first time, I made and tried this MM fondant. OMG !! I will never use anything else 😊. Easy to make, so much cheaper and the most beautiful results I’ve ever been able to achieve, ever !! And I’ve made many fondant cakes. My husband couldn’t believe how flawless and perfect it was either.
I can’t thank you enough for this recipe and the instructions. I will only be using this from now on. Awesome fondant 👏👏👏
Julie
My favorite fondant recipe! I never liked this stuff until I made my own and it was fantastic. I use a beater in my power drill (with a high torque setting!!) to mix it before kneading it. Works like a charm and less messy.
Davina
Wonderful recipe!!! I have used it two years in a row for the cutout decorations on my daughter’s birthday cakes (haven’t yet tried draping a whole cake in it, but love the detailed instructions). I substitute coconut oil for Crisco which adds a mild coconut flavor to the marshmallow. I like to roll it between two sheets of parchment paper, though it is also easy to work without the parchment as long as you keep all surfaces lightly greased. So simple to make and work with, my daughter (now 6) could practically do it herself. And everybody comments on how tasty it is, which I have never heard anyone say about classic fondant.
Susan
Hi, Peggy. I was wondering if marzipan or, in a pinch, almond paste could be used in place of buttercream beneath the fondant. I know it’s more commonly used with royal icing. Thank you!
Meghan
Hi, This is my first time making fondant, but mine kept tearing, so i added probably 2TBSP water (in half T increments), but then it seemed it just kept getting stickier rather than more elastic. I got it to the best state I could, covered it in shortening, and refrigerated it. Is that stickiness normal? Or should I expect to need to add some cornstarch or powdered sugar tomorrow? Overall I really appreciate the clarity in your recipe and the pictures! Thank you!
Nancy
Here is the fondant Q&A page, https://whatscookingamerica.net/PegW/MakingFondantQA.htm
If your fondant is too, dry you will need to add a little more water. When you see cracking in the dough, that is not a good sign so add a teaspoon of water, knead well, and add a few drops more water if you see more cracks and knead again.
If the dough is sticky, add Crisco to your hands and knead it into the dough.
The first time you make the fondant, it will take a bit longer in the time area. Once you get the feel for it, everything will go much faster and your comfort level will go up. Make sure that the dough is very workable before you double wrap and store it. It will get better with sitting overnight but if it’s too dry to start with, it will not get moister.
Allow the dough to warm up to room temp if it was refrigerated before using. I usually put it in the microwave for 10 seconds just to speed up the process and make it easier to handle. Be careful though, anything that comes out of the microwave can burn you. Give the dough another bit of gentle kneading. If you sense that there is a problem, to dry or sticky, correct it first before trying to apply it to the cake.
Kate Barazzuol
I used this for the first time this past weekend and loved it! Thank you for this truly terrific recipe!
Can this be frozen?
Linda Wysocki
Have you tried a chocolate marshmallow fondant recipe, especially a white chocolate marshmallow recipe. Would like to hear comparisons.