Mother’s Day Cake Recipe

Mother’s Day Cake is likely made by a young person who wants to make a special dessert for Mom on Mother’s Day. Time is usually in short supply and young folks are just learning their way around the kitchen.
So, this is my very simple version of a Triangle Cake. If you want to, you can make your own pound cake and chocolate icing. You can also vary the cake by applying with a pastry brush, a very thin layer of warmed seedless raspberry jam to each layer of the cake before spreading the icing on the layer.
Cake decorating advice from Peggy:
(1) One of the first things that I learned in cake decorating is to relax and have fun. Try to remember that you are working in a medium that is meant to be eaten. It will not be around 50 years from now. The memories and pictures might be around, but I can promise you that the important part of all of this is that you went to the effort and everyone was delighted.
(2) Lesson two is that no cake decorator creates a perfect cake; the pros just know how to correct the errors and go on. The cake that I am going to use today is a dense, moist cake that will hold its shape under the weight of what can be a heavy bit of icing and decorations.
- 1 (10.75-ounce) Frozen Pound cake
- (16-ounce) cans of Chocolate Frosting
- A large knife
- A cutting board
- Wax paper or parchment paper
- A Knife for spreading the icing
- Cake plate
- Optional Non-toxic Edible Flowers or Crystallized/Candied Edible Flowers for decorating the plate (suggestions later).
-
The first thing you need to do is to read your recipe completely through, then gather all your supplies together.
-
Open the pound cake and defrost according to the directions printed on the paper lid.
-
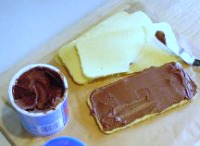
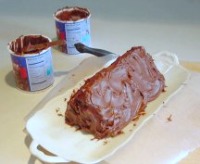
Open the icing cans and stir (this will soften the icing a little bit and make it easier for frosting).
-
Tear off a piece of wax paper or parchment paper to cut and to work on. I found that placing the cake on it and doing most of the icing on the paper, I saved time and effort with the clean up. You’ll be able to just throw away most of the mess.

-
Place your cake on the paper and slice off the top browned bump. Set it aside because the cook gets to eat this piece and it’s a reward for the hard work. Place the cake on its side and slice in half. Please take your time and cut the cake as evenly as possible. You will be rewarded with a cake that is easier to handle and a better looking cake.
-
Set aside one piece and slice the remaining piece in half. Repeat with the first half. You should now have four (4) slices each about 1/2-inch thick.
-
Lay one layer on the wax paper or parchment paper and ice with about 1/2-inch of icing.
-
NOTE: Be careful so that you do not rip the cake.
-
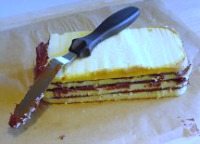 Top with another layer, making sure that they are aligned one on top of another. Ice with frosting and place layer 3 on the top and ice.
 -
Your last layering step is to place the 4th layer on the top. Do not ice this layer. It will get a coating of icing at a later time.
-
Very gently push down on the layers to make sure they are well joined together. If icing oozes out, scrape the sides to help keep the cake neat and easier to handle.
-
Now we will start to make the triangle part of the cake.
-
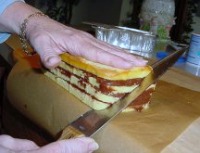
To make it easy for me I placed the cake at the edge of the counter so that my knife handle hangs over the edge.
-
Put your hand lightly on the top of the cake to help keep it from shifting.
-
Carefully cut the cake on the diagonal from one end to the other.

-
As you get to the end, you might have move your hand to the bottom end of the cake to hold it still. Whatever works for you, is just fine, just make sure that you do not press down to hard and push the icing out from between the layers.
-
Tip the top layer over on end.
-
Since you are working with Chocolate Icing, I find the easiest way to keep things neat and presentable is to put pieces of wax paper under your cake. After you finish icing, you will be able to gently pull the sheet out from under the cake and your plate will be almost perfectly clean. So, do that now and then gently pick up the cake half that you tipped up and place it on one side of the wax paper.
-
Your next step is to put a thick layer of icing on the tall side of the triangle. This will help “glue” the two sides together.
-
Notice in the top picture that the one side of the plate is propped up on the cutting board. There really is a very good reason for this. The icing that you just put on the cake is heavy and can cause the cake to tip over onto the iced side. If you don’t have someone helping you, this is one way to keep the cake steady while you pick up the second half of the cake and place it on the cake plate next to the first half. Make sure that the layers of both sides of the cake go up and down.
-
Gently push the 2 sides together so that they stick to each other.
-
Just for a point of reference I have now used up 1 (one) can of icing.
-
 Place a coating of icing over your cake using a swirling motion. I find that I use about half a can of icing for this finish icing.
 -
Gently slide the wax paper out from under the cake.
-
Clean up any leftover dabs of icing off of the plate with a damp paper towel.
-
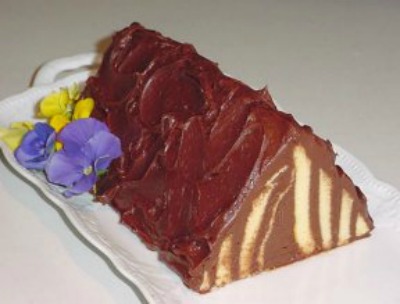
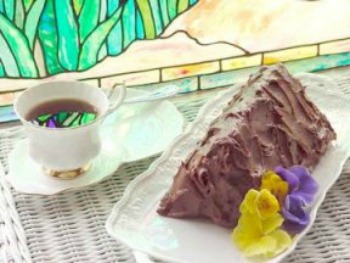
You can serve the cake now or place a few flower decorations on the plate. Please use only Non Toxic flowers Edible Flowers or Crystallized/Candied Edible Flowers with your food. A few of the flowers that would look lovely and be safe would be:
-
African Daisy, African Violets, Baby Tears, Begonia, Dahlia, Dogwood, Gardenia, Honeysuckle, Marigold, Rose, Poppy, Violets, Dandelions.
-
Make sure that you pick a flower that has not been sprayed with pesticides then gently wash the flower in running water and blot dry with a paper towel. Poke the stem into the side of the cake to help hold them on to the plate and serve with a smile. Check out Linda’s web page on Cooking with Edible Flowers.
-
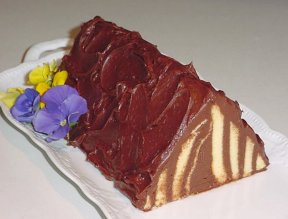
The last picture here is to show you what happens when you do not cut the slices evenly. When I cut into the cake to serve, I found that one side was just perfect and the other end of the cake as you can see a bit off center. If this happens to you, do not worry at all. We are all bakers who are learning and not well schooled Pastry Chefs. Mom will love the effort that you put in and will be eternally grateful that you thought of her on her Special Day.
Check out some of Peggy Weaver’s many Cake Decorating Articles, Tutorials, and Q&A pages below:
 Peggy’s Baking Corner Home Page
Peggy Weaver, author of Peggy’s Baking Corner, has generously answered all the above question on cake baking during the last 15 years. Peggy will not be able to continue with the Question and Answer pages in the future. She thanks you for all your interesting questions.
Fondant Icing/Covering:
Fondant Icing 101 (Recipe and Tutorial on making & using fondant icing)
Covering Cakes with Fondant Icing
Decorating Cakes with Fondant Icing
Fondant does not freeze well at all, as a matter of fact, downright lousy. Do not even think about refrigerating it either. The condensation that can occur when you defrost or bring to room temp can destroy the finish of the fondant.
Now, if you are going to freeze the cake, as many folks do until the first anniversary, yes go ahead and freeze. The cake will not look as beautiful as it did originally but you just have to keep the idea in mind that it was perfect on the day of the wedding.
Buttercream Icing/Covering:
Buttercream Icing 101 (Recipe and Tutorial on making & using buttercream icing)
Wedding Cakes:
Assembling Cakes/Wedding Cakes
Decorating Wedding Cakes (Lots of Q&A’s on decoration a wedding cake)
Other Cake Baking and Decoration Topics:
Peggy’s Cake Decorating Idea Photos (The idea page has photos only and no detailed decorating instructions.)