Fourth of July Top Hat Cake Recipe

Fourth of July Top Hat Cake Recipe. For years now, when I think of the 4th of July, I have had a mental flash of the Uncle Sam Poster where he has his finger pointing at you and says “I want YOU”.
One of the things that strike me is his Top Hat. That hat has fascinated me for some reason, so I decided to do something about it.
Naturally, I asked my Dear Husband to come up with a design that started with a 9 x 13-inch cake pan and he came through again for me. For this Fourth of July Top Hat Cake, I am adding a few extra ingredients to a mix so that we will have a fuller, taller, looking cake.
One thing you should do is to prepare your icing in advance by at least 1 day and up to a week. Please keep it refrigerated if the weather is hot. See notes below on Buttercream Icing.
So here we go . . . . .
- 1 batch Buttercream Icing (see notes on Buttercream Icing below)
- Butter Cake Mix (preferably Duncan Hines)
- 3/4 cup warm water
- 3/4 cup butter (with salt), melted
- 4 extra large eggs, room temperature
- 1/2 cup all-purpose flour
- 1/4 cup granulated sugar
- 1/4 teaspoon baking powder
- 1/4 teaspoon butter extract or Butavan
- Cake board
- 9 x 13 metal pan A pan with straight up and down sides and sharp edges work the best for this recipe
- At least 1, 10-inch piping bag 3 piping bags would be better
- At least #1, #16, or #17 Decorating Star Tips 3 decorating tips would be nicer
- At least 1 coupler Yep, 3 would be the greatest!
- Red Food Gel Color
- Royal Blue Food Gel Color
-
Preheat oven to 325 degrees F. Grease and flour a 9 x 13-inch cake pan; set aside.
-
In a large mixing bowl, combine all of the dry ingredients. Using your mixer, beat the dry ingredients for a moment or two. Many times the Butter Cake mix will clump together and you might have to over mix the batter before you can get all of the ingredients properly combined.
-
In another bowl, combine all of the wet ingredients and gently stir to combine. Add the combined wet ingredients and beat on low for 2 minutes. Stop, scrape the bowl, and continue beating for another 2 minutes.
-
Pour the batter into your prepared pan. Tip the pan from side to side so that the batter leaves a “Ring around the Pan.” I like to go about 3/4 of the way up the side of the pan. Do not forget the corners! By doing this, the batter will have a head start with the rising process and you will get a taller cake.
-
Place the cake pan on a large cookie sheet and place in the oven. Bake for 32 to 38 minutes or until a toothpick comes out clean. Remove from the oven and place on a cooling rack.
-
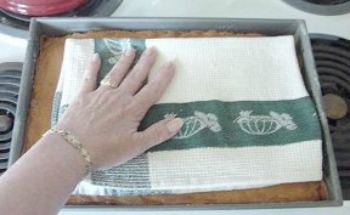
NOTE: If the top of the cake has a dome, immediately place a clean folded tea towel on the cake and press down to flatten the dome top. Please be careful because the cake and the pan will be hot. After about 10 minutes, turn the cake out of the pan onto the cooling rack. Cool completely.

-
While the cake is cooling, prepare your cake board. I purchased a 14 x 19-inch cake board at my local craft store and cut off, with a razor knife, 3 1/2 inches. The finished board is 14 x 15 1/2 inches and covered in aluminum foil. You do not need to cut the board at all, I just felt that it had a better look.
-
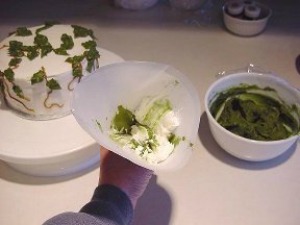
Take your prepared Buttercream Icing out of the refrigerator and allow it to come to room temperature for easier piping.
-
Since the 4th of July is usually hot and in some neighborhoods humid, please use the Buttercream Icing 101 as it holds up better in High Humidity. This type of Buttercream Icing is a crusting type of icing so after it sits for about an hour the decorations will become quite firm but not hard. Also for this cake, we will not need the paper towels because we will be skipping the crumb and finishing icing step completely.
-
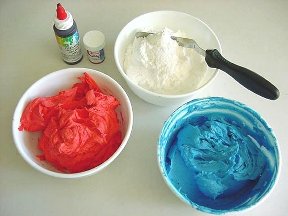
Divide your batch of white icing into the following (Remember – Use Food Gel Colors):
-
12 ounces that will be colored Red
-
12 ounces will be colored Blue
-
The remaining will be left White
-
Your Red icing will intensify in color overnight and, depending on the shade of Blue you use, it can also darken. Make your colors a little lighter that you think you will need. If you decide you want a darker shade, you can always add a bit more food coloring just before you are get ready to do your icing.
-
The Buttercream Icing needs to be a medium consistency. In this case, that means that you want to icing to easily come out of the tip. If you find that your hand is shaking from the struggle of squeezing the piping bag, you will need to thin it out.
-
Remove the icing from the bag into a bowl, add a 1/2 teaspoon to a teaspoon of water; stir so that all of the water mixed in thoroughly. Put it back into the bag and try again.
-
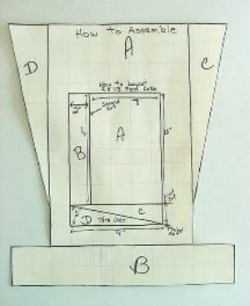
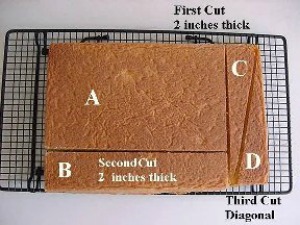
Please take a careful look at the drawing. This is two (2) drawings in one.
-
The inner drawing is the example of how you will be slicing the 9 x 13 cake.
-
The outer, Top Hat shape, is showing you how those parts are placed together to make the Hat cake.
-
The easiest way to cut your cake is with a serrated knife. When cutting the diagonal slice, start carefully in the middle and cut gently toward each pointed end. This will give you a neat sharp pointed slice.
-
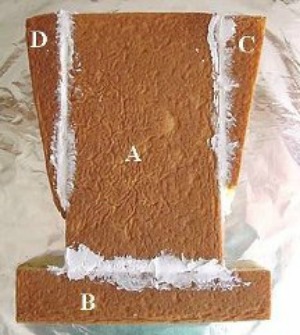
When you are done with your slicing, your cut cake will look like the picture below.
-
Do a dry run on you cake placement by carefully placing your cake on the board.
-
Gently remove the pieces and then reassemble the pieces into the Top Hat shape.
-
Connect the pieces together with a little of your white icing acting as a type of glue.
-
Now is the time to transfer the pattern to the cake:
-
Draw a straight line from side to side, gently with your knife, (slice into the cake just enough so that you can see it, about 1/8 inch deep) defining the brim. This will be 2 inches above the bottom of the cake.
-
Above that, 2 inches up, make another faint cut defining the Hat Band. This will be 4 inches above the bottom of the cake.
-
Next, mark the vertical lines. You will need to make 6 vertical lines. Each will be 1 inch apart at the bottom and 1 inches apart at the top of the hat.
-
Find the approximate, vertical, midway point. Go to about inch on each side of it, and cut a tiny mark. At the bottom, right next to the marked line of the hat band, find the vertical midway and make a tiny mark inch to each side of it. Mark your lines with the tiny 1/8 inch cuts and continue with the rest of the guide lines.
-
-
If you have only one piping bag, load the Blue icing first but. It will be easiest if you pipe the Brim and the Hat band at the beginning. It will be easiest on your hands if you only fill your bag about half way full of the icing.
-
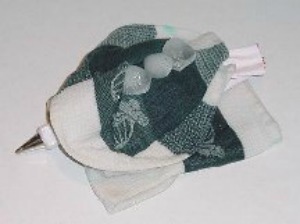
On most warm days, your hand will also be warm and that can melt your icing. If you are having a hard time with the icing heating up to much, you can make a little cooling unit to place your bag into for a few minutes.
-
I take a tea towel and fold into quarters. I place 3 ice cubes under the bottom 2 layers put the piping bag on top of that, and fold the towel over. I then put a few more ice cubes between the top layers of towel and pour a little water over the whole thing. This makes a tiny refrigerator. I don’t like to put the icing bag in the family refrigerator because with the opening and closing of the door, you loose most of the cool air. That is bad on the groceries and bad on the electric bill.
-
This method works best for me, it cools fast and it is the most convenient, but please be creative. Whatever works for you is the best way.
-
To decorate, we are going cover the cake with a Star Fill in pattern. Use a #16 Star Tip. This tip is the one that is used for many of the Novelty Shaped Cakes.
-
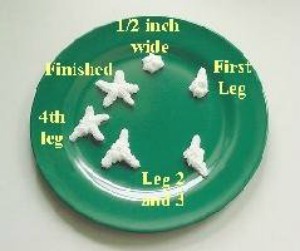
Practice a few stars on a plate so that you get the feel of what you will be doing.
-
Take note, if your hand is shaking and you are struggling, you can do a few things:
-
Make sure that the Buttercream is cool but not cold, and that it is the correct consistency.
-
You might need to remove the icing from the bag, add a little water, stir thoroughly, and put it back in the bag. This seems like a great bother but in the long run, you will not be sorry. If you struggle to much you will hate what you are doing. You are here to have a good time so do not struggle with your tools.
-
One last thing, you just might need to go up one tube size to tip #17. For some folks just changing your tip is almost like a miracle.
-
If you have a gap between the stars, do not try to place your tip in the hole and pipe a very tiny star. In most cases, the new star will sit above the rest of the stars and look like a bump on the surface of the icing. Instead, put the piping tip into the hole and wiggle it around a tiny bit, this will cause the edges of the stars to blend together and cover the hole.
-
For color placement, look again at the Transfer Photo above, the one that showed you the pattern. You will see the letters “W” for White, “R” for Red and Blue.
-
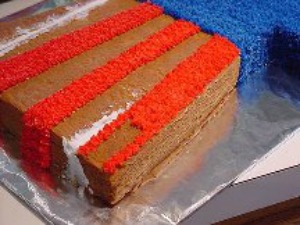
Pipe the Blue stars on the Hat Brim and Hat Band first. Make sure that you also pipe blue stars on the sides and the bottom edge of the cake. Pipe the Red stripes next. You will be making (4) four Red stripes on the top of the cake and (3) three White stripes. The sides of the cake, in the crown section, will also be White.
-
When the striping is done, you only have twp things left to do:
-
Make the large White stars on the Hat Band.
-
Make the white line that helps to divide the hat band and the brim visually.
-
To practice making the large star, pipe a big circle in the center of a plate. It should be about 1/2-inch across. Pipe the top arm at the very top of the center circle. Make the arm about 1/2-inch long. Next, pipe the second and third legs of the star at the bottom. They look like they would hold up the weigh of the star. Next, pipe the right arm and then the left arm.
-
Once you get the hang of it, pipe directly on the Hat Band of the cake. Start with the middle star first. This will help you balance the other 2 stars.
-
-
When you are done piping the Stars, pipe a White String above and below the large White Stars around the Hat Band.
-
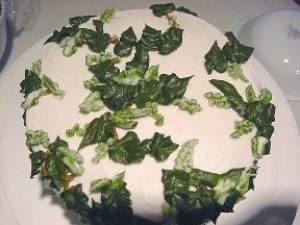
You are all done and ready to serve any time, so do not forget to take a picture.
Back to Peggy’s Baking Corner Home Page
Check out some of Peggy Weaver’s many Cake Decorating Articles, Tutorials, and Q&A pages
Fondant Icing/Covering:
Fondant Icing 101
(Recipe and Tutorial on making & using fondant icing)
Covering Cakes with Fondant Icing
Decorating Cakes with Fondant Icing
Fondant does not freeze well at all, as a matter of fact, downright lousy. Do not even think about refrigerating it either. The condensation that can occur when you defrost or bring to room temp can destroy the finish of the fondant.
Now, if you are going to freeze the cake, as many folks do until the first anniversary, yes go ahead and freeze. The cake will not look as beautiful as it did originally but you just have to keep the idea in mind that it was perfect on the day of the wedding.
Buttercream Icing/Covering:
Buttercream Icing 101
(Recipe and Tutorial on making & using buttercream icing)
Wedding Cakes:
Assembling Cakes/Wedding Cakes
Decorating Wedding Cakes
(Lots of Q&A’s on decoration a wedding cake)
Other Cake Baking and Decoration Topics:
Peggy’s Cake Decorating Idea Photos
(The idea page has photos only and no detailed decorating instructions.)

Back to Peggy’s Baking Corner Home Page
Peggy Weaver, author of Peggy’s Baking Corner, has generously answered all the above question on cake baking during the last 15 years. Peggy will not be able to continue with the Question and Answer pages in the future. She thanks you for all your interesting questions.
More of Peggy’s great recipes:
Chocolate Amaretto Snowball Cake