Valentine’s Day Cake Recipe

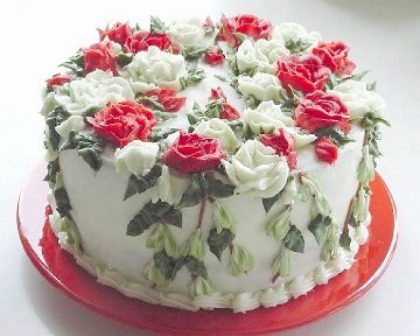
Valentine’s Day Cake – This year I decided to make a 6-inch cake because an intimate Valentine’s Day dinner for two calls for a smaller dessert.
The design idea went just fine and the baking went just fine, but trying to cover my cake with a pretty coating of Buttercream Icing was just murder. To top it off, the final step was a…… well…… I will just say for now, unpleasant at best! I will tell you later just what I did.
- Your favorite cake recipe or 1 box of cake mix*
- 1 batch of Buttercream Icing (click on the underlined for the recipe)**
- Food Gel Color - red, leaf green, and brown***
- 5 Couplers
- Decorating Tips #3, #16, #103, #352
- 5 pastry piping bag or parchment bags****
- 2 cake boards that fit the size of your chosen cake. Stack them and cover in aluminum foil.
-
Baking the Cake:
-
I chose to use a white cake mix today. I wanted a slightly denser cake so when the recipe called for 3 egg whites, I used 3 whole eggs instead. I also added 1 teaspoon of vanilla extract because I love vanilla. The little extra dash of vanilla extract, heightens the taste of the cake.
-
Bake your cake in well-prepared cake pans at 325 degrees F. The lower, slower baking is better for the cakes' texture and moistness. It also will dome less, so you will have less to do later before icing.
-
If you are using a 6- by 3-inch cake pan, you will need to bake for about 42 minutes, but start checking before at 40 minutes with a toothpick.
-
When the cakes are finished baking, remove the pans from the oven and place on a cooling rack. Immediately, using a tea towel (remember the cakes are very hot), gently press down on the dome of the cake with your hand to gently help flatten the top. This will help increase the denseness of the cake and improve your texture.
-
Allow the cake to cool for 10 minutes, remove them from the pans, and allow them to finish cooling with the bottom side (the part that was inside the pan) facing up. By cooling your cakes this way, when the time comes to do your icing, you will have a crisp edge to start with and your icing will have a better visual look.
-
When your cake is completely cooled, it is time to slice, fill the cake, and then coat with, what is called, a crumb coat. This thin coat of icing will help lock your wayward crumbs into place and really help with the time and quality of the final icing. Believe me, you really will save time and energy. Let the thin coat of icing crust up, usually 30 minutes is more than enough.
-
NOTE: Often I am trying to work ahead, so I will bake, cool, and crumb coat one night and decorate the next day. If you are using a dairy based filling, you should to do things a bit differently. Since you need to refrigerate a cream cheese filled cake, you will have a difficult time with crumb coat when it is removed from the refrigerator as the cake will start to collect condensation and soften up again. Allow the cake to come to room temp before applying your final icing.
-
-
Decorating the Cake:
-
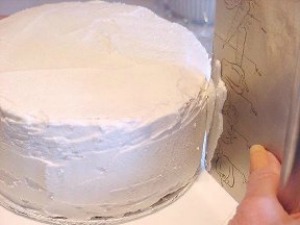
I quickly add the icing that is needed for the final coat. Since I am making a small cake, I just glob on the icing and spread it out with a knife first, and then use my bench scraper. For a large round or sheet cake, I use a special, very large tip that is made for icing.
-

-
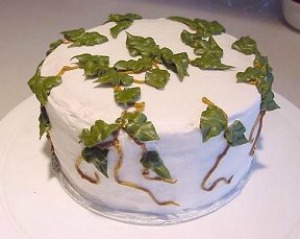
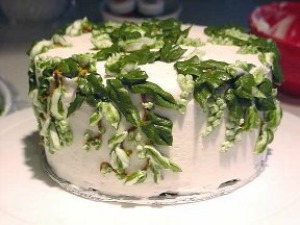
Take a close look at the cake photos above. This is a really messy Buttercream Icing job.
-
No matter what I did, I could not get the Buttercream smooth. I let it sit at room temperature and tried to fix it with a knife. I put it in the refrigerator for an hour and then tried to fix it with the knife again. So I decided to use the parchment paper trick below:
-
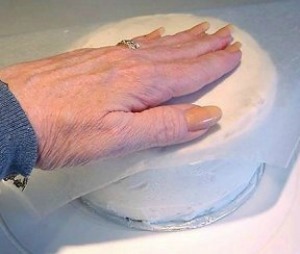
Parchment Paper Trick: Place the parchment paper on the crusted icing and gently and briskly rub with your hand. The warmth of your skin help move and smooth the icing into place. Rub both the top of the cake and the sides for the best look.
-
-
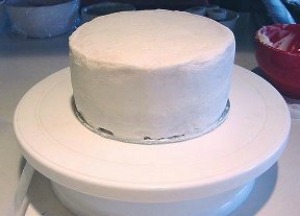
As you can see in the above photos, I did an OK job but it still not a great job with the parchment paper. Believe me, there are such things as bad Buttercream Icing days and this was one of them.
-
The weather outside is very rainy and damp so the icing would not crust. Doing the crumb coat was almost useless. We had a weather system that had been changing from a High Pressure System to a Low Pressure System and this weather mess was sitting right over our heads. The point of this info is to let you know that some days it seems just darn near impossible to get the project done right. Do not berate yourself, just change the way you put on the icing and cover up the problem areas. In other words, FAKE IT and act like you planned to do it that way all of the time.
-
-
To make the vines:
-
The next step is to put on your vines. Insert a #3 tip and place your brown icing in the piping bag. Here is where you start with the “I can’t get this right” cover up. I placed the vines randomly over the areas that I felt were the least visually pleasant. In your garden, vines do not grow absolutely straight and evenly spaced so if you don’t have 6 equally spaced areas around the cake, so much the better! Pipe a few vines on the top of the cake so that they can peek out between the leaves and flowers that you will be putting on the cake top.
-
-
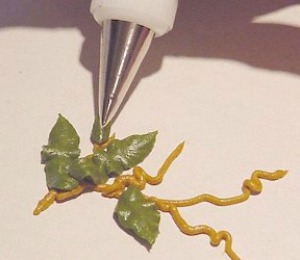
To make the leaves:
-
Hold the piping bag so that the V of the tip is on top. The point, the bottom of the V, will put the vein crease in the center of the leaf. The icing will squeeze out of the sides of the tip and create the wavy sides of the leaves.
-
Poke the tip gently into the icing so that you secure the leaves to the cake, squeeze the bag, pull the bag away from the cake and release the pressure. This technique will help the leaves to “float” in the air and appear graceful. Do not forget to twist and turn a few of the leaves like Mother Nature does.
-
Place your dark green icing in a bag with the #352 tip. Pipe random leaves that are 1 to 1 inches long. You can pipe larger leaves if you are decorating a larger cake. Remember to be delicate with a small cake and go bolder with the larger cakes to keep things in proportion.
-
-
-
To make the long flower buds:
-
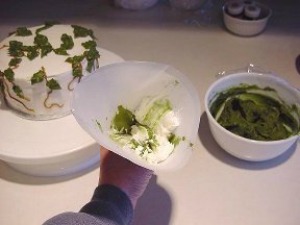
Take a clean piping bag and insert the #352 Tip that you used for the leaves. Now you need to “stripe the piping bag” for a color variation.
-
I take a spatula, a gob of green icing and I smear the icing on the side of the bag. Drop in a spatula full of white icing and repeat the process. I like to do this 2 or 3 times and then plop a gob of white in the center, then a gob of green, etc until the bag is about 1/2 full.
-
I noticed years ago that if you have a level icing problem, the more decoration you put on the cake, the less noticeable it is because everyone is so caught up with the fancy stuff, the basic are often unnoticed. That is why we are doing the color striping, seed pods, flower buds, and flowers. You can skip any of these steps but the end results will not be as nearly as dramatic.
-
I like to pipe a few practice pods on a plate to clear the tip and so that I feel comfortable with the technique.
-
-
To make the flower buds:
-
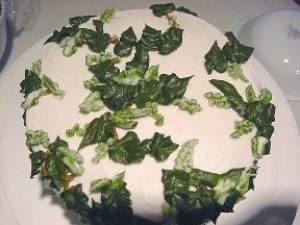
Look at this photo on the left. Notice that this time I am holding the tip just the opposite than I did for the leaves. Now the point of the V is on the side and the icing comes out with a tall ridge. On the branches, pipe individual flower buds or little clusters of 2 or 3. The icing should be coming out the tip in streaks not in a continual color.
-
Pipe a few buds over the top of the leaves you piped earlier and if you can, jam the tip under a few of the leaves and make the buds look like they are growing from under the leaves. Make sure you are piping randomly, the way that Mother Nature grows and so that you are also covering up any the icing problems.
-
-
To make the seed pods:
-
You will use the same piping bag but you need to change to the #3 tip.
-
Toward the end of your vine tip, pipe little beads in clusters like tiny grapes. I like to have 7 to 15 seed pods in the cluster but let the size of your piping and the cake, be the deciding factor.
-
-
-
You are almost done now.
-
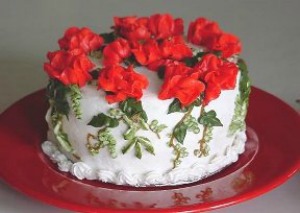
Fill your piping bag with the red icing and Tip #103 and pipe your roses randomly on the top of the cake. The size of the rose you make and your placement will determine the quantity. You might even consider making a few rose buds laying on their side.
-
If I am making a larger cake, 9 or 10 inches, I will also make a few roses with the remaining green striped icing.
-
If you need to refill the piping bag, just put in white icing so that only a very little green shows through. You want to have a very pale green rose so that it will act as a filler and give you a feeling of stability.
-
-
The last step is to place your cake on the serving plate and pipe a row of shells around the bottom of the cake. My preference is a size 16 tip for this step but you can be creative and use larger or smaller sizes as you wish.
-
-
A few last words of advice. I’ll now tell you about the unpleasantness that I referred to at the top of the page.
-
Do not tip the cake plate while decorating so that you can get that flower on.
-
I did and I had to clean up the counter, the floor, my hands, and my blouse. I even had to help clean up my husband who was there with a glass of wine. He had just poured my glass and was watching me put the last flower on the cake.
-
The whole side of the cake was trashed and in one place, my whole thumb went inside.
-
Luckily, I only needed to take pictures. The final picture I took was of the other side of the cake that survived.

* I like to use a white cake, spice cake (love is spicy sometimes, isn’t it?) or of course, the famous Red Velvet Cake. If you are using a box mix, any of these cakes will make two (2) each 6-inch cakes or one (1) each 8-inch cake with 2 layers. I freeze one of the 6-inch cakes so that I have it handy for another day. No matter whether you use the 6- by 3-inch pan or 8- by 2-inch pan, divide your batter in half and pour each into the well prepared cake pans.
** A day or two before you are going to decorate your cake, make up your colors of Buttercream Icing.
Food Gel Colors: 8 ounces leaf green, 10 ounces red, and 4 ounces of brown. Leave your remaining icing white.
*** I find that colors of red and green icing will intensify if you give them time to ripen. Mix and cover them with plastic wrap and place in the refrigerator. Allow the icings to come to room temperature before putting them in the piping bags and trying to decorate with them.
**** I chose parchment bags for this project for the simple reason that I can clean up faster and I hate trying to get the red stains out of my vinyl piping bags.
If the room temperature icing seems too thick to pipe easily, remove from the piping bag, add a few drops of water, stir thoroughly and return it to the bag.
Back to Peggy’s Baking Corner Home Page
Peggy Weaver, author of Peggy’s Baking Corner, has generously answered all the above question on cake baking during the last 15 years. Peggy will not be able to continue with the Question and Answer pages in the future. She thanks you for all your interesting questions.
More of Peggy’s great recipes:
Chocolate Amaretto Snowball Cake
Back to Peggy’s Baking Corner Home Page
Check out some of Peggy Weaver’s many Cake Decorating Articles, Tutorials, and Q&A pages below:
Fondant Icing/Covering:
Fondant Icing 101
(Recipe and Tutorial on making & using fondant icing)
Covering Cakes with Fondant Icing
Decorating Cakes with Fondant Icing
Buttercream Icing/Covering:
Buttercream Icing 101
Recipe and Tutorial on making & using buttercream icing)
Wedding Cakes:
Assembling Cakes/Wedding Cakes
Decorating Wedding Cakes
(Lots of Q&A’s on decoration a wedding cake)
Other Cake Baking and Decoration Topics:
Peggy’s Cake Decorating Idea Photos
(The idea page has photos only and no detailed decorating instructions.)
One Response to “Valentine’s Day Cake Recipe”
Pritika Arjun Kumar
Hi
thanks for sharing. I accidentally landed on this site. I was looking for some cake recipes. But I must say the way you have explained each and every step. I’m definitely going to try this Valentine’s day. Once again thankyou for sharing.